MQTT AT Examples for Cloud
This document mainly describes how to connect your ESP32-S2 to AWS IoT with MQTT AT commands.
Important
For details on how to use MQTT AT commands, please refer to MQTT AT Commands. You need to become familiar with the AWS IoT by reading the AWS IoT Development Guide.
Please follow the steps below to connect your ESP32-S2 to AWS IoT with ESP-AT.
Obtain certificates and endpoints from AWS IoT
Sign in to your AWS IoT Console account and switch to the IoT Core services.
Create an AWS IoT policy, thing, and certificates following the instructions in Create AWS IoT Resources.
Make sure you have got the following certificate and key files:
device.pem.crt (Device certificate)
private.pem.key (Private key)
Amazon-root-CA-1.pem (Root CA certificate)
Get the endpoint and bind the thing to the policy through the certificate according to the documentation Set up the policy.
The endpoint value has the format of xxx-ats.iot.us-east-2.amazonaws.com.
Note
It is strongly recommended to familiarize yourself with the AWS IoT Developer Guide. Below are some key points from this Guide that are worth noting.
All devices must have a device certificate, private key, and root CA certificate installed in order to communicate with AWS IoT.
Information on how to activate certificates.
Select Ohio as your region.
Connect to AWS IoT based on mutual authentication with MQTT AT commands
Configure certificates
There are three ways to replace MQTT certificates:
Method 1: Recompile firmware
Open your local ESP-AT project and do the following:
Replace mqtt_ca.crt with
Amazon-root-CA-1.pem.Replace mqtt_client.crt with
device.pem.crt.Replace mqtt_client.key with
private.pem.key.
Then compile the ESP-AT project to build the AT firmware, and flash the firmware to your ESP32-S2. For more information, please refer to Compile ESP-AT Project Locally.
Method 2: Update certificates at runtime
If you don’t want to recompile the firmware, you can directly use the AT+SYSMFG command to update MQTT certificates at runtime. For detailed operation steps, please refer to PKI Configuration in AT+SYSMFG command examples. The certificate configuration method is the same as SSL certificates, just change the namespace to mqtt_cert, mqtt_key, and mqtt_ca.
Method 3: Update only the certificate bin file
If you already have AT firmware and only need to pre-flash your own certificates, you can directly update the mfg_nvs.bin file. For detailed operation steps, please refer to How to Update PKI Configuration.
Use AT commands to connect to AWS IoT
Set the Wi-Fi mode to station.
Command:
AT+CWMODE=1
Response:
OK
Connect to the AP.
Command:
AT+CWJAP=<"ssid">,<"password">
Response:
OK
Set the SNTP server.
Command:
AT+CIPSNTPCFG=1,8,"pool.ntp.org"
Response:
OK
Query the SNTP time.
Command:
AT+CIPSNTPTIME?
Response:
+CIPSNTPTIME:<asctime style time>
OK
Note:
The <asctime style time> obtained at this time must match the actual wall-clock time in the configured time zone; otherwise the connection may fail because the certificate is outside its validity period.
(Optional) Update the MQTT certificates at runtime.
a). Update the MQTT root CA certificate.
Command:
AT+SYSMFG=2,"mqtt_ca","mqtt_ca",8,<ca_len>
Response:
OK

>
After receiving
>, send the complete content ofAmazon-root-CA-1.pem, where<ca_len>is the byte length of the certificate file.b). Update the MQTT client private key.
Command:
AT+SYSMFG=2,"mqtt_key","mqtt_key",8,<key_len>
Response:
OK

>
After receiving
>, send the complete content ofprivate.pem.key, where<key_len>is the byte length of the private key file.c). Update the MQTT client certificate.
Command:
AT+SYSMFG=2,"mqtt_cert","mqtt_cert",8,<cert_len>
Response:
OK

>
After receiving
>, send the complete content ofdevice.pem.crt, where<cert_len>is the byte length of the certificate file.Note:
The key names in the
mqtt_ca,mqtt_key, andmqtt_certnamespaces are the same as their respective namespace names.The data written is binary type (
<type> = 8), and the data length sent must exactly match<ca_len>,<key_len>, or<cert_len>.To query or verify the result, refer to AT+SYSMFG Command Examples.
Set MQTT user properties.
Command:
AT+MQTTUSERCFG=0,5,"esp32","espressif","1234567890",0,0,""
Response:
OK
Note:
If the second parameter of AT+MQTTUSERCFG is 5, it is authenticated by both sides and cannot be changed.
Connect to AWS IoT.
Command:
AT+MQTTCONN=0,"<endpoint>",8883,1
Response:
+MQTTCONNECTED:0,5,<endpoint>,"8883","",1
OK
Note:
Please enter your actual endpoint string from the AWS IoT console in place of
<endpoint>in the command.The port 8883 cannot be changed.
Subscribe to messages.
Command:
AT+MQTTSUB=0,"topic/esp32at",1
Response:
OK
Publish a message.
Command:
AT+MQTTPUB=0,"topic/esp32at","hello aws!",1,0
Response:
+MQTTSUBRECV:0,"topic/esp32at",10,hello aws!

OK
Example log
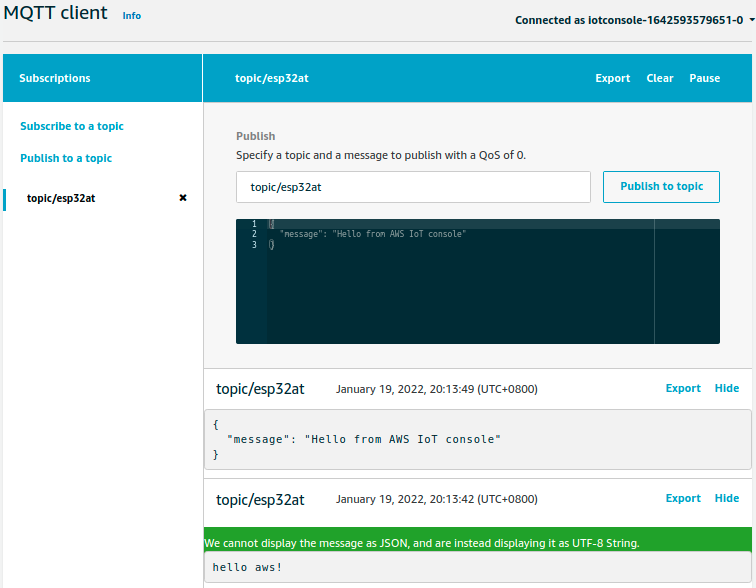
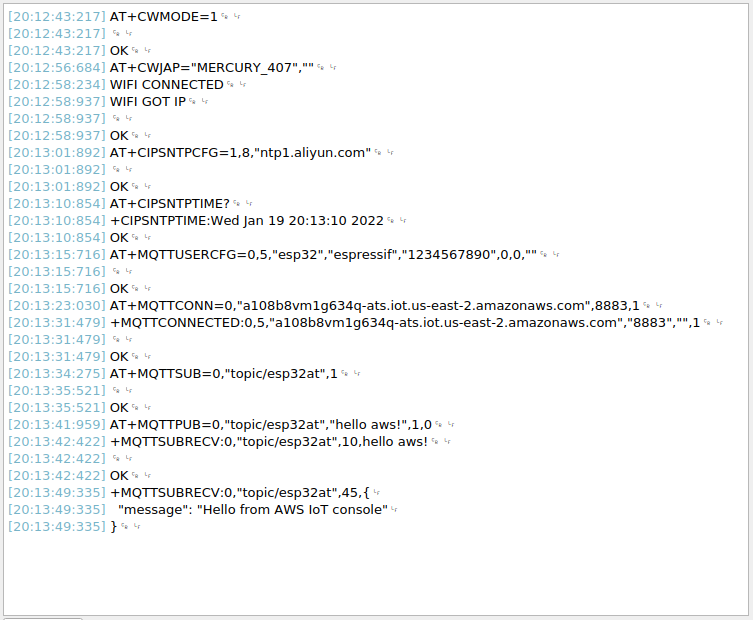
Log for normal interaction is as follows:
Log on the ESP32-S2 side
Log on the AWS side