USB Device Driver
Overview
The driver allows you to use ESP32-S2 chips to develop USB devices on a top of TinyUSB stack. TinyUSB is integrated with ESP-IDF to provide USB features of the framework. Using this driver the chip works as simple or composite device supporting several USB devices simultaneously.
TinyUSB stack is distributed via IDF Component Registry.
Our USB-OTG implementation is limited to 6 USB endpoints (5 IN/OUT endpoints and 1 IN endpoint) . Please note that enabling Secure Boot or flash encryption disables the USB-OTG USB stack in the ROM, disallowing updates via the serial emulation or Device Firmware Update (DFU) on that port. For more details, please refer to technical reference manual.
Features
Configuration of device and string USB descriptors
USB Serial Device (CDC-ACM)
Input and output streams through USB Serial Device
Other USB classes (MIDI, MSC, HID...) support directly via TinyUSB
VBUS monitoring for self-powered devices
Hardware USB Connection
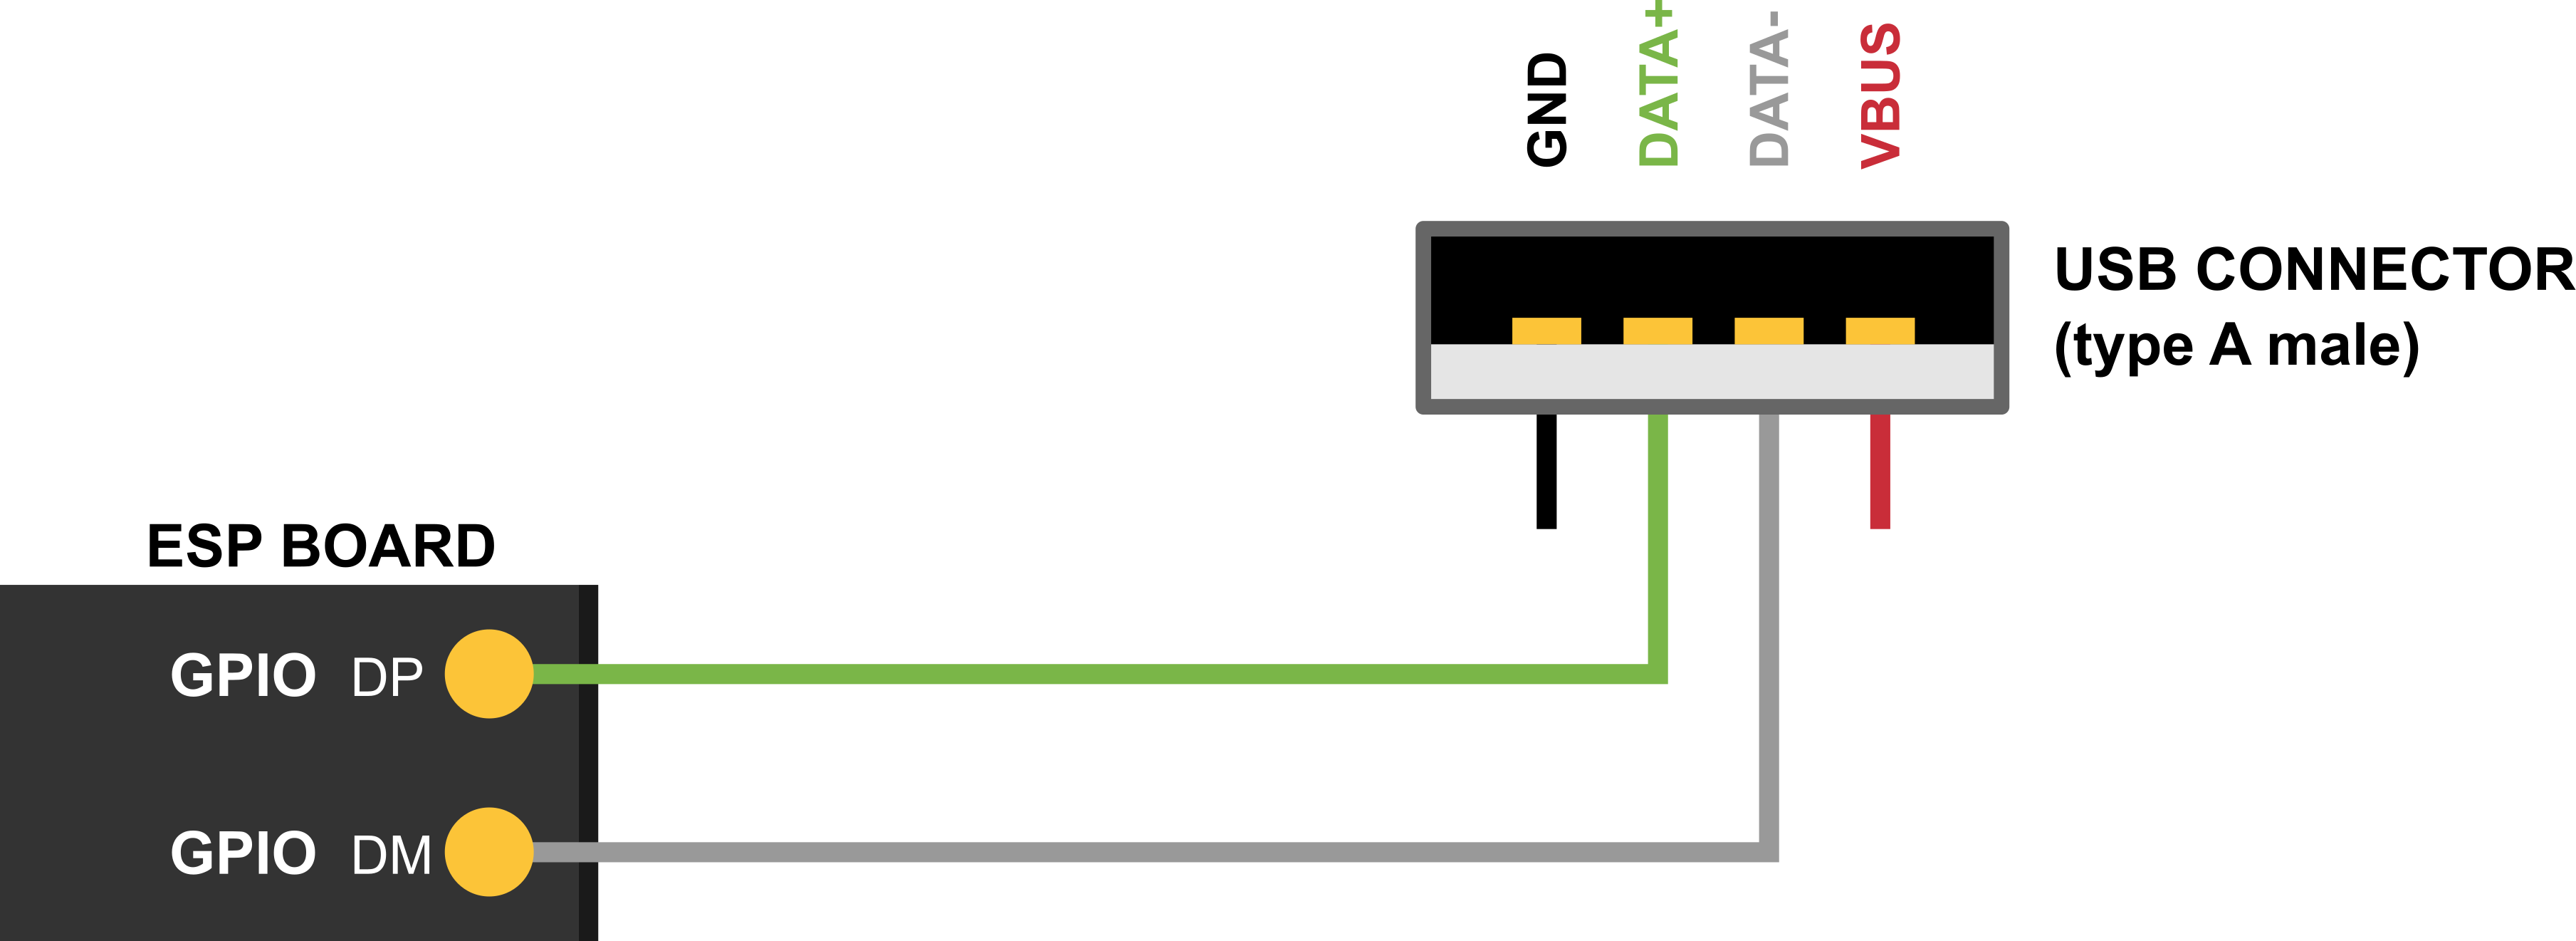
Any board with the ESP32-S2 chip with USB connectors or with exposed USB's D+ and D- (DATA+/DATA-) pins.
If the board has no USB connector but has the pins, connect pins directly to the host (e.g. with do-it-yourself cable from any USB connection cable).
On ESP32-S2, connect GPIO 20 and 19 to D+/D- respectively:

Self-powered devices must also connect VBUS through voltage divider or comparator, more details in Self-Powered Device subchapter.
Driver Structure
As the basis is used the TinyUSB stack.
On top of it the driver implements:
Customization of USB descriptors
Serial device support
Redirecting of standard streams through the Serial device
Encapsulated driver's task servicing the TinyUSB
Configuration
Via Menuconfig options you can specify:
Several descriptor's parameters (see Descriptors Configuration below)
USB Serial low-level configuration
The verbosity of the TinyUSB's log
Disable the TinyUSB main task (for the custom implementation)
Descriptors Configuration
The driver's descriptors are provided by tinyusb_config_t structure's device_descriptor, configuration_descriptor and string_descriptor members. Therefore, you should initialize tinyusb_config_t with your desired descriptors before calling tinyusb_driver_install() to install the driver.
However, the driver also provides default descriptors. You can install the driver with default device and string descriptors by setting the device_descriptor and string_descriptor members of tinyusb_config_t to NULL before calling tinyusb_driver_install(). To lower your development effort we also provide default configuration descriptor for CDC and MSC class, as these classes rarely require custom configuration. The driver's default device descriptor is specified using Menuconfig, where the following fields should be configured:
PID
VID
bcdDevice
Manufacturer
Product name
Name of CDC or MSC device if it is On
Serial number
If you want to use your own descriptors with extended modification, you can define them during the driver installation process.
Install Driver
To initialize the driver, users should call tinyusb_driver_install(). The driver's configuration is specified in a tinyusb_config_t structure that is passed as an argument to tinyusb_driver_install().
Note that the
tinyusb_config_tstructure can be zero initialized (e.g.const tinyusb_config_t tusb_cfg = { 0 };) or partially (as shown below). For any member that is initialized to 0 or NULL, the driver will use its default configuration values for that member (see example below)
const tinyusb_config_t partial_init = {
    .device_descriptor = NULL,  // Use default device descriptor specified in Menuconfig
    .string_descriptor = NULL,  // Use default string descriptors specified in Menuconfig
    .external_phy = false,      // Use internal USB PHY
    .configuration_descriptor = NULL, // Use default configuration descriptor according to settings in Menuconfig
};
Self-Powered Device
USB specification mandates self-powered devices to monitor voltage level on USB's VBUS signal. As opposed to bus-powered devices, a self-powered device can be fully functional even without USB connection. The self-powered device detects connection and disconnection events by monitoring the VBUS voltage level. VBUS is considered valid if it rises above 4.75 V and invalid if it falls below 4.35 V.
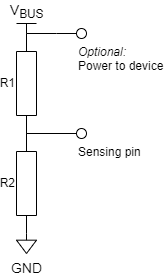
No ESP32-S2 pin is 5 V tolerant, so you must connect the VBUS to ESP32-S2 via a comparator with voltage thresholds as described above, or use a simple resistor voltage divider that will output (0.75 x Vdd) if VBUS is 4.4 V (see figure below). In both cases, voltage on the sensing pin must be logic low within 3 ms after the device is unplugged from USB host.

Simple voltage divider for VBUS monitoring
To use this feature, in tinyusb_config_t you must set self_powered to true and vbus_monitor_io to GPIO number that will be used for VBUS monitoring.
USB Serial Device (CDC-ACM)
If the CDC option is enabled in Menuconfig, the USB Serial Device can be initialized with tusb_cdc_acm_init() according to the settings from tinyusb_config_cdcacm_t (see example below).
const tinyusb_config_cdcacm_t acm_cfg = {
    .usb_dev = TINYUSB_USBDEV_0,
    .cdc_port = TINYUSB_CDC_ACM_0,
    .rx_unread_buf_sz = 64,
    .callback_rx = NULL,
    .callback_rx_wanted_char = NULL,
    .callback_line_state_changed = NULL,
    .callback_line_coding_changed = NULL
};
tusb_cdc_acm_init(&acm_cfg);
To specify callbacks you can either set the pointer to your tusb_cdcacm_callback_t function in the configuration structure or call tinyusb_cdcacm_register_callback() after initialization.
USB Serial Console
The driver allows to redirect all standard application streams (stdin, stdout, stderr) to the USB Serial Device and return them to UART using esp_tusb_init_console()/esp_tusb_deinit_console() functions.
USB Mass Storage Device (MSC)
If the MSC CONFIG_TINYUSB_MSC_ENABLED option is enabled in Menuconfig, the ESP Chip can be used as USB MSC Device. The storage media (spi-flash or sd-card) can be initialized as shown below (see example below).
SPI-Flash
static esp_err_t storage_init_spiflash(wl_handle_t *wl_handle)
{
    ***
    esp_partition_t *data_partition = esp_partition_find_first(ESP_PARTITION_TYPE_DATA, ESP_PARTITION_SUBTYPE_DATA_FAT, NULL);
    ***
    wl_mount(data_partition, wl_handle);
    ***
}
storage_init_spiflash(&wl_handle);

const tinyusb_msc_spiflash_config_t config_spi = {
    .wl_handle = wl_handle
};
tinyusb_msc_storage_init_spiflash(&config_spi);
SD-Card
static esp_err_t storage_init_sdmmc(sdmmc_card_t **card)
{
    ***
    sdmmc_host_t host = SDMMC_HOST_DEFAULT();
    sdmmc_slot_config_t slot_config = SDMMC_SLOT_CONFIG_DEFAULT();
    // For SD Card, set bus width to use

    slot_config.width = 4;
    slot_config.clk = CONFIG_EXAMPLE_PIN_CLK;
    slot_config.cmd = CONFIG_EXAMPLE_PIN_CMD;
    slot_config.d0 = CONFIG_EXAMPLE_PIN_D0;
    slot_config.d1 = CONFIG_EXAMPLE_PIN_D1;
    slot_config.d2 = CONFIG_EXAMPLE_PIN_D2;
    slot_config.d3 = CONFIG_EXAMPLE_PIN_D3;
    slot_config.flags |= SDMMC_SLOT_FLAG_INTERNAL_PULLUP;

    sd_card = (sdmmc_card_t *)malloc(sizeof(sdmmc_card_t));
    (*host.init)();
    sdmmc_host_init_slot(host.slot, (const sdmmc_slot_config_t *) &slot_config);
    sdmmc_card_init(&host, sd_card);
    ***
}
storage_init_sdmmc(&card);

const tinyusb_msc_sdmmc_config_t config_sdmmc = {
    .card = card
};
tinyusb_msc_storage_init_sdmmc(&config_sdmmc);
Application Examples
The table below describes the code examples available in the directory peripherals/usb/.
Code Example |
Description |
|---|---|
How to set up ESP32-S2 chip to get log output via Serial Device connection |
|
How to set up ESP32-S2 chip to work as a USB Serial Device |
|
How to set up ESP32-S2 chip to work as a USB MIDI Device |
|
How to set up ESP32-S2 chip to work as a USB Human Interface Device |
|
How to set up ESP32-S2 chip to work as a USB Mass Storage Device |