Getting Started
In this chapter, our aim would be to get our development setup functional, and also to get an understanding for the development tools and repositories available around ESP32.
Development Overview
The following diagram depicts the typical developer setup for development with ESP32.
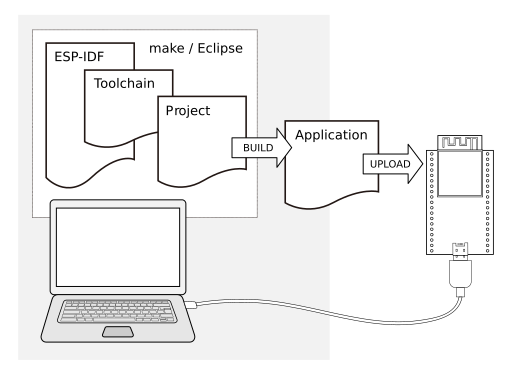
Typical Developer Setup
The PC, or the Development Host can be any of Linux, Windows or Mac. The ESP32 based development board is connected to the Development Host over a USB cable. The Development Host has the ESP-IDF (Espressif’s SDK), the compiler toolchain and the code for your project. The development host builds this code and generates the executable firmware image. The tools on the Development Host then download the generated firmware image on to the development board. As the firmware executes on the development board, the logs from the firmware can be monitored from the Development Host.
ESP-IDF
ESP-IDF is Espressif’s IoT Development Framework for ESP32.
ESP-IDF is a collection of libraries and header files that provides the core software components that are required to build any software projects on ESP32.
ESP-IDF also provides tools and utilities that are required for typical developer and production usecases, like build, flash, debug and measure.
Setting up IDF
Please follow the steps in this documentation for setting up IDF: https://docs.espressif.com/projects/esp-idf/en/latest/esp32/get-started/index.html. Please complete all the steps on this page.
Before proceeding, please ensure that you have setup your development host, and have built the first application as indicated in this page. Now that you have done that, let’s look at some additional details about IDF.
IDF Details
The IDF has a component based design.

Component Based Design
All the software in the IDF is available as components. The Operating System, the network stack, Wi-Fi drivers, middleware modules like the HTTP Server are all components within IDF.
This design allows you to use your own or third-party components that are built for ESP-IDF. ESP-IDF v5.0+ includes the ESP Component Manager which allows you to easily use components from the ESP Component Registry (https://components.espressif.com/).
A developer typically builds applications against the IDF. The applications contain the business logic, any drivers for externally interfaced peripherals and the SDK configuration.
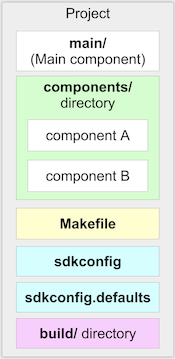
Application’s Structure
An application must contain one main component. This is the primary component that holds the application logic. The application may additionally include other components as may be desired. The application’s CMakeLists.txt defines the build instructions for the application. Additionally, an optional sdkconfig.defaults may be placed that picks up the default SDK configuration that should be selected for this application.
Modern ESP-IDF applications can also include an idf_component.yml file that specifies dependencies from the ESP Component Registry, allowing automatic download and management of third-party components.
Getting ESP-Jumpstart
The ESP-Jumpstart repository contains a sequence of applications that we will use for this exercise. These applications build with the ESP-IDF that you have setup before. Let’s get started by cloning the ESP-Jumpstart git repository https://github.com/espressif/esp-jumpstart.
$ git clone --recursive https://github.com/espressif/esp-jumpstart
Since we are building a production-ready firmware here, we would want to base our development on a stable release of IDF. Currently, ESP-Jumpstart requires ESP-IDF v5.1 or later. The examples have been tested with ESP-IDF v5.1 through v5.5.
ESP-Jumpstart now uses modern component management with the ESP Component Registry for dependencies like button handling, LED strips, QR code generation, and network provisioning. These components are automatically downloaded when you build the examples.
Now we build our first, Hello World, application from ESP-Jumpstart and flash it on to our development board. You should be already familiar with most of the steps below.
$ cd esp-jumpstart/1_hello_world
$ export ESPPORT=/dev/cu.SLAB_USBTOUART   # Or the correct device name for your setup
$ export ESPBAUD=921600
$ idf.py menuconfig
$ idf.py flash monitor
This will then build the entire SDK and the application. Once the build is successful, it will write the generated firmware to the device.
Once the flashing is successful, the device will reset and you will see the console output from this firmware.
The Code
Now let’s look at the code of the Hello World Application. It is only a few lines of code as shown below:
#include <stdio.h>
#include "freertos/FreeRTOS.h"
#include "freertos/task.h"


void app_main()
{
    int i = 0;
    while (1) {
        printf("[%d] Hello world!\n", i);
        i++;
        vTaskDelay(5000 / portTICK_PERIOD_MS);
    }
}
The code is fairly simple. A few takeaways:
The app_main() function is the application entry point. All applications begin execution at this point. This function gets called after the FreeRTOS kernel is already executing on both the cores of the ESP32. Once FreeRTOS is initialised, it forks an application thread, called the main thread, on one of the cores. The app_main() function is called in this thread’s context. The stack of the application thread can be configured through the SDK configuration.
C library functions like printf(), strlen(), time() can be directly called. The IDF uses the newlib C library, which is a low-footprint implementation of the C library. Most of the category of functions of the C library like stdio, stdlib, string operations, math, time/timezones, file/directory operations are supported. Support for signals, locales, wchrs is not available. In our example above, we use the printf() function for printing to the console.
FreeRTOS is the operating system powering both the cores. FreeRTOS (https://www.freertos.org) is a tiny kernel that provides mechanisms for task creation, inter-task communication (semaphores, message queues, mutexes), interrupts and timers. In our example above, we use the vTaskDelay function for putting the thread to sleep for 5 seconds. Details of the FreeRTOS APIs are available at: https://www.freertos.org/a00106.html
Progress so far
Now we have the basic development setup and process in place. We can build the code into executable firmware images. We can flash these images to a connected development board, and we can monitor the console to look at debug logs and messages generated by the firmware.
ESP Component Registry
ESP-Jumpstart leverages the ESP Component Registry (https://components.espressif.com/) for modern component management. This registry provides a centralized repository of reusable components that can be easily integrated into ESP-IDF projects.
Key Components Used
ESP-Jumpstart uses the following components from the registry:
espressif/button (v4.1.3+): Modern button handling with debouncing, multiple event types, and flexible configuration
espressif/led_strip (v3.0.0+): WS2812 LED strip control with optimized performance and multiple backend support
espressif/qrcode (v0.1.0~2): QR code generation for device provisioning and configuration
espressif/network_provisioning (v1.0.0+): Unified network provisioning supporting both BLE and SoftAP transports
Component Management
Components are automatically downloaded and managed through the
idf_component.yml files in each example. When you run idf.py build,
the ESP Component Manager automatically:
Downloads the specified component versions
Resolves dependencies between components
Integrates them into your build system
Caches components locally for faster subsequent builds
This modern approach provides several advantages:
Version Control: Specify exact component versions for reproducible builds
Dependency Management: Automatic resolution of component dependencies
Easy Updates: Simple version bumping to get latest features and fixes
Reduced Repository Size: Components are downloaded on-demand rather than stored in git
Supported ESP32 Variants
ESP-Jumpstart supports the following ESP32 variants with ESP-IDF v5.1+:
ESP32: Wi-Fi + Bluetooth Classic + BLE
ESP32-S2: Wi-Fi only (uses SoftAP provisioning)
ESP32-S3: Wi-Fi + BLE
ESP32-C2: Wi-Fi + BLE
ESP32-C3: Wi-Fi + BLE
ESP32-C6: Wi-Fi + BLE
Each variant automatically selects appropriate GPIO defaults and provisioning transports based on its capabilities.
Let’s now build a simple power outlet with ESP32.