Overview and Get Started
Overview
The Modbus serial communication protocol is the de facto standard protocol widely used to connect industrial electronic devices. Modbus allows communication among many devices connected to the same network, for example, a system that measures temperature and humidity and communicates the results to a computer. The Modbus protocol uses several types of data: Holding Registers, Input Registers, Coils (single bit output), Discrete Inputs. Versions of the Modbus protocol exist for serial port and for Ethernet and other protocols that support the Internet protocol suite. There are 3 variants of the ESP-Modbus protocol:
Modbus RTU— This is used in serial communication and makes use of a compact, binary representation of the data for protocol communication. The RTU format follows the commands/data with a cyclic redundancy check checksum as an error check mechanism to ensure the reliability of data. Modbus RTU is the most common implementation available for Modbus. A Modbus RTU message must be transmitted continuously without inter-character hesitations. Modbus messages are framed (separated) by idle (silent) periods. RS-485 is usually used for this type.
Modbus ASCII— This is used in serial communication and makes use of ASCII characters for protocol communication. The ASCII format uses a longitudinal redundancy check checksum. Modbus ASCII messages are framed by leading colon (“:”) and trailing newline (CR/LF).
Modbus TCP/IP or Modbus TCP— This is a Modbus variant used for communications over TCP/IP networks, connecting over port 502. It does not require a checksum calculation, as lower layers already provide checksum protection.
Note
This documentation, and the included code snippets, require some familiarity with the Modbus protocol. Refer to the Modbus Organization protocol specifications.
The rest of this section shows how an ESP-Modbus application is put together, and walks through the calls in order.
Typical ESP-Modbus code looks like this (note that error handling is omitted for clarity; see the basic master example and the basic slave example for complete code):
Note
For instructions on how to set up and flash the code, see the README files of the basic master example and the basic slave example.
ESP-Slave
Overview and explanation of the Slave API call sequence:
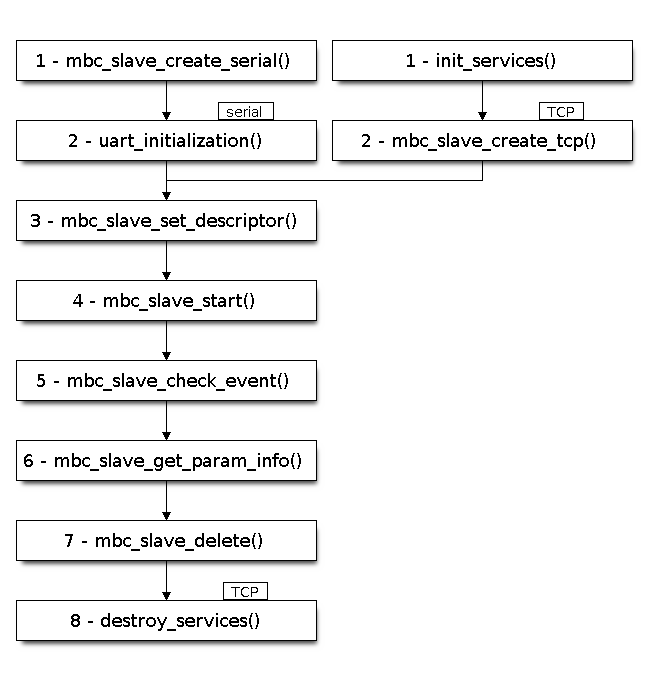
Slave API call sequence. Each step links to its API section.
Declare a slave handle and fill in comm_config before creating the instance. The handle is how later calls refer to this slave. Serial configuration sets the UART baud rate, port, and related fields. TCP configuration sets the TCP port and the IP address type. mbc_slave_create_serial() or mbc_slave_create_tcp() then binds that configuration to the handle.
For serial slave:
// Creation of slave instance with all configuration previously set
static void *slave_handle = NULL;
// 1.
mbc_slave_create_serial(&comm_config, &slave_handle);

// 2.
uart_initialization();
Note
RS485 communication also needs the UART driver to set the pins and the communication mode. See the UART communication section.
For TCP slave:
// Setup of network
// 1.
init_services();

// Creation of slave instance with all configuration previously set
static void *slave_handle = NULL;
// 2.
mbc_slave_create_tcp(&comm_config, &slave_handle);
Note
init_services() prepares the network interface used by the TCP slave. See the esp_netif component.
mbc_slave_create_serial() and mbc_slave_create_tcp() take a mb_communication_info_t as comm_config.
Common for all slave types:
Declare each register area with mb_register_area_descriptor_t. The descriptor stores the Modbus register type, the memory that holds the value, and the size. mbc_slave_set_descriptor() associates that area with the slave handle. After every area is set, mbc_slave_start() starts the slave stack for this instance.
// Initialization of register areas to be accessed by master
// 3.
mbc_slave_set_descriptor(slave_handle, reg_area);

// Start of ESP-Modbus slave stack
// 4.
mbc_slave_start(slave_handle);
For more info on slave set descriptor see Configuring Slave Data Access.
Slave Communication Steps:
The slave waits for a master request, then reads which register the master accessed.
// First check, depending on the mask provided, whether there is a master request in the queue
// 5.
mbc_slave_check_event(slave_handle, MB_READ_WRITE_MASK);
// Handle the request when there is one and populate the register info struct with the info
// 6.
mbc_slave_get_param_info(slave_handle, ®_info, MB_PAR_INFO_GET_TOUT);
Note
ESP-Modbus also covers legacy Modbus communication using request structures. For more information, see Slave Communication.
Slave shutdown:
// Properly handle the shutdown of slave instances
// 7.
mbc_slave_delete(slave_handle);
Only for TCP slaves:
// Necessary extra step for TCP instances; it pairs with init_services()
// 8.
destroy_services();
ESP-Master
Overview and explanation of the Master API call sequence:
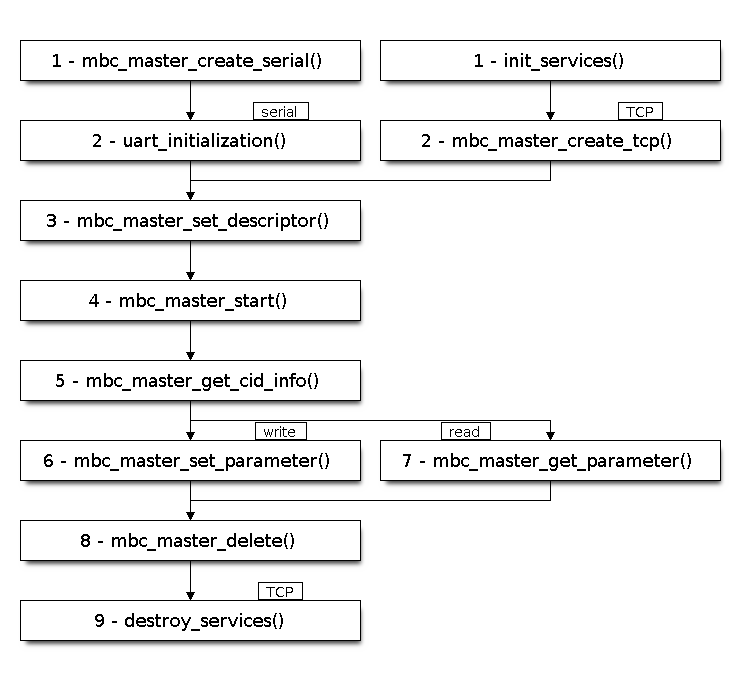
Master API call sequence. Each step links to its API section.
Declare a master handle and fill in comm_config before creating the instance. The handle is how later calls refer to this master. Serial configuration sets the UART baud rate, port, and related fields. TCP configuration sets the TCP port and the list of slave IP addresses. mbc_master_create_serial() or mbc_master_create_tcp() then binds that configuration to the handle.
For serial master:
// Creation of master instance with all configuration previously set
static void *master_handle = NULL;
// 1.
mbc_master_create_serial(&comm_config, &master_handle);

// 2.
uart_initialization();
Note
RS485 communication also needs the UART driver to set the pins and the communication mode. See the UART communication section.
For TCP master:
// Setup of network
// 1.
init_services(ip_addr_type);

// Creation of master instance with all configuration previously set
static void *master_handle = NULL;
// 2.
mbc_master_create_tcp(&comm_config, &master_handle);
Note
init_services() prepares the network interface used by the TCP master. See the esp_netif component.
mbc_master_create_serial() and mbc_master_create_tcp() take a mb_communication_info_t as comm_config.
Common for all master types:
The master needs the list of registers it will access before it starts. In ESP-Modbus this list is the data dictionary, and each entry is a characteristic identified by a characteristic ID (CID). A characteristic stores metadata such as which slave holds the register, the register address on that slave, whether the value can be read or written, and the optional minimum and maximum. mbc_master_set_descriptor() associates this dictionary with the master handle. mbc_master_start() then starts the master stack for this instance.
// Associate Data dictionary table to master instance for parameter description
// 3.
mbc_master_set_descriptor(master_handle, &device_parameters[0], num_device_parameters);

// Start of ESP-Modbus master stack
// 4.
mbc_master_start(master_handle);
For more info on master data dictionary see Configuring Master Data Access.
Master Communication Steps:
The steps start with mbc_master_get_cid_info(), which reads the data-dictionary entry for a Characteristic. That metadata can be used for validation and logging. The master writes to the slave with mbc_master_set_parameter() and reads from the slave with mbc_master_get_parameter(). Both calls use the CID to find the register.
// Retrieving info about the register from the Data dictionary table
// 5.
mbc_master_get_cid_info(master_handle, cid, ¶m_descriptor);
// Write request based on Characteristic ID (CID) from Data dictionary table
// 6.
mbc_master_set_parameter(master_handle, cid, parameter_value, &type);
// Read request based on Characteristic ID (CID) from Data dictionary table
// 7.
mbc_master_get_parameter(master_handle, cid, parameter_value, &type);
Note
ESP-Modbus also covers legacy Modbus communication using request structures. For more information, see Legacy Modbus Communication.
Master shutdown:
// 8.
mbc_master_delete(master_handle);
Only for TCP master:
// Necessary extra step for TCP instances; it pairs with init_services()
// 9.
destroy_services();
Note
For an easier setup, these functions already cover some of the steps above:
Master
master_init_serial()andmaster_init_tcp(), pluswrite_modbus_parameter()andread_modbus_parameter(), are inexamples/get_started/basic_master/main/basic_master.c. See the basic master example.Slave
slave_init_serial()andslave_init_tcp()are inexamples/get_started/basic_slave/main/basic_slave.c. See the basic slave example.