Selecting the Suitable Flashing Platform
Note
This document is automatically translated using AI. Please excuse any detailed errors. The official English version is still in progress.
Espressif officially provides the following flash tools for different needs:
Web-based Flashing Tool: ESP LAUNCHPAD Flashing Tool
Advantage: Simple and fast, no need to set up an environment or additional tools, firmware can be easily flashed through the Web interface
PC-based Mass Production Burning Tool: Flash Download Tool
Advantage: Provides a graphical interface, suitable for automated deployment, supports multiple devices for batch programming at the same time.
Disadvantage: Only applicable in a Windows PC environment.
ESP-IDF Command Line Terminal Flashing Tool: idf.py tool
Advantage: Provides a front-end interface for managing operations such as project build, deployment, debugging, and burning.
Open-source Python-based Flashing Tool: esptool tool
Advantage: Allows developers to perform secondary development and script integration, supports advanced operation commands, and can be used on platforms such as Windows, macOS, Linux, etc.
Based on IDE Integrated Development Burning Environment VS Code IDE, Espressif IDE (Eclipse), Arduino IDE
Preparation
Before flashing the firmware to the ESP device, it is necessary to understand the hardware conditions for the ESP device to enter the firmware download mode. For specific instructions, please refer to ESP Product Firmware Flashing Instructions.
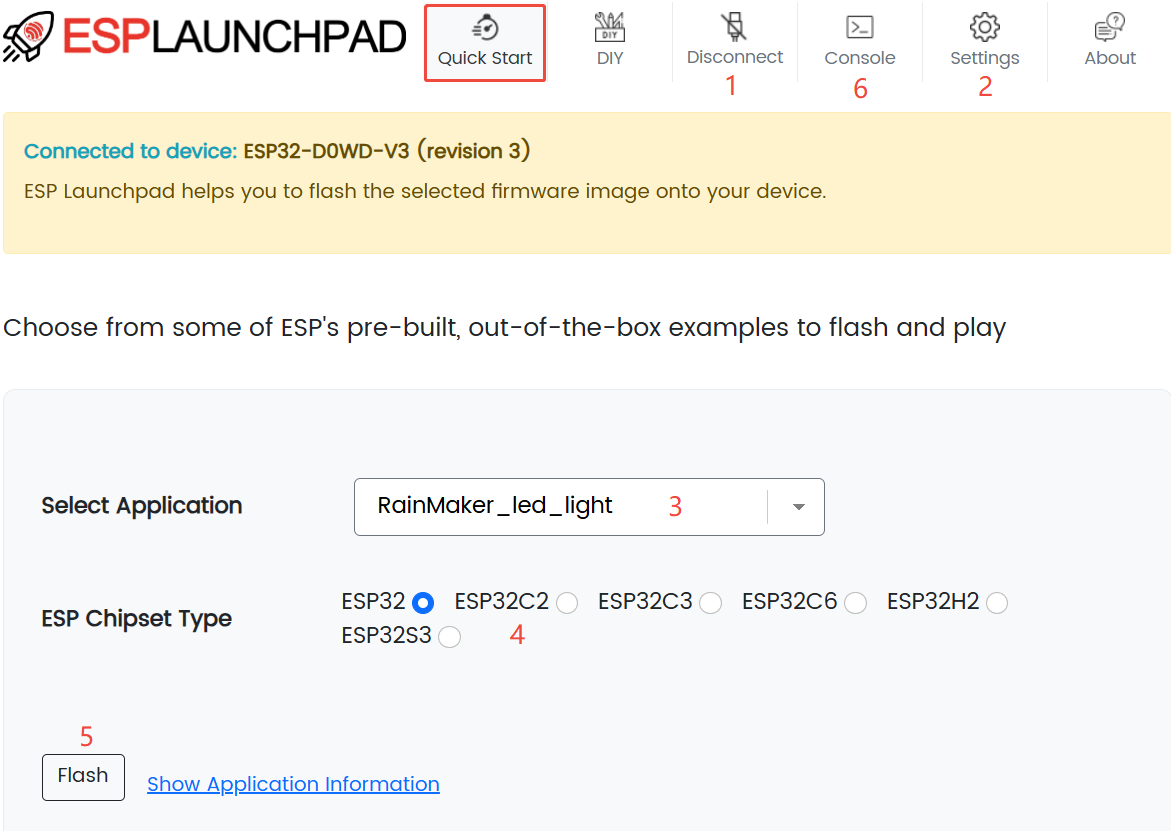
ESP LAUNCHPAD Flashing Tool
ESP LAUNCHPAD is a web-based firmware flashing tool platform provided by Espressif, which is used to quickly flash precompiled firmware to ESP devices. There is no need to set up a local development environment, it can be used by accessing the webpage through a browser.
The ESP LAUNCHPAD provides some built-in, ready-to-use binary firmware, which users can directly flash onto ESP devices for testing. As follows:
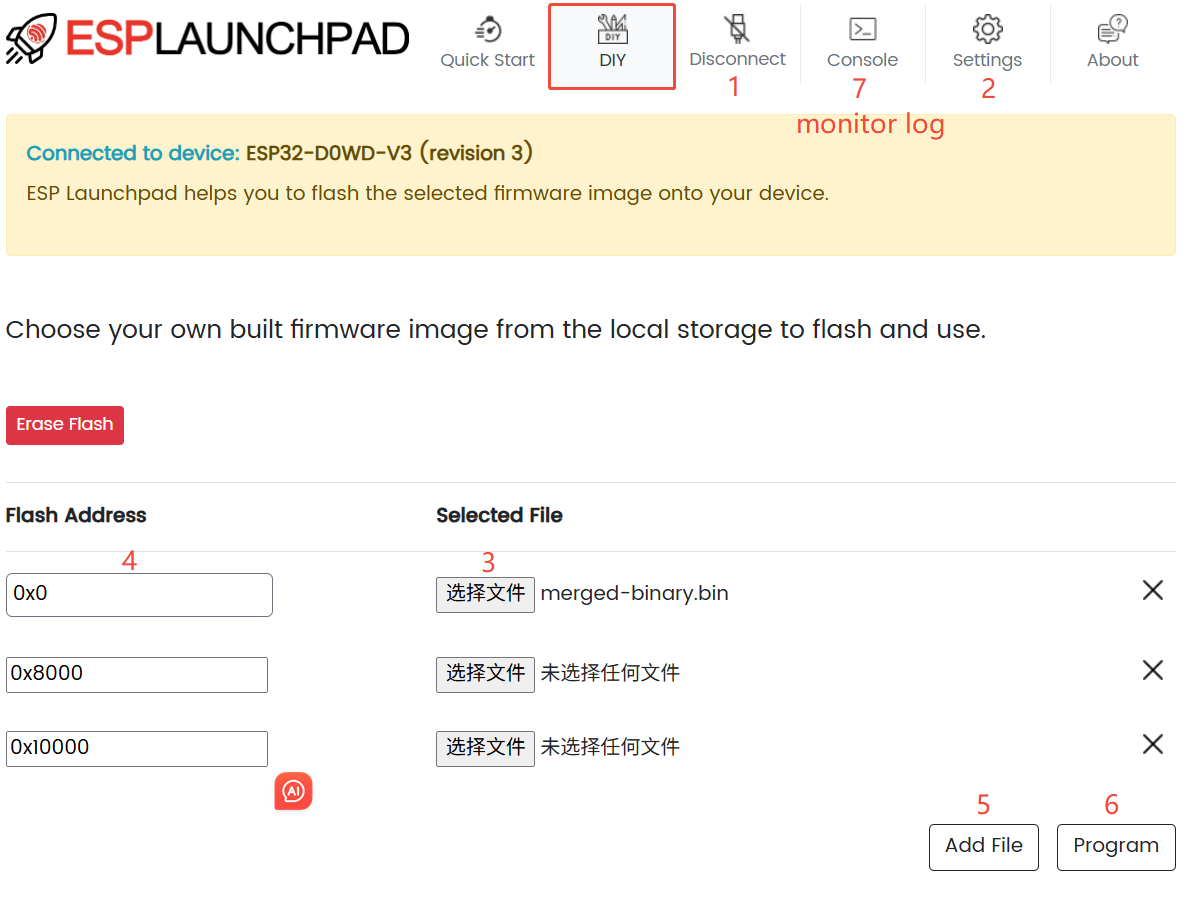
In addition, the ESP LAUNCHPAD also supports uploading your own local binary firmware for burning. As follows:
Flash Download Tool
The Flash download tool is a Windows-based programming tool provided by Espressif. It is used to burn pre-compiled firmware (.bin files) into the Flash of ESP series chips. It also supports operations such as reading chip information, Flash content, and eFuse.
Download the Flash Download Tool
The Flash download tool supports two modes: Develop mode and Factory mode, with the differences as follows:
Develop mode, only supports single-chip product burning.
Factory mode: Supports simultaneous burning of multiple products.
For detailed instructions, please refer to: Flash Download Tool User Guide.
Additionally, Espressif provides a series of programming and production testing tools, supporting customers to quickly deploy batch programming environments. For specific hardware selection, refer to: Production Testing Accessories.
idf.py tool
idf.py is the command line frontend tool for ESP-IDF, used to uniformly manage project configuration, building, burning, and debugging operations. Essentially, it is a wrapper for tools like CMake, Ninja/Make, esptool, etc. To use the idf.py tool, users need to first set up the ESP-IDF software compilation environment.
For setting up the ESP-IDF environment, please refer to: Environment Setup instructions.
For instructions on how to use the idf.py tool, please refer to: IDF Front-end Tool - idf.py.
Note:
idf.py must be run in the ESP-IDF project directory (the directory containing CMakeLists.txt).
Common commands for idf.py are as follows:
Project Configuration:
idf.py menuconfigBuild Project:
idf.py buildFlashing Project:
idf.py flashMonitor Log:
idf.py monitorOne-click build + flash + monitor:
idf.py flash monitor
Additionally, users can run idf.py --help in the ESP-IDF command line terminal to view all commands and usage instructions supported by the idf.py tool. As follows:

esptool tool
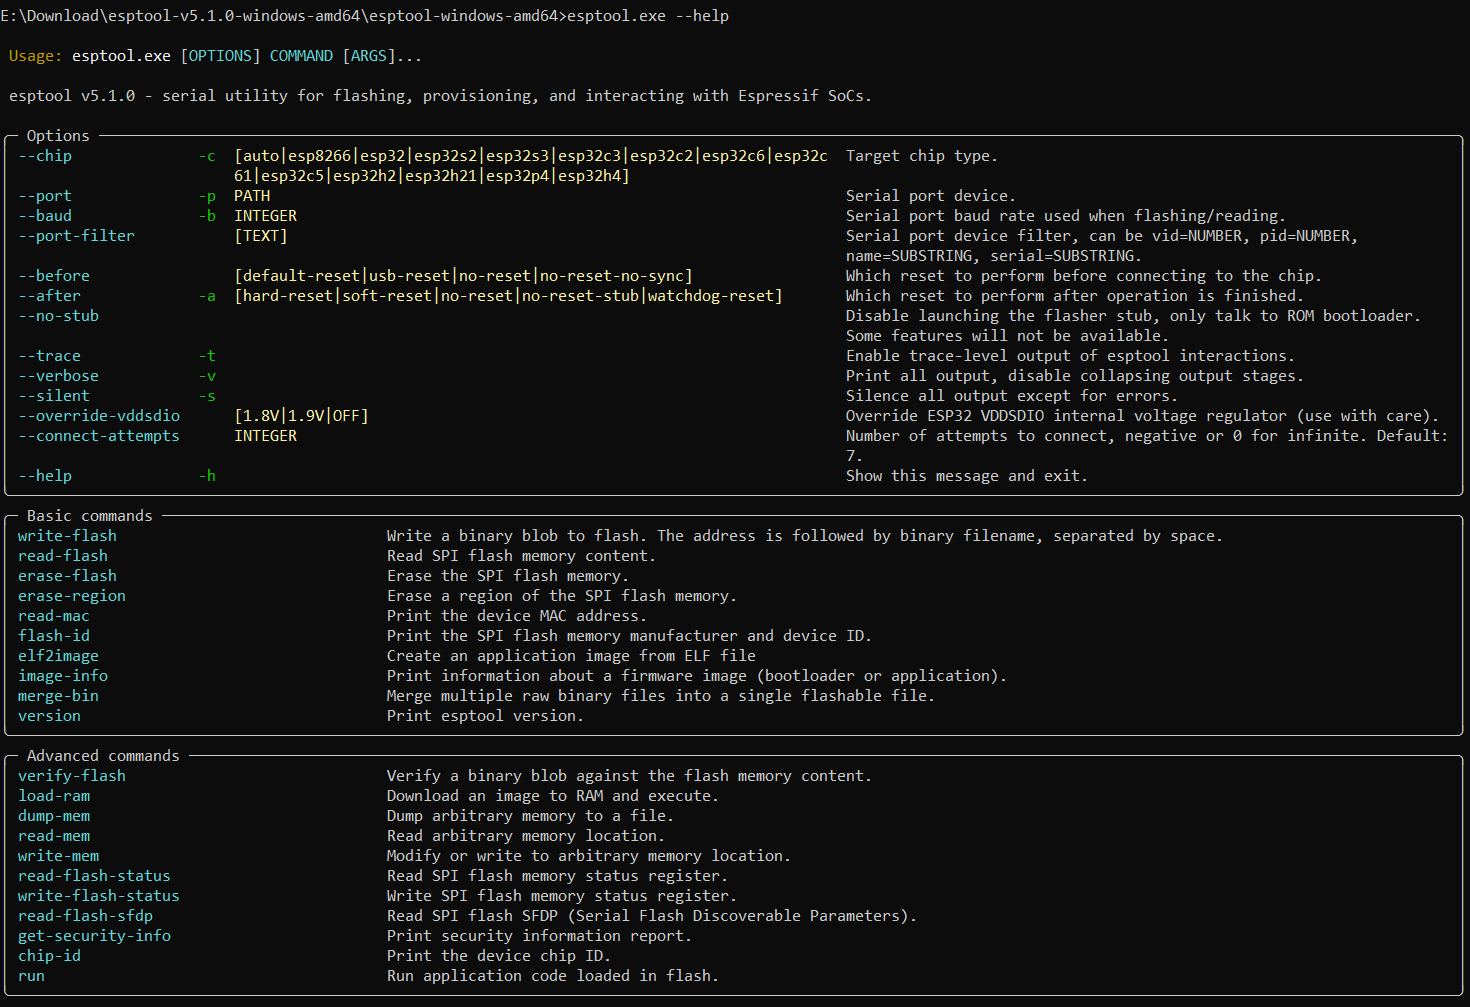
esptool is an open-source, cross-platform command-line tool based on Python provided by Espressif. It can be used on platforms such as Windows, macOS, Linux, and supports secondary development and script integration.
The esptool tool provides three operation tools, which are:
esptool.py: A universal burning and chip interaction tool, used for communication with ESP chip ROM Bootloader or flasher stub via serial port.espefuse.py: eFuse management tool, used for reading, writing, and protection configuration of eFuse (one-time programmable)espsecure.py: A security operation tool used for signing, encryption, and other operations. It is used in conjunction with security features such as secure boot and Flash encryption.
esptool Installation Method
Using esptool on Windows
Download the esptool package from esptool > releases > Assets.
Unzip the toolkit
Press
win + Rshortcut, type incmd, hitenterto enter the terminal command environment.cdto the esptool toolkit path, executeesptool.exe --help,espefuse.exe --help,espsecure.exe --helpcommands to view all supported commands and usage instructions.
Using esptool on Linux
Open the terminal command line.
Use the command
python -m pip install esptoolto install the esptool environment.Execute
esptool.py --help,espefuse.py --help,espsecure.py --helpcommands to view all supported commands and usage instructions.
Common esptool commands
Flashing Firmware :
esptool.py write_flash 0x0 app.binReading Firmware :
esptool.py read_flash 0x0 0x20000 app.bindReading Chip efuse :
espefuse.py -p COM* summaryGenerate secure boot key :
espsecure.py generate_signing_key secure_boot_signing_key.pem --version 2
IDE Burning
VS Code IDE
To flash using the VS Code IDE, you need to install the ESP-IDF Extension integrated development environment in VS Code. Refer to the Installation of ESP-IDF and related tools instructions. The ESP-IDF plugin under VS Code can provide a complete “what you see is what you get” flash environment, which is equivalent to turning command line operations such as the idf.py tool into buttons and menus. In the VS Code ESP-IDF plugin, the common button/command correspondence with the command line is roughly as follows:
Project Configuration: Graphical “SDK Configuration Editor” ==
idf.py menuconfigBuild Project ==
idf.py buildFlashing Project ==
idf.py flashMonitor Log ==
idf.py monitorOne-click build + flash + monitor ==
idf.py flash monitor(internal combination of build/flash/monitor)

For detailed usage, see: Flash Project instructions.
Espressif IDE (Eclipse)
Espressif-IDE is the official integrated development environment based on Eclipse CDT, used for developing IoT applications for the ESP series chips using ESP-IDF. This standalone IDE is specifically designed for ESP-IDF, and includes built-in Eclipse plugins for ESP-IDF, basic plugins for Eclipse CDT, and other third-party plugins to assist in development. It supports the construction of ESP-IDF applications and can run on Windows, macOS, and Linux.
For installation and usage of the Espressif-IDE environment, refer to the Espressif-IDE User Guide.
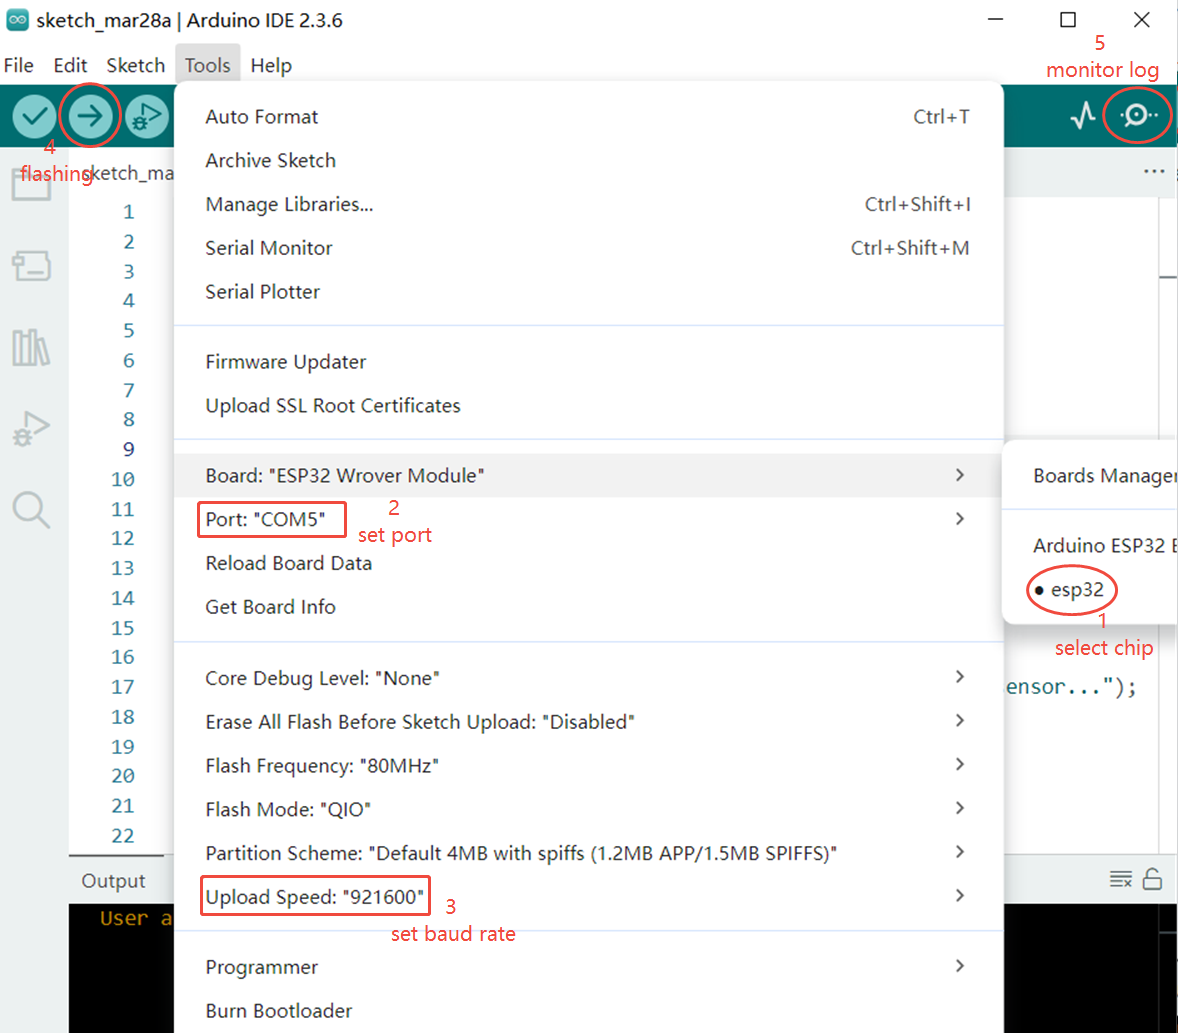
Arduino IDE
ESP32 development under the Arduino IDE primarily relies on the ESP32 Arduino Core maintained by Espressif official (arduino-esp32). It encapsulates the ESP32 series chips into an Arduino-supported “core”, allowing you to develop ESP32 using the familiar Arduino API, while also utilizing some of the underlying ESP-IDF functions.
Reference Document:
For environment setup, refer to: Installing ESP32 Arduino Software Development Environment on Windows