LED Indicator
This guide includes the following content:
Table of Contents
As one of the simplest output peripherals, LED indicators can indicate the current operating state of the system by blinking in different types. ESP-IoT-Solution provides an LED indicator component with the following features:
Can define multiple groups of different blink types
Can define the priority of blink types
Can set up multiple indicators
The LEDC driver supports adjusting brightness, gradient, and color.
Supported Indicator Light Types
Driver Type |
Description |
On/Off |
Brightness |
Breathing |
Color |
Color Gradient |
Index |
|---|---|---|---|---|---|---|---|
GPIO |
Control indicator lights through GPIO |
√ |
× |
× |
× |
× |
× |
LEDC |
Control indicator lights through PWM (single channel) |
√ |
√ |
√ |
× |
× |
× |
RGB LED |
Control indicator lights through PWM (three channels) |
√ |
√ |
√ |
√ |
√ |
× |
LED Strips |
Control lights like WS2812 through RMT/SPI |
√ |
√ |
√ |
√ |
√ |
√ |
Defining Blinking Type
Control On/Off
The blink step structure blink_step_t defines the type of a step, indicator state and the state duration. Multiple steps are combined into one blink type, and different blink types can be used to identify different system states. The blink type is defined as follows:
Example 1. define a blink loop: turn on 0.05 s, turn off 0.1 s, and loop.
const blink_step_t test_blink_loop[] = {
    {LED_BLINK_HOLD, LED_STATE_ON, 50},               // step1: turn on LED 50 ms
    {LED_BLINK_HOLD, LED_STATE_OFF, 100},             // step2: turn off LED 100 ms
    {LED_BLINK_LOOP, 0, 0},                           // step3: loop from step1
};
Example 2. define a blink loop: turn on 0.05 s, turn off 0.1 s, turn on 0.15 s, turn off 0.1 s, and stop blink.
const blink_step_t test_blink_one_time[] = {
    {LED_BLINK_HOLD, LED_STATE_ON, 50},               // step1: turn on LED 50 ms
    {LED_BLINK_HOLD, LED_STATE_OFF, 100},             // step2: turn off LED 100 ms
    {LED_BLINK_HOLD, LED_STATE_ON, 150},              // step3: turn on LED 150 ms
    {LED_BLINK_HOLD, LED_STATE_OFF, 100},             // step4: turn off LED 100 ms
    {LED_BLINK_STOP, 0, 0},                           // step5: stop blink (off)
};
typedef enum {
    BLINK_TEST_BLINK_ONE_TIME, /**< test_blink_one_time */
    BLINK_TEST_BLINK_LOOP,     /**< test_blink_loop */
    BLINK_MAX,                 /**< INVALID type */
} led_indicator_blink_type_t;

blink_step_t const * led_indicator_blink_lists[] = {
    [BLINK_TEST_BLINK_ONE_TIME] = test_blink_one_time,
    [BLINK_TEST_BLINK_LOOP] = test_blink_loop,
    [BLINK_MAX] = NULL,
};
Controlling Brightness
For drivers supporting brightness control, the indicator light’s brightness can be controlled in the following ways:
Example 1: Defining a brightness setting: Setting the indicator light to 50% brightness for 0.5 seconds.
const blink_step_t test_blink_50_brightness[] = {
    {LED_BLINK_BRIGHTNESS, LED_STATE_50_PERCENT, 500},   // step1: set to half brightness 500 ms
    {LED_BLINK_STOP, 0, 0},                              // step4: stop blink (50% brightness)
};
Example 2: Defining a looping blink: Gradually turning on for 0.5s, then gradually turning off for 0.5s, repeating the sequence.
const blink_step_t test_blink_breathe[] = {
    {LED_BLINK_HOLD, LED_STATE_OFF, 0},                  // step1: set LED off
    {LED_BLINK_BREATHE, LED_STATE_ON, 500},              // step2: fade from off to on 500ms
    {LED_BLINK_BREATHE, LED_STATE_OFF, 500},             // step3: fade from on to off 500ms
    {LED_BLINK_LOOP, 0, 0},                              // step4: loop from step1
};
Example 3: Defining a blink: Gradually brightening from 50% to 100% brightness for 0.5s.
const blink_step_t test_blink_breathe_2[] = {
    {LED_BLINK_BRIGHTNESS, LED_STATE_50_PERCENT, 0},     // step1: set to half brightness 0 ms
    {LED_BLINK_BREATHE, LED_STATE_ON, 500},              // step2: fade from off to on 500ms
    {LED_BLINK_STOP, 0, 0},                              // step3: stop blink (100% brightness)
};
Controlling Color
For drivers supporting color control, we can use LED_BLINK_RGB, LED_BLINK_RGB_RING, LED_BLINK_HSV, LED_BLINK_HSV_RING to control the color.
LED_BLINK_RGB: Controls color via RGB, where R takes 8 bits (0-255), G takes 8 bits (0-255), and B takes 8 bits (0-255).
LED_BLINK_RGB_RING: Controls color gradient through RGB, transitioning from the previous color to the current set color. Use RGB value interpolation method.
LED_BLINK_HSV: Controls color via HSV, where H takes 9 bits (0-360), S takes 8 bits (0-255), and V takes 8 bits (0-255).
LED_BLINK_HSV_RING: Controls color gradient through HSV, transitioning from the previous color to the current set color. Use HSV value interpolation method.
Example 1: Defining a color setting to display red on the indicator light.
const blink_step_t test_blink_rgb_red[] = {
    {LED_BLINK_RGB, SET_RGB(255, 0, 0), 0},                // step1: set to red color 0 ms
    {LED_BLINK_STOP, 0, 0},                                // step2: stop blink (red color)
};
Example 2: Defining a color gradient, transitioning the indicator light from red to blue and looping the sequence.
const blink_step_t test_blink_rgb_red_blue[] = {
    {LED_BLINK_RGB, SET_RGB(0xFF, 0, 0), 0},               // step1: set to red color 0 ms
    {LED_BLINK_RGB_RING, SET_RGB(0, 0, 0xFF), 4000},       // step2: fade from red to blue 4000ms
    {LED_BLINK_RGB_RING, SET_RGB(0xFF, 0, 0), 4000},       // step3: fade from blue to red 4000ms
    {LED_BLINK_LOOP, 0, 0},                                // step4: loop from step1
};
Display color gradient using RGB interpolation. The effect is as follows.

RGB Gradient
Additionally, the driver supports setting colors through HSV similarly to RGB.
Example 3: Defining a color sequence to display red for 0.5s, green for 0.5s, blue for 0.5s, and then stop.
const blink_step_t test_blink_hsv_colors[] = {
    {LED_BLINK_HSV, SET_HSV(0, 255, 255), 500},            // step1: set color to red 500 ms
    {LED_BLINK_HSV, SET_HSV(120, 255, 255), 500},          // step2: set color to green 500 ms
    {LED_BLINK_HSV, SET_HSV(240, 255, 255), 500},          // step3: set color to blue 500 ms
    {LED_BLINK_STOP, 0, 0},                                // step4: stop blink (blue color)
};
Example 4: Defining a color gradient, transitioning the indicator light from red to blue and looping the sequence using HSV.
const blink_step_t test_blink_hsv_red_blue[] = {
    {LED_BLINK_HSV, SET_HSV(0, 255, 255), 0},              // step1: set to red color 0 ms
    {LED_BLINK_HSV_RING, SET_HSV(240, 255, 255), 4000},    // step2: fade from red to blue 4000ms
    {LED_BLINK_HSV_RING, SET_HSV(0, 255, 255), 4000},      // step3: fade from blue to red 4000ms
    {LED_BLINK_LOOP, 0, 0},                                // step4: loop from step1
};
Using HSV interpolation to display color gradient, the effect is as follows. This method creates a more vibrant color gradient.

Controlling Index
For drivers supporting index control, we can manipulate the state of each light on the strip using macros like INSERT_INDEX, SET_IHSV, SET_IRGB. Setting a value of MAX_INDEX:127 indicates setting all the lights.
Example 1: Defining a color pattern where light at index 0 displays red, index 1 displays green, index 2 displays blue, and then exits.
const blink_step_t test_blink_index_setting1[] = {
    {LED_BLINK_RGB, SET_IRGB(0, 255, 0, 0), 0},      // step1: set index 0 to red color 0 ms
    {LED_BLINK_RGB, SET_IRGB(1, 0, 255, 0), 0},      // step2: set index 1 to green color 0 ms
    {LED_BLINK_RGB, SET_IRGB(2, 0, 0, 255), 0},      // step3: set index 2 to blue color 0 ms
    {LED_BLINK_LOOP, 0, 0},                           // step4: loop from step1
};
Example 2: Defining a color pattern where all lights breathe continuously.
const blink_step_t test_blink_all_breath[] = {
    {LED_BLINK_BRIGHTNESS, INSERT_INDEX(MAX_INDEX, LED_STATE_OFF), 0},     // step1: set all leds to off 0 ms
    {LED_BLINK_BREATHE, INSERT_INDEX(MAX_INDEX, LED_STATE_ON), 1000},     // step2: set all leds fade to on 1000 ms
    {LED_BLINK_BREATHE, INSERT_INDEX(MAX_INDEX, LED_STATE_OFF), 1000},    // step3: set all leds fade to off 1000 ms
    {LED_BLINK_LOOP, 0, 0},                                              // step4: loop from step1
};
Predefined Blinking Priorities
These examples demonstrate controlling individual or all lights on the strip using specific indexes or macros like MAX_INDEX.
For the same indicator, a high-priority blink can interrupt an ongoing low-priority blink, which will resume execution after the high-priority blink stop. The blink priority can be adjusted by configuring the enumeration member order of the blink type led_indicator_blink_type_t, the smaller order value the higher execution priority.
For instance, in the following example, test_blink_one_time has higher priority than test_blink_loop, and should blink first:
typedef enum {
    BLINK_TEST_BLINK_ONE_TIME, /**< test_blink_one_time */
    BLINK_TEST_BLINK_LOOP,     /**< test_blink_loop */
    BLINK_MAX,                 /**< INVALID type */
} led_indicator_blink_type_t;
Control Indicator Blinks
Create an indicator by specifying an IO and a set of configuration information.
led_indicator_config_t config = {
    .mode = LED_GPIO_MODE,
    .led_gpio_config = {
        .active_level = 1,
        .gpio_num = 1,
    },
    .blink_lists = led_indicator_get_sample_lists(),
    .blink_list_num = led_indicator_get_sample_lists_num(),
};
led_indicator_handle_t led_handle = led_indicator_create(8, &config); // attach to gpio 8
Start/stop blinking: control your indicator to start/stop a specified type of blink by calling corresponding functions. The functions are returned immediately after calling, and the blink process is controlled by the internal timer. The same indicator can perform multiple blink types in turn based on their priorities.
led_indicator_start(led_handle, BLINK_TEST_BLINK_LOOP); // call to start, the function not block

/*
*......
*/

led_indicator_stop(led_handle, BLINK_TEST_BLINK_LOOP); // call stop
Delete an indicator: you can also delete an indicator to release resources if there are no further operations required.
led_indicator_delete(&led_handle);
Preempt operation: You can flash the specified type directly at any time.
led_indicator_preempt_start(led_handle, BLINK_TEST_BLINK_LOOP);
Stop preempt: You can use the stop queueing function to cancel the blinking mode that is being queued.
led_indicator_preempt_stop(led_handle, BLINK_TEST_BLINK_LOOP);
Note
This component supports thread-safe operations. You can share the LED indicator handle led_indicator_handle_t with global variables, or use led_indicator_get_handle to get the handle in other threads via the LED’s IO number for operation.
Custom light blink
static blink_step_t const *led_blink_lst[] = {
    [BLINK_DOUBLE] = double_blink,
    [BLINK_TRIPLE] = triple_blink,
    [BLINK_NUM] = NULL,
};

led_indicator_config_t config = {
    .mode = LED_GPIO_MODE,
    .led_gpio_config = {
        .active_level = 1,
        .gpio_num = 1,
    },
    .blink_lists = led_blink_lst,
    .blink_list_num = BLINK_MAX,
};
By defining led_blink_lst[] to achieve the custom indicator.
Adjustment of Gamma
The way human eyes perceive brightness is not linear but has certain nonlinear characteristics. Under normal conditions, the human eye is more sensitive to darker areas and less sensitive to brighter areas. However, on digital display devices such as monitors, the brightness values of images are usually encoded in a linear manner. This leads to issues of brightness distortion or loss of details when converting the linearly encoded brightness values to the perceived brightness by the human eye. To address this problem, gamma correction is applied to the image. Gamma correction involves adjusting the brightness values nonlinearly to correct the image display. By applying a gamma value (typically ranging from 2.2 to 2.4), the linearly encoded brightness values are mapped to a nonlinear brightness curve that better matches the perception of the human eye. This improves the visibility of details in darker areas and enhances the overall visual accuracy and balance of the image.
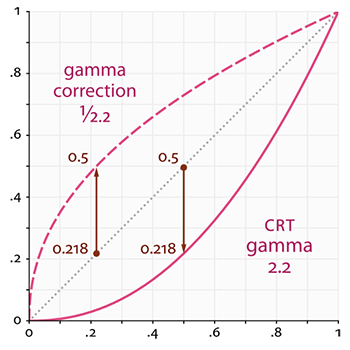
Gamma Curve
float gamma = 2.3;
led_indicator_new_gamma_table(gamma);
The default gamma table is 2.3, and a new gamma table can be generated using the led_indicator_new_gamma_table() function.
Drive Level Setting
For different hardware configurations, it might involve either common anode or common cathode connections. You can adjust the is_active_level_high in the settings to either true or false to configure the drive level.
API Reference
Header File
Functions
-
led_indicator_handle_t led_indicator_create(const led_indicator_config_t *config)
create a LED indicator instance with GPIO number and configuration
- Parameters
config – configuration of the LED, eg. GPIO level when LED off
- Returns
led_indicator_handle_t handle of the LED indicator, NULL if create failed.
-
esp_err_t led_indicator_delete(led_indicator_handle_t handle)
delete the LED indicator and release resource
- Parameters
handle – pointer to LED indicator handle
- Returns
esp_err_t
ESP_ERR_INVALID_ARG if parameter is invalid
ESP_OK Success
ESP_FAIL Delete fail
-
esp_err_t led_indicator_start(led_indicator_handle_t handle, int blink_type)
start a new blink_type on the LED indicator. if multiple blink_type started simultaneously, it will be executed according to priority.
- Parameters
handle – LED indicator handle
blink_type – predefined blink type
- Returns
esp_err_t
ESP_ERR_INVALID_ARG if parameter is invalid
ESP_ERR_NOT_FOUND no predefined blink_type found
ESP_OK Success
-
esp_err_t led_indicator_stop(led_indicator_handle_t handle, int blink_type)
stop a blink_type. you can stop a blink_type at any time, no matter it is executing or waiting to be executed.
- Parameters
handle – LED indicator handle
blink_type – predefined blink type
- Returns
esp_err_t
ESP_ERR_INVALID_ARG if parameter is invalid
ESP_ERR_NOT_FOUND no predefined blink_type found
ESP_OK Success
-
esp_err_t led_indicator_preempt_start(led_indicator_handle_t handle, int blink_type)
Immediately execute an action of any priority. Until the action is executed, or call led_indicator_preempt_stop().
- Parameters
handle – LED indicator handle
blink_type – predefined blink type
- Returns
esp_err_t
ESP_OK Success
ESP_FAIL Fail
ESP_ERR_INVALID_ARG if parameter is invalid
-
esp_err_t led_indicator_preempt_stop(led_indicator_handle_t handle, int blink_type)
Stop the current preemptive action.
- Parameters
handle – LED indicator handle
blink_type – predefined blink type
- Returns
esp_err_t
ESP_OK Success
ESP_FAIL Fail
ESP_ERR_INVALID_ARG if parameter is invalid
-
uint8_t led_indicator_get_brightness(led_indicator_handle_t handle)
Get the current brightness value of the LED indicator.
- Parameters
handle – LED indicator handle
- Returns
uint8_t Current brightness value: 0-255 if handle is null return 0
-
esp_err_t led_indicator_set_on_off(led_indicator_handle_t handle, bool on_off)
Set the LED indicator on or off.
Note
If you have an RGB/Strips type of light, this API will control the last LED index you set, and the color will be displayed based on the last color you set.
- Parameters
handle – LED indicator handle.
on_off – true: on, false: off
- Returns
esp_err_t
ESP_OK: Success
ESP_FAIL: Failure
ESP_ERR_INVALID_ARG: Invalid parameter
-
esp_err_t led_indicator_set_brightness(led_indicator_handle_t handle, uint32_t brightness)
Set the brightness for the LED indicator.
- Parameters
handle – LED indicator handle.
brightness – Brightness value to set (0 to 255). You can control a specific LED by specifying the index using
SET_IB, and set it to MAX_INDEX 127 to control all LEDs. This feature is only supported for LEDs of type LED_RGB_MODE. Index: (0-126), set (127) to control all.
- Returns
esp_err_t
ESP_OK: Success
ESP_FAIL: Failure
ESP_ERR_INVALID_ARG: Invalid parameter
-
uint32_t led_indicator_get_hsv(led_indicator_handle_t handle)
Get the HSV color of the LED indicator.
Note
Index settings are only supported for LED_RGB_MODE.
- Parameters
handle – LED indicator handle.
- Returns
HSV color value H: 0-360, S: 0-255, V: 0-255
-
esp_err_t led_indicator_set_hsv(led_indicator_handle_t handle, uint32_t ihsv_value)
Set the HSV color for the LED indicator.
Note
Index settings are only supported for LED_RGB_MODE.
- Parameters
handle – LED indicator handle.
ihsv_value – HSV color value to set. I: 0-126, set 127 to control all H: 0-360, S: 0-255, V: 0-255
- Returns
esp_err_t
ESP_OK: Success
ESP_FAIL: Failure
ESP_ERR_INVALID_ARG: Invalid parameter
-
uint32_t led_indicator_get_rgb(led_indicator_handle_t handle)
Get the RGB color of the LED indicator.
Note
Index settings are only supported for LED_RGB_MODE.
- Parameters
handle – LED indicator handle.
- Returns
RGB color value (0xRRGGBB) R: 0-255, G: 0-255, B: 0-255
-
esp_err_t led_indicator_set_rgb(led_indicator_handle_t handle, uint32_t irgb_value)
Set the RGB color for the LED indicator.
Note
Index settings are only supported for LED_RGB_MODE.
- Parameters
handle – LED indicator handle.
irgb_value – RGB color value to set (0xRRGGBB). I: 0-126, set 127 to control all R: 0-255, G: 0-255, B: 0-255
- Returns
esp_err_t
ESP_OK: Success
ESP_FAIL: Failure
ESP_ERR_INVALID_ARG: Invalid parameter
-
esp_err_t led_indicator_set_color_temperature(led_indicator_handle_t handle, const uint32_t temperature)
Set the color temperature for the LED indicator.
Note
Index settings are only supported for LED_RGB_MODE.
- Parameters
handle – LED indicator handle.
temperature – Color temperature of LED (0xIITTTTTT) I: 0-126, set 127 to control all, TTTTTT: 0-1000000
- Returns
esp_err_t
ESP_OK: Success
ESP_FAIL: Failure
ESP_ERR_INVALID_ARG: Invalid parameter
Structures
-
struct blink_step_t
one blink step, a meaningful signal consists of a group of steps
Public Members
-
blink_step_type_t type
action type in this step
-
uint32_t value
hold on or off, set 0 if LED_BLINK_STOP() or LED_BLINK_LOOP
-
uint32_t hold_time_ms
hold time(ms), set 0 if not LED_BLINK_HOLD
-
blink_step_type_t type
-
struct led_indicator_config_t
LED indicator specified configurations, as a arg when create a new indicator.
Public Members
-
led_indicator_mode_t mode
LED work mode, eg. GPIO or pwm mode
-
led_indicator_gpio_config_t *led_indicator_gpio_config
LED GPIO configuration
-
led_indicator_ledc_config_t *led_indicator_ledc_config
LED LEDC configuration
-
led_indicator_rgb_config_t *led_indicator_rgb_config
LED RGB configuration
-
led_indicator_strips_config_t *led_indicator_strips_config
LED LEDC rgb configuration
-
led_indicator_custom_config_t *led_indicator_custom_config
LED custom configuration
-
union led_indicator_config_t::[anonymous] [anonymous]
LED configuration
-
const blink_step_t **blink_lists
user defined LED blink lists
-
uint16_t blink_list_num
number of blink lists
-
led_indicator_mode_t mode
Type Definitions
-
typedef void *led_indicator_handle_t
LED indicator operation handle
Enumerations
-
enum [anonymous]
LED state: 0-100, only hardware that supports to set brightness can adjust brightness.
Values:
-
enumerator LED_STATE_OFF
turn off the LED
-
enumerator LED_STATE_25_PERCENT
25% brightness, must support to set brightness
-
enumerator LED_STATE_50_PERCENT
50% brightness, must support to set brightness
-
enumerator LED_STATE_75_PERCENT
75% brightness, must support to set brightness
-
enumerator LED_STATE_ON
turn on the LED
-
enumerator LED_STATE_OFF
-
enum blink_step_type_t
actions in this type
Values:
-
enumerator LED_BLINK_STOP
stop the blink
-
enumerator LED_BLINK_HOLD
hold the on-off state
-
enumerator LED_BLINK_BREATHE
breathe state
-
enumerator LED_BLINK_BRIGHTNESS
set the brightness, it will transition from the old brightness to the new brightness
-
enumerator LED_BLINK_RGB
color change with R(0-255) G(0-255) B(0-255)
-
enumerator LED_BLINK_RGB_RING
Gradual color transition from old color to new color in a color ring
-
enumerator LED_BLINK_HSV
color change with H(0-360) S(0-255) V(0-255)
-
enumerator LED_BLINK_HSV_RING
Gradual color transition from old color to new color in a color ring
-
enumerator LED_BLINK_LOOP
loop from first step
-
enumerator LED_BLINK_STOP
-
enum led_indicator_mode_t
LED indicator blink mode, as a member of led_indicator_config_t.
Values:
-
enumerator LED_GPIO_MODE
blink with max brightness
-
enumerator LED_LEDC_MODE
blink with LEDC driver
-
enumerator LED_RGB_MODE
blink with RGB driver
-
enumerator LED_STRIPS_MODE
blink with LEDC strips driver
-
enumerator LED_CUSTOM_MODE
blink with custom driver
-
enumerator LED_GPIO_MODE