Get Started
This document is intended to help users set up the software environment for the development of audio applications using hardware based on the ESP32 family of chips by Espressif. After that, a simple example will show you how to use ESP-ADF (Espressif Audio Development Framework).
Development Board Overview
For easier start with ESP-ADF, Espressif designed ESP32, ESP32-S2, and ESP32-S3 based development boards intended for audio applications. Click the links below to learn more about the available boards.
If you do not have any of the above boards, you can still use ESP-ADF for the ESP32 and ESP32-S2 based audio applications. For this, your board needs to have a compatible audio codec or DSP chip; alternatively, you can develop a driver to support communication with your specific chip.
About ESP-ADF
The ESP-ADF is available as a set of components to extend the functionality already delivered by the ESP-IDF (Espressif IoT Development Framework).
To use ESP-ADF you need set up the ESP-IDF first, and this is described in the next section.
Note
ESP-ADF provides support for specific ESP-IDF versions. If your have already set up another version, please switch to a supported ESP-IDF version, or you may not be able to compile ESP-ADF applications. In addition, the python version needs to be between 3.7 and 3.11.
Quick Start
This section provides quick steps to run a simple ADF sample project on an ESP device for experienced users. For beginners, please go through the complete steps from Step 1. Set up ESP-IDF to Step 9. Monitor to build a project.
Note
If you want to install using an IED, please refer to Section VS Code Extension VS Code or Section IDF Eclipse Plugin and Espressif IDE.
If you encounter issues in the following steps, you could refer to the complete steps from Step 1. Set up ESP-IDF to Step 9. Monitor or describe them in GitHub Issues or ESP Forum.
Linux and macOS
The operating environment below is on Linux Ubuntu 18.04 and above.
Download the full ESP-ADF repository from GitHub by running:
git clone --recursive https://github.com/espressif/esp-adf.git
For users located in China, it is faster to download from Gitee:
git clone --recursive https://gitee.com/EspressifSystems/esp-adf.git
Configure the
$ESP-IDFand$ESP-ADFcompilation environment by running:cd esp-adf ./install.sh . ./export.sh
After completing the above environment variable configuration, you can compile the ADF sample project
$ADF_PATH/examples/get-started/play_mp3_control. Switch to the project’s directory, compile, and flash it onto your ESP device by running the following command. Then, you will see the serial port of the routine is printed.
cd $ADF_PATH/examples/get-started/play_mp3_control
idf.py build flash monitor
Windows
Download the full ESP-ADF repository from GitHub by running:
git clone --recursive https://github.com/espressif/esp-adf.git
For users located in China, it is faster to download from Gitee:
git clone --recursive https://gitee.com/EspressifSystems/esp-adf.git
Install the
$ESP-IDFcompilation environment in the command prompt window:Using Command Prompt (cmd.exe):
    cd esp-adf
    .\install.bat

**Using PowerShell:**
cd esp-adf .\install.ps1
Or first download the full ESP-IDF Windows Installer from ESP-IDF Windows Installer (Please download the ESP-IDF versions supported by ESP-ADF). And then turn off the antivirus software (Because it may prevent the installation as the software writes the Windows system regedit) and install the downloaded file. After the installation is complete, open the ESP-IDF CMD shortcut icon on the desktop, the script will automatically help you download submodules, and set environment variables such as
IDF_PATH.Set the
ADF_PATHby running the following commands:Using Command Prompt (cmd.exe):
.\export.bat
echo %ADF_PATH%
Using PowerShell:
.\export.ps1
echo $ADF_PATH
// or
echo $env:ADF_PATH
If your
ADF_PATHvariable prints correctly, it’s time to compile the ADF routines:Using Command Prompt (cmd.exe):
cd %ADF_PATH%\examples\get-started\play_mp3_control
idf.py build flash monitor
Using PowerShell:
cd $ADF_PATH\examples\get-started\play_mp3_control
idf.py build flash monitor
Installation Step by Step
This is a detailed roadmap to walk you through the installation process.
Setting up Development Environment
Step 1. Set up ESP-IDF for Windows, Linux or Mac OS
Creating Your First Project
Step 1. Set up ESP-IDF
Configure your PC according to Getting Started section of ESP-IDF Programming Guide. Windows, Linux and Mac OS operating systems are supported. Please select and follow the guide specific to ESP32 or ESP32-S2 chip. The chip name is provided in the board name.
Note
This guide uses the directory ~/esp on Linux and macOS or %userprofile%\esp on Windows as an installation folder for ESP-ADF. You can use any directory, but you will need to adjust paths for the commands accordingly. Keep in mind that ESP-ADF does not support spaces in paths.
To make the installation easier and less prone to errors, use the ~/esp default directory for the installation.
If this is your first exposure to the ESP-IDF, then it is recommended to get familiar with hello_world or blink example first.
After getting familiar with ESP-IDF, decide on which ESP-IDF version to use for your application depending on the Espressif chip that you have and your project type. For this, consult Versions section of ESP-IDF Programming Guide.
Once you successfully build, upload, and run examples for your version of ESP-IDF, you can proceed to the next step.
Step 2. Get ESP-ADF
Now you can start installing audio-specific API / libraries provided in ESP-ADF repository.
Windows
Open Command Prompt and run the following commands:
cd %userprofile%\esp
git clone --recursive https://github.com/espressif/esp-adf.git
Linux and macOS
Open Terminal, and run the following commands:
cd ~/esp
git clone --recursive https://github.com/espressif/esp-adf.git
Step 3. Set up the environment
Before being able to compile ESP-ADF projects, on each new session, ESP-IDF tools should be added to the PATH environment variable. To make the tools usable from the command line, some environment variables must be set. ESP-ADF provides a script which does that.
Windows
ESP-IDF Tools Installer for Windows creates an “ESP-IDF Command Prompt” shortcut in the Start Menu. This shortcut opens the Command Prompt and sets up all the required environment variables. You can open this shortcut and proceed to the next step.
Alternatively, if you want to use ESP-IDF in an existing Command Prompt window, you can run:
%userprofile%\esp\esp-adf\export.bat
Linux and macOS
In the terminal where you have installed ESP-IDF, run:
. $HOME/esp/esp-adf/export.sh
Note the space between the leading dot and the path!
You can also create an alias for the export script to your .profile or .bash_profile script. This way you can set up the environment in a new terminal window by typing get_idf:
alias get_idf='. $HOME/esp/esp-adf/export.sh'
Note that it is not recommended to source export.sh from the profile script directly. Doing so activates IDF virtual environment in every terminal session (even in those where IDF is not needed), defeating the purpose of the virtual environment and likely affecting other software.
Step 4. Start a Project
After initial preparation you are ready to build the first audio application. The process has already been described in ESP-IDF documentation. Now we would like to discuss remaining key steps and show how the toolchain is able to access the ESP-ADF components by using the ADF_PATH variable.
To demonstrate how to build an application, we will use get-started/play_mp3_control project from examples directory in the ADF.
Windows
cd %userprofile%\esp
xcopy /e /i %ADF_PATH%\examples\get-started\play_mp3_control play_mp3_control
Linux and macOS
cd ~/esp
cp -r $ADF_PATH/examples/get-started/play_mp3_control .
There is a range of example projects in the examples directory in ESP-ADF. You can copy any project in the same way as presented above and run it.
It is also possible to build examples in-place, without copying them first.
Important
The ESP-IDF build system does not support spaces in the paths to either ESP-IDF or to projects.
Step 5. Connect Your Device
Connect the audio board to the PC, check under what serial port the board is visible and verify, if serial communication works as described in ESP-IDF documentation.
Note
Keep the port name handy as you will need it in the next steps.
Step 6. Configure
Navigate to your play_mp3_control directory from Step 4. Start a Project and configure the project:
Windows
cd %userprofile%\esp\play_mp3_control
idf.py set-target esp32
idf.py menuconfig
Linux and macOS
cd ~/esp/play_mp3_control
idf.py set-target esp32
idf.py menuconfig
Note
If you are using an ESP32-S2 based board, then the second command above should be idf.py set-target esp32s2.
Setting the target with idf.py set-target <target> should be done once, after opening a new project. If the project contains some existing builds and configuration, they will be cleared and initialized. The target may be saved in environment variable to skip this step at all. See Selecting the Target in ESP-IDF Programming Guide for additional information.
If the previous steps have been done correctly, the following menu appears:
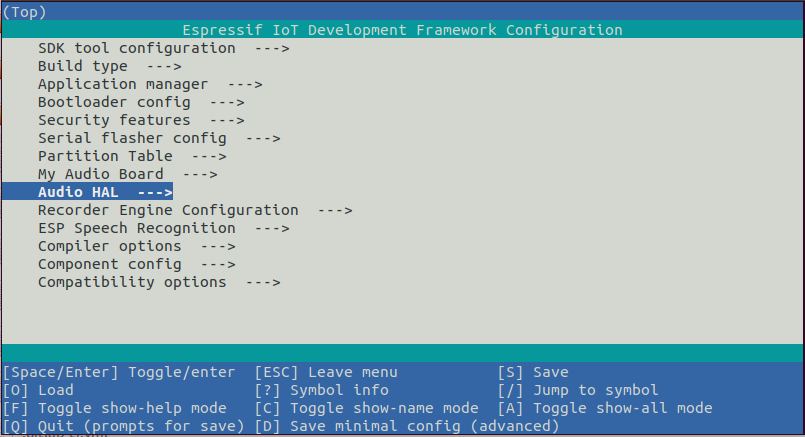
Project configuration - Home window
You are using this menu to set up your board type and other project specific variables, e.g. Wi-Fi network name and password, the processor speed, etc.

Project configuration - Board selection
Select your board from the menu, press S to save configuration and then Q to exit.
Note
The colors of the menu could be different in your terminal. You can change the appearance with the option
--style. Please run idf.py menuconfig --help for further information.
Step 7. Build the Project
Build the project by running:
idf.py build
This command will compile the application and all ESP-IDF and ESP-ADF components, then it will generate the bootloader, partition table, and application binaries.
$ idf.py build
 Executing action: all (aliases: build)
 Running ninja in directory /path/to/esp/play_mp3_control/build
 Executing "ninja all"...
 [0/1] Re-running CMake...

... (more lines of build system output)

 [1064/1064] Generating binary image from built executable
 esptool.py v3.0-dev
 Generated /path/to/esp/play_mp3_control/build/play_mp3_control.bin

 Project build complete. To flash it, run this command:
 /path/to/.espressif/python_env/idf4.2_py2.7_env/bin/python ../esp-idf/components/esptool_py/esptool/esptool.py -p (PORT) -b 460800 --before default_reset --after hard_reset --chip esp32  write_flash --flash_mode dio --flash_size detect --flash_freq 40m 0x1000 build/bootloader/bootloader.bin 0x8000 build/partition_table/partition-table.bin 0x10000 build/play_mp3_control.bin
 or run 'idf.py -p (PORT) flash'
If there are no errors, the build will finish by generating the firmware binary .bin file.
Step 8. Flash onto the Device
Flash the binaries that you just built onto your board by running:
idf.py -p PORT [-b BAUD] flash monitor
Replace PORT with your board’s serial port name from Step 5. Connect Your Device.
You can also change the flasher baud rate by replacing BAUD with the baud rate you need. The default baud rate is 460800.
For more information on idf.py arguments, see Using the Build System in ESP-IDF Programming Guide.
Note
The option flash automatically builds and flashes the project, so running idf.py build is not necessary.
To upload the binaries, the board should be put into upload mode. To do so, hold down Boot button, momentarily press Reset button and release the Boot button. The upload mode may be initiated anytime during the application build, but no later than “Connecting” message is being displayed:
...

esptool.py v3.0-dev
Serial port /dev/ttyUSB0
Connecting........_____....
Without the upload mode enabled, after showing several ....._____, the connection will eventually time out.
Once build and upload is complete, you should see the following:
...

Leaving...
Hard resetting via RTS pin...
Executing action: monitor
Running idf_monitor in directory /path/to/esp/play_mp3_control
Executing "/path/to/.espressif/python_env/idf4.2_py2.7_env/bin/python /path/to/esp/esp-idf/tools/idf_monitor.py -p /dev/ttyUSB0 -b 115200 --toolchain-prefix xtensa-esp32-elf- /path/to/esp/play_mp3_control/build/play_mp3_control.elf -m '/path/to/.espressif/python_env/idf4.2_py2.7_env/bin/python' '/path/to/esp/esp-idf/tools/idf.py'"...
--- idf_monitor on /dev/ttyUSB0 115200 ---
--- Quit: Ctrl+] | Menu: Ctrl+T | Help: Ctrl+T followed by Ctrl+H ---
If there are no issues by the end of the flash process, the board will reboot and start up the “play_mp3_control” application.
Step 9. Monitor
At this point press the Reset button to start the application. Following several lines of start up log, the play_mp3_control application specific messages should be displayed:
...

I (397) PLAY_FLASH_MP3_CONTROL: [ 1 ] Start audio codec chip
I (427) PLAY_FLASH_MP3_CONTROL: [ 2 ] Create audio pipeline, add all elements to pipeline, and subscribe pipeline event
I (427) PLAY_FLASH_MP3_CONTROL: [2.1] Create mp3 decoder to decode mp3 file and set custom read callback
I (437) PLAY_FLASH_MP3_CONTROL: [2.2] Create i2s stream to write data to codec chip
I (467) PLAY_FLASH_MP3_CONTROL: [2.3] Register all elements to audio pipeline
I (467) PLAY_FLASH_MP3_CONTROL: [2.4] Link it together [mp3_music_read_cb]-->mp3_decoder-->i2s_stream-->[codec_chip]
I (477) PLAY_FLASH_MP3_CONTROL: [ 3 ] Set up  event listener
I (477) PLAY_FLASH_MP3_CONTROL: [3.1] Listening event from all elements of pipeline
I (487) PLAY_FLASH_MP3_CONTROL: [ 4 ] Start audio_pipeline
I (507) PLAY_FLASH_MP3_CONTROL: [ * ] Receive music info from mp3 decoder, sample_rates=44100, bits=16, ch=2
I (7277) PLAY_FLASH_MP3_CONTROL: [ 5 ] Stop audio_pipeline
If there are no issues, besides the above log, you should hear a sound played for about 7 seconds by the speakers or headphones connected to your audio board. Reset the board to hear it again if required.
Now you are ready to try some other examples, or go right to developing your own applications. Check how the examples are made aware of location of the ESP-ADF. Open the get-started/play_mp3_control/Makefile and you should see
include($ENV{ADF_PATH}/CMakeLists.txt)
include($ENV{IDF_PATH}/tools/cmake/project.cmake)
The first line contains ADF_PATH to point the toolchain to another file in ESP-ADF directory that provides configuration variables and path to ESP-ADF components reacquired by the toolchain. You need similar Makefile in your own applications developed with the ESP-ADF.
VS Code Extension
Follow VS Code Extension Quick Installation Guide to install ESP-IDF Visual Studio Code Extension. If the previous steps have been done correctly, the following toolbar appears:

VS Code Extension Toolbar
To install the ESP-ADF extension, open
Command Paletteand enterinstall adf. Then, a progress bar shows up in the lower right corner.
If you have cloned the ESP-ADF repository before, please enter
open settings(ui)inCommand Palette. Go toUser > Extensions > ESP_IDFand manually set the ESP-ADF path inidf.customExtraVarskey-value setting by addingADF_PATHas key and the ESP-ADF path as value. You can also set the ESP-ADF path in.vscode/settings.json.
In
Command Palette, enternew project, select theESP-IDF: New Projectoption, and choose the ESP-IDF version to use. A window will appear with ESP-IDF and ESP-ADF (if you configured using install adf command or adding ADF_PATH in idf.customExtraVars setting) sections. Expand ESP-ADF and choose the desired example from the list of example projects.Select an example, click
Create project using example XX, and later configure the new project, including the directory to save, the project name, and other settings.On the toolbar at the bottom of VS Code, click the gear symbol
menuconfigto configure the example and click the column symbolBuildto build the example. See available shortcut keys for VS code extensions.On the toolbar at the bottom of VS Code, click the plug-in symbol
Select Portto configure the serial port and click the lightning symbolFlash Deviceto flash firmware. After the firmware is flashed successfully, clickMonitor Deviceto start the monitor function. Or, you can also use the flame symbol to build, flash, and monitor the example at the same time.
IDF Eclipse Plugin and Espressif IDE
Install and Set up Environment Variables
Follow IDF Eclipse Plugin Quick Installation Guide to install IDF Eclipse Plugin or download and install Espressif IDE from Espressif IDE Download Link. If the previous steps have been done correctly, you can create, build and flash IDF project in the Eclipse environment.
Espressif IDE (Reskinned Eclipse)
To install ESP-ADF, follow section Step 2. Get ESP-ADF.
To set
ADF_PATHenvironment variable, openWindow>Preferences>C/C++>Build>Environmentpanel, click Add button and fill inADF_PATH. After you complete the above steps, selectADF_PATHinEnvironment variablestable and click Edit and OK button without changing any value (There is a bug in Eclipse CDT that is appending a null value before the path hence we need to click on edit and save it.).
If this step does not work, you can delete
ADF_PATHset in Eclipse and setADF_PATHas system environment variable. For Windows, set environment variable inAdvanced System Settingpanel. For Linux and macOS, addexport ADF_PATH=your adf pathin file/etc/profile. However, it is not recommended. Doing so activates ADF virtual environment in every terminal session (including those where ADF is not needed), defeating the purpose of the virtual environment and likely affecting other software.
Create a New Project
To create new project, go to
File>New>Espressif IDF Projectand provide a project name.Click Finish to create an empty project. Or click Next and check
Create a project using one of the templatesto create a project using ESP-IDF templates.
After creating a new project, you can use ESP-IDF and ESP-ADF to develop the project.
Import Existing Project
To import existing ESP-ADF examples, go to File > Import > Espressif > Existing IDF Project and select an ESP-ADF example (Opening an existing project directly may not be able to set the ESP target).
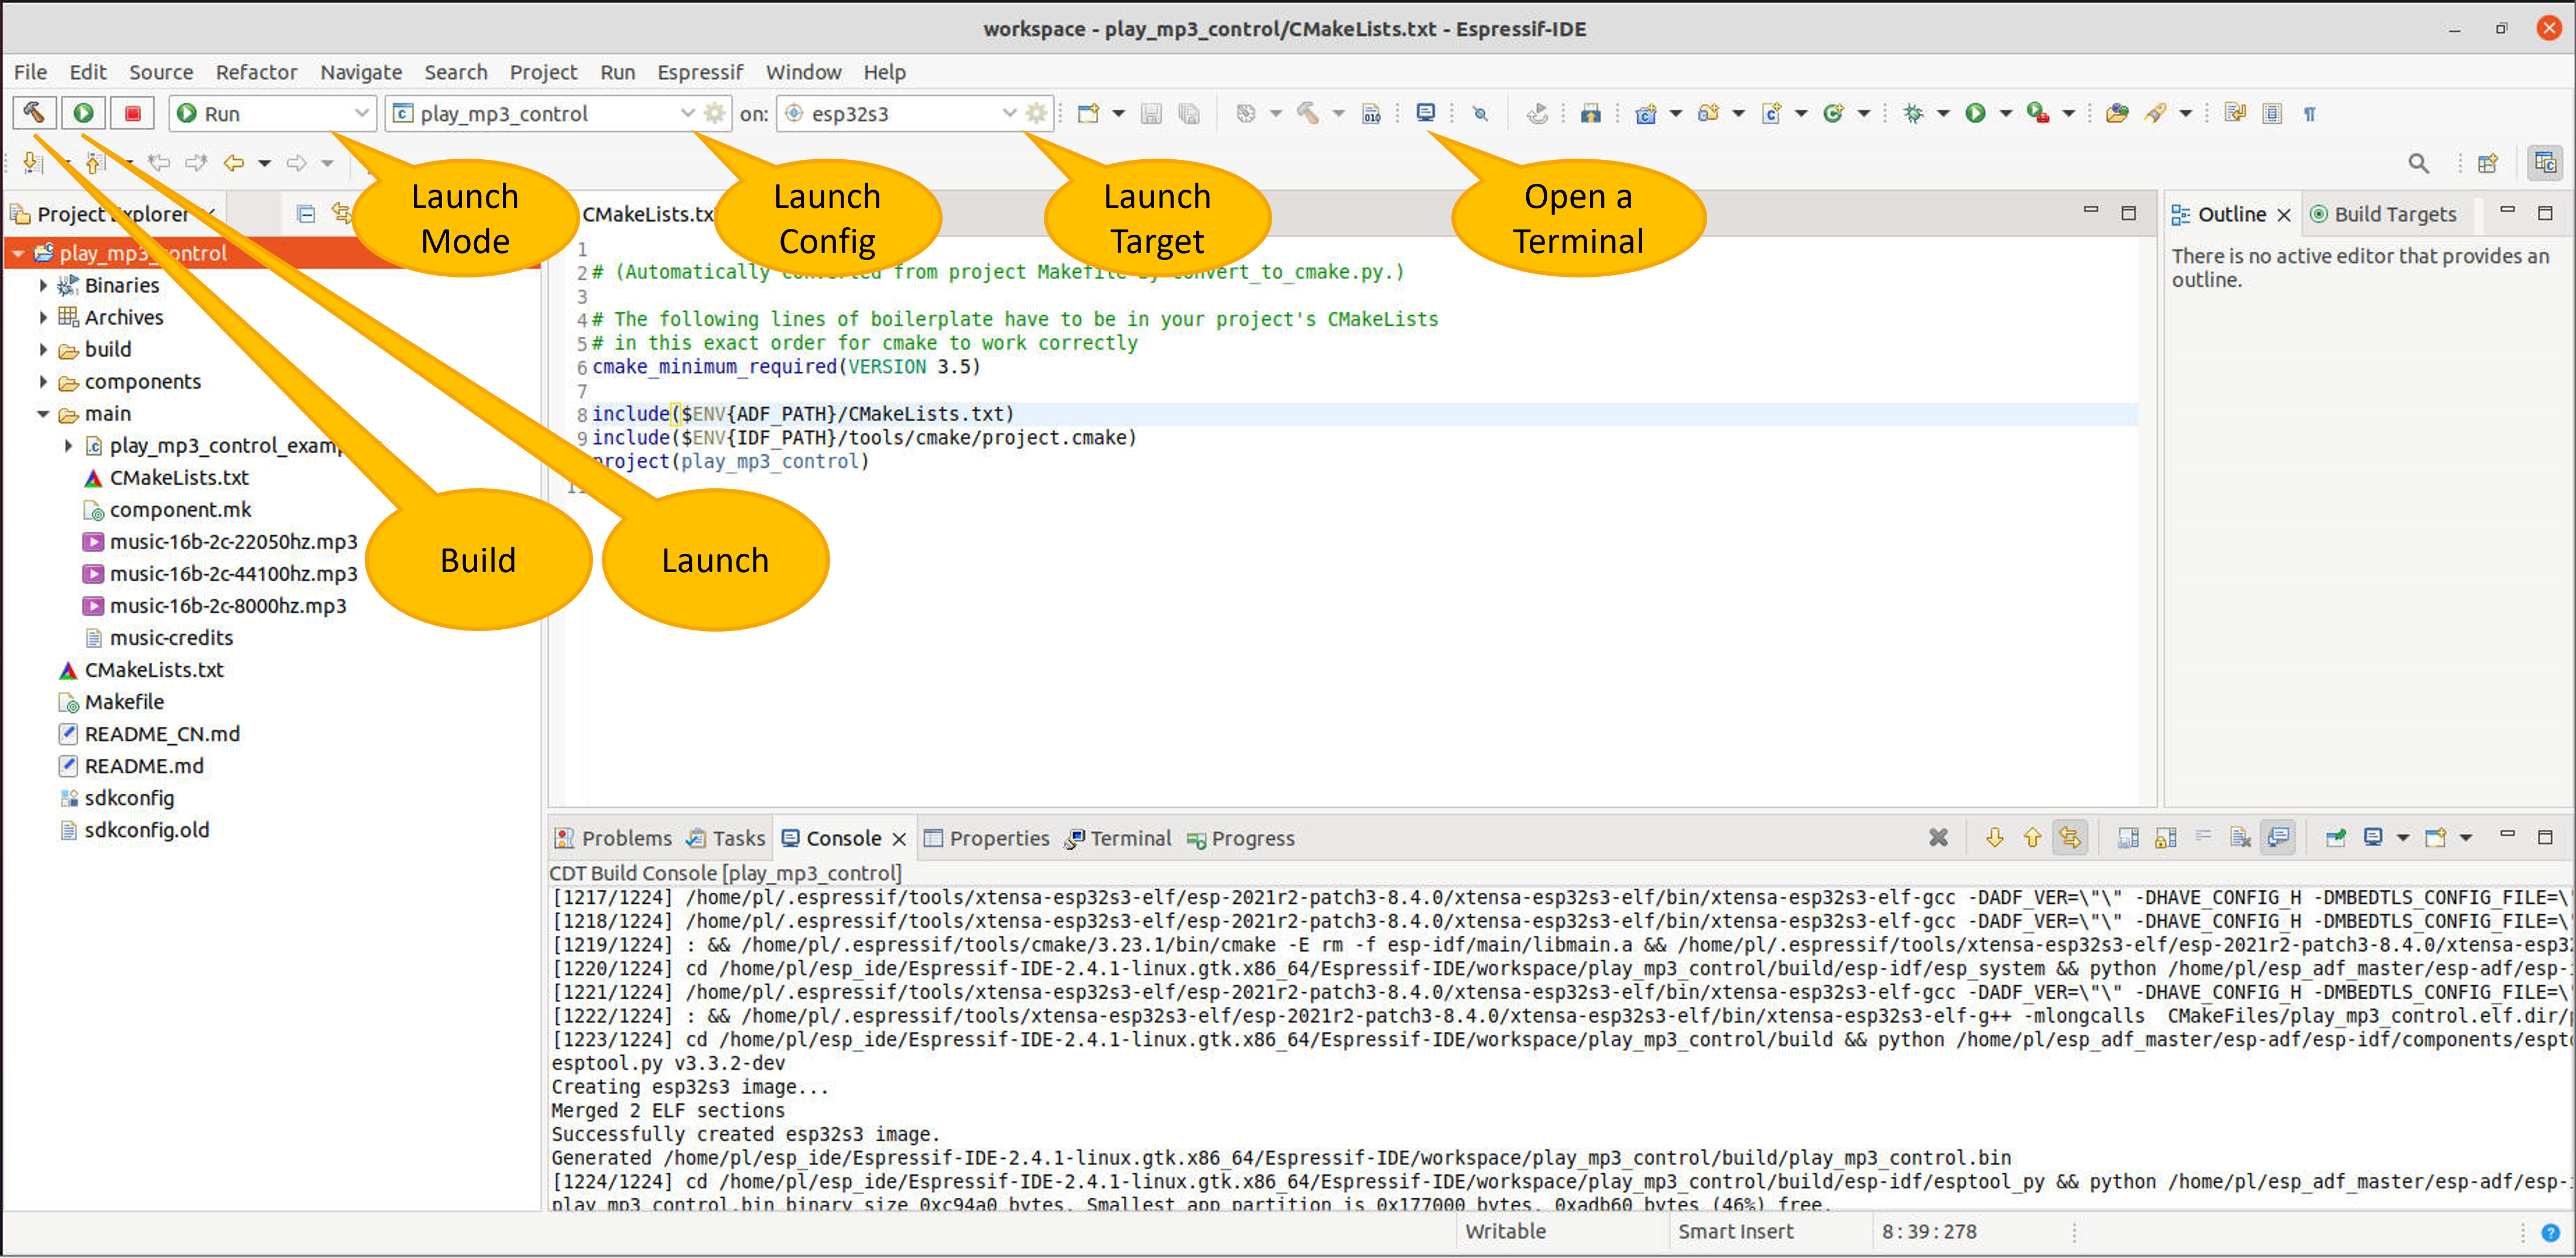
Quick Start
Select a project from
Project Explorer.In the Launch Mode drop-down menu, select
Run.In the Launch Configuration (auto-detected) drop-down menu, select your application.
Select ESP target from the third drop-down, which is called Launch Target. Click gear symbol Edit button of Launch Target to set
Serial Port.Double click
sdkconfigfile to launch theSDK Configuration Editor.Click Build button to build the project.
Click Launch button to flash the project.
Click Open a Terminal button and select ESP-IDF Serial Monitor to view serial output.
For more information about IDF Eclipse Plugin and Espressif IDE, please refer to ESP-IDF Eclipse Plugin.
Update ESP-ADF
After some time of using ESP-ADF, you may want to update it to take advantage of new features or bug fixes. The simplest way to do so is by deleting existing esp-adf folder and cloning it again, which is same as when doing initial installation described in sections Step 2. Get ESP-ADF.
Another solution is to update only what has changed. This method is useful if you have a slow connection to the GitHub. To do the update run the following commands:
cd ~/esp/esp-adf
git pull
git submodule update --init --recursive
The git pull command is fetching and merging changes from ESP-ADF repository on GitHub. Then git submodule update --init --recursive is updating existing submodules or getting a fresh copy of new ones. On GitHub the submodules are represented as links to other repositories and require this additional command to get them onto your PC.