下载指导
本文档以 ESP32-WROOM-32 模组为例,介绍如何下载 ESP32-WROOM-32 模组对应的 AT 固件,以及如何将固件烧录到模组上,其它 ESP32 系列模组也可参考本文档。
下载和烧录 AT 固件之前,请确保您已正确连接所需硬件,具体可参考 硬件连接。
对于不同系列的模组,AT 默认固件所支持的命令会有所差异。具体可参考 ESP-AT 固件差异。
下载 AT 固件
请按照以下步骤将 AT 固件下载至 PC:
前往 AT 固件
找到您的模组所对应的 AT 固件
点击相应链接进行下载
此处,我们下载了 ESP32-WROOM-32 对应的 ESP32-WROOM-32_AT_Bin_V2.2.0.0 固件,该固件的目录结构及其中各个 bin 文件介绍如下,其它 ESP32 系列模组固件的目录结构及 bin 文件也可参考如下介绍:
.
├── at_customize.bin                 // 二级分区表
├── bootloader                       // bootloader
│   └── bootloader.bin
├── customized_partitions            // AT 自定义 bin 文件
│   ├── ble_data.bin
│   ├── client_ca.bin
│   ├── client_cert.bin
│   ├── client_key.bin
│   ├── factory_param.bin
│   ├── factory_param_WROOM-32.bin
│   ├── mqtt_ca.bin
│   ├── mqtt_cert.bin
│   ├── mqtt_key.bin
│   ├── server_ca.bin
│   ├── server_cert.bin
│   └── server_key.bin
├── download.config                  // 烧录固件的参数
├── esp-at.bin                       // AT 应用固件
├── esp-at.elf
├── esp-at.map
├── factory                          // 量产所需打包好的 bin 文件
│   ├── factory_WROOM-32.bin
│   └── factory_parameter.log
├── flasher_args.json                // 下载参数信息新的格式
├── ota_data_initial.bin             // ota data 区初始值
├── partition_table                  // 一级分区列表
│   └── partition-table.bin
├── phy_init_data.bin                // phy 初始值信息
└── sdkconfig                        // AT 固件对应的编译配置
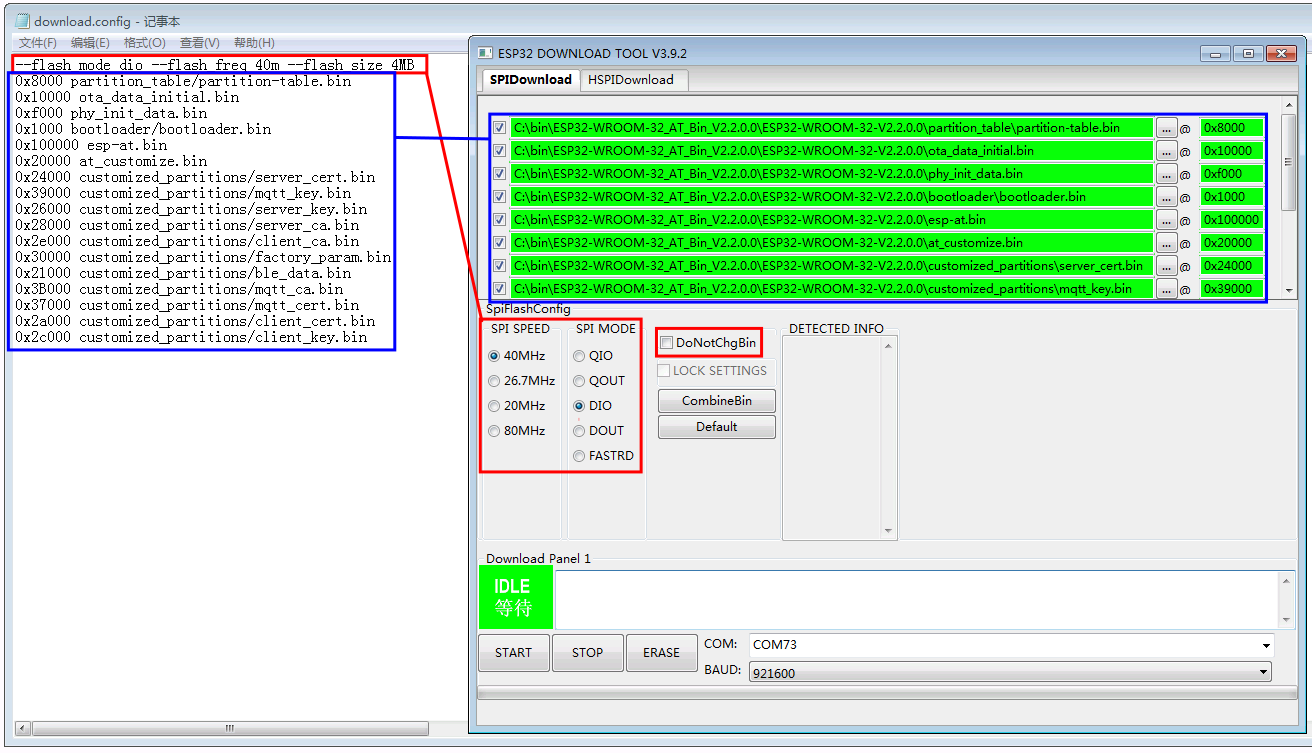
其中,download.config 文件包含烧录固件的参数:
--flash_mode dio --flash_freq 40m --flash_size 4MB
0x8000 partition_table/partition-table.bin
0x10000 ota_data_initial.bin
0xf000 phy_init_data.bin
0x1000 bootloader/bootloader.bin
0x100000 esp-at.bin
0x20000 at_customize.bin
0x24000 customized_partitions/server_cert.bin
0x39000 customized_partitions/mqtt_key.bin
0x26000 customized_partitions/server_key.bin
0x28000 customized_partitions/server_ca.bin
0x2e000 customized_partitions/client_ca.bin
0x30000 customized_partitions/factory_param.bin
0x21000 customized_partitions/ble_data.bin
0x3B000 customized_partitions/mqtt_ca.bin
0x37000 customized_partitions/mqtt_cert.bin
0x2a000 customized_partitions/client_cert.bin
0x2c000 customized_partitions/client_key.bin
--flash_mode dio代表此固件采用的 flash dio 模式进行编译;--flash_freq 40m代表此固件采用的 flash 通讯频率为 40 MHz;--flash_size 4MB代表此固件适用的 flash 最小为 4 MB;0x10000 ota_data_initial.bin代表在0x10000地址烧录ota_data_initial.bin文件。
烧录 AT 固件至设备
请根据您的操作系统选择对应的烧录方法。
Windows
开始烧录之前,请下载 Flash 下载工具。更多有关 Flash 下载工具的介绍,请参考压缩包中 doc 文件夹。
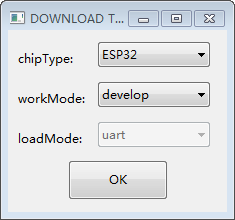
打开 Flash 下载工具;
选择芯片类型;(此处,我们选择
ESP32。)根据您的需求选择一种工作模式;(此处,我们选择
develop。)根据您的需求选择一种下载接口;(此处,我们选择
uart。)
固件下载配置选择
将 AT 固件烧录至设备,以下两种方式任选其一:
为了避免烧录出现问题,请查看开发板的下载接口的 COM 端口号,并从 “COM:” 下拉列表中选择该端口号。有关如何查看端口号的详细介绍请参考 在 Windows 上查看端口。
烧录完成后, 请 检查 AT 固件是否烧录成功。
Linux 或 macOS
开始烧录之前,请安装 esptool.py。
以下两种方式任选其一,将 AT 固件烧录至设备:
分开下载多个 bin 文件至不同的地址:输入以下命令,替换
PORTNAME和download.config参数;esptool.py --chip auto --port PORTNAME --baud 115200 --before default_reset --after hard_reset write_flash -z download.config
将
PORTNAME替换成开发板的下载接口名称,若您无法确定该接口名称,请参考 在 Linux 和 macOS 上查看端口。将
download.config替换成该文件里的参数列表。以下是将固件烧录至 ESP32-WROOM-32 模组输入的命令:
esptool.py --chip auto --port /dev/tty.usbserial-0001 --baud 115200 --before default_reset --after hard_reset write_flash -z --flash_mode dio --flash_freq 40m --flash_size 4MB 0x8000 partition_table/partition-table.bin 0x10000 ota_data_initial.bin 0xf000 phy_init_data.bin 0x1000 bootloader/bootloader.bin 0x100000 esp-at.bin 0x20000 at_customize.bin 0x24000 customized_partitions/server_cert.bin 0x39000 customized_partitions/mqtt_key.bin 0x26000 customized_partitions/server_key.bin 0x28000 customized_partitions/server_ca.bin 0x2e000 customized_partitions/client_ca.bin 0x30000 customized_partitions/factory_param.bin 0x21000 customized_partitions/ble_data.bin 0x3B000 customized_partitions/mqtt_ca.bin 0x37000 customized_partitions/mqtt_cert.bin 0x2a000 customized_partitions/client_cert.bin 0x2c000 customized_partitions/client_key.bin
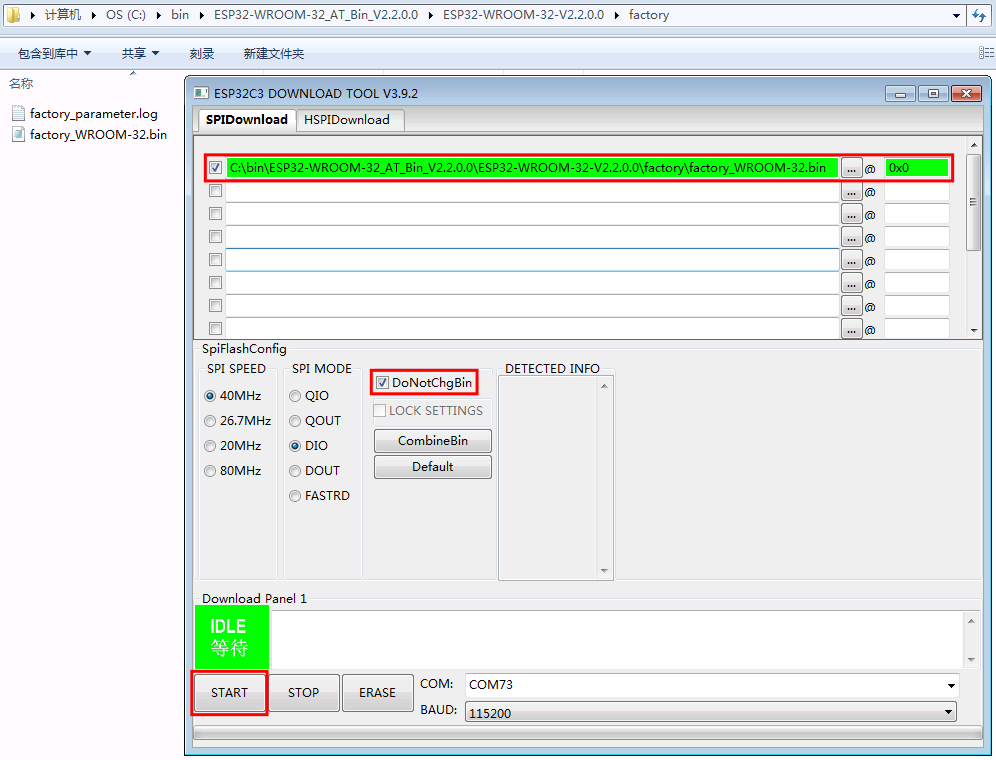
直接下载打包好的量产固件至
0x0地址:输入以下命令,替换PORTNAME和FILEDIRECTORY参数;esptool.py --chip auto --port PORTNAME --baud 115200 --before default_reset --after hard_reset write_flash -z --flash_mode dio --flash_freq 40m --flash_size 4MB 0x0 FILEDIRECTORY
将
PORTNAME替换成开发板的下载接口名称,若您无法确定该接口名称,请参考 在 Linux 和 macOS 上查看端口。将
FILEDIRECTORY替换成打包好的量产固件的文件路径,通常情况下,文件路径是factory/XXX.bin。以下是将固件烧录至 ESP32-WROOM-32 模组输入的命令:
esptool.py --chip auto --port /dev/tty.usbserial-0001 --baud 115200 --before default_reset --after hard_reset write_flash -z --flash_mode dio --flash_freq 40m --flash_size 4MB 0x0 factory/factory_WROOM-32.bin
烧录完成后,请 检查 AT 固件是否烧录成功。
检查 AT 固件是否烧录成功
请按照以下步骤检查 AT 固件是否烧录成功:
打开串口工具,如 SecureCRT;
串口:选择用于发送或接收“AT 命令/响应”的串口(详情请见 硬件连接);
波特率:115200;
数据位:8;
检验位:None;
停止位:1;
流控:None;
输入 “AT+GMR” 命令,并且换行 (CR LF);
若如下图所示,响应是 OK, 则表示 AT 固件烧录成功。
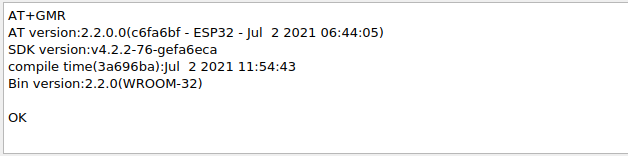
AT 响应
否则,您需要检查 ESP32 设备开机日志,可以通过“下载/输出日志”串口在电脑上查看。若日志和下面的日志相似,则说明 ESP-AT 固件已经正确初始化了。
ESP32 开机日志:
ets Jun  8 2016 00:22:57

rst:0x1 (POWERON_RESET),boot:0x13 (SPI_FAST_FLASH_BOOT)
configsip: 0, SPIWP:0xee
clk_drv:0x00,q_drv:0x00,d_drv:0x00,cs0_drv:0x00,hd_drv:0x00,wp_drv:0x00
mode:DIO, clock div:2
load:0x3fff0030,len:7168
load:0x40078000,len:13200
load:0x40080400,len:4564
0x40080400: _init at ??:?

entry 0x400806f4
I (26) boot: ESP-IDF v4.2.2-76-gefa6eca 2nd stage bootloader
I (26) boot: compile time 11:54:30
I (26) boot: chip revision: 1
I (30) boot_comm: chip revision: 1, min. bootloader chip revision: 0
I (37) boot.esp32: SPI Speed      : 40MHz
I (42) boot.esp32: SPI Mode       : DIO
I (46) boot.esp32: SPI Flash Size : 4MB
I (51) boot: Enabling RNG early entropy source...
I (56) boot: Partition Table:
I (60) boot: ## Label            Usage          Type ST Offset   Length
I (67) boot:  0 phy_init         RF data          01 01 0000f000 00001000
I (75) boot:  1 otadata          OTA data         01 00 00010000 00002000
I (82) boot:  2 nvs              WiFi data        01 02 00012000 0000e000
I (90) boot:  3 at_customize     unknown          40 00 00020000 000e0000
I (97) boot:  4 ota_0            OTA app          00 10 00100000 00180000
I (105) boot:  5 ota_1            OTA app          00 11 00280000 00180000
I (112) boot: End of partition table
I (117) boot_comm: chip revision: 1, min. application chip revision: 0
I (124) esp_image: segment 0: paddr=0x00100020 vaddr=0x3f400020 size=0x285f8 (165368) map
I (196) esp_image: segment 1: paddr=0x00128620 vaddr=0x3ffbdb60 size=0x03934 ( 14644) load
I (202) esp_image: segment 2: paddr=0x0012bf5c vaddr=0x40080000 size=0x040bc ( 16572) load
I (210) esp_image: segment 3: paddr=0x00130020 vaddr=0x400d0020 size=0x109f40 (1089344) map
I (626) esp_image: segment 4: paddr=0x00239f68 vaddr=0x400840bc size=0x1aa04 (109060) load
I (674) esp_image: segment 5: paddr=0x00254974 vaddr=0x400c0000 size=0x00064 (   100) load
I (691) boot: Loaded app from partition at offset 0x100000
I (691) boot: Disabling RNG early entropy source...
module_name:WROOM-32
max tx power=78,ret=0
2.2.0