Configure ESP-WROVER-KIT JTAG Interface
All versions of ESP-WROVER-KIT boards have built-in JTAG functionality. Putting it to work requires setting jumpers or DIP switches to enable JTAG functionality, and configuring USB drivers. Please refer to step by step instructions below.
Configure Hardware
Enable on-board JTAG functionality by setting JP8 according to ESP-WROVER-KIT V4.1 Getting Started Guide, Section Setup Options.
Verify if ESP32 pins used for JTAG communication are not connected to some other h/w that may disturb JTAG operation:
ESP32 JTAG pins¶ ESP32 Pin
JTAG Signal
MTDO / GPIO15
TDO
MTDI / GPIO12
TDI
MTCK / GPIO13
TCK
MTMS / GPIO14
TMS
GND
GND
Configure USB Drivers
Install and configure USB drivers, so OpenOCD is able to communicate with JTAG interface on ESP-WROVER-KIT board as well as with UART interface used to upload application for flash. Follow steps below specific to your operating system.
Note
ESP-WROVER-KIT uses an FT2232 adapter. The following instructions can also be used for other FT2232 based JTAG adapters.
Windows
Using standard USB A / micro USB B cable connect ESP-WROVER-KIT to the computer. Switch the ESP-WROVER-KIT on.
Wait until USB ports of ESP-WROVER-KIT are recognized by Windows and drives are installed. If they do not install automatically, then download them from https://www.ftdichip.com/Drivers/D2XX.htm and install manually.
Download Zadig tool (Zadig_X.X.exe) from https://zadig.akeo.ie/ and run it.
In Zadig tool go to “Options” and check “List All Devices”.
Check the list of devices that should contain two ESP-WROVER-KIT specific USB entries: “Dual RS232-HS (Interface 0)” and “Dual RS232-HS (Interface 1)”. The driver name would be “FTDIBUS (vxxxx)” and USB ID: 0403 6010.
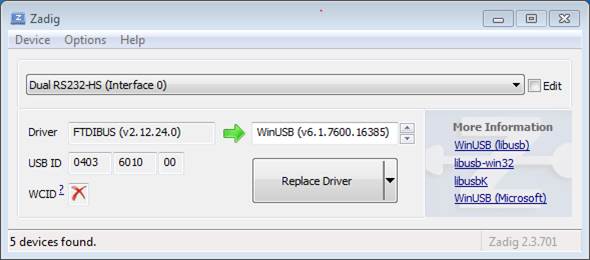
Configuration of JTAG USB driver in Zadig tool
The first device (Dual RS232-HS (Interface 0)) is connected to the JTAG port of the ESP32. Original “FTDIBUS (vxxxx)” driver of this device should be replaced with “WinUSB (v6xxxxx)”. To do so, select “Dual RS232-HS (Interface 0) and reinstall attached driver to the “WinUSB (v6xxxxx)”, see picture above.
Note
Do not change the second device “Dual RS232-HS (Interface 1)”. It is routed to ESP32’s serial port (UART) used for upload of application to ESP32’s flash.
Now ESP-WROVER-KIT’s JTAG interface should be available to the OpenOCD. To carry on with debugging environment setup, proceed to section Run OpenOCD.
Linux
Using standard USB A / micro USB B cable connect ESP-WROVER-KIT board to the computer. Power on the board.
Open a terminal, enter
ls -l /dev/ttyUSB*command and check, if board’s USB ports are recognized by the OS. You are looking for similar result:user-name@computer-name:~/esp$ ls -l /dev/ttyUSB* crw-rw---- 1 root dialout 188, 0 Jul 10 19:04 /dev/ttyUSB0 crw-rw---- 1 root dialout 188, 1 Jul 10 19:04 /dev/ttyUSB1
Following section “Permissions delegation” in OpenOCD’s README, set up the access permissions to both USB ports.
Log off and login, then cycle the power to the board to make the changes effective. In terminal enter again
ls -l /dev/ttyUSB*command to verify, if group-owner has changed fromdialouttoplugdev:user-name@computer-name:~/esp$ ls -l /dev/ttyUSB* crw-rw-r-- 1 root plugdev 188, 0 Jul 10 19:07 /dev/ttyUSB0 crw-rw-r-- 1 root plugdev 188, 1 Jul 10 19:07 /dev/ttyUSB1
If you see similar result and you are a member of
plugdevgroup, then the set up is complete.The
/dev/ttyUSBninterface with lower number is used for JTAG communication. The other interface is routed to ESP32’s serial port (UART) used for upload of application to ESP32’s flash.
Now ESP-WROVER-KIT’s JTAG interface should be available to the OpenOCD. To carry on with debugging environment setup, proceed to section Run OpenOCD.
MacOS
On macOS, using FT2232 for JTAG and serial port at the same time needs some additional steps. When the OS loads FTDI serial port driver, it does so for both channels of FT2232 chip. However only one of these channels is used as a serial port, while the other is used as JTAG. If the OS has loaded FTDI serial port driver for the channel used for JTAG, OpenOCD will not be able to connect to the chip. There are two ways around this:
Manually unload the FTDI serial port driver before starting OpenOCD, start OpenOCD, then load the serial port driver.
Modify FTDI driver configuration so that it doesn’t load itself for channel B of FT2232 chip, which is the channel used for JTAG on ESP-WROVER-KIT.
Manually unloading the driver
Install FTDI driver from https://www.ftdichip.com/Drivers/VCP.htm
Connect USB cable to the ESP-WROVER-KIT.
Unload the serial port driver:
sudo kextunload -b com.FTDI.driver.FTDIUSBSerialDriver
In some cases you may need to unload Apple’s FTDI driver as well:
sudo kextunload -b com.apple.driver.AppleUSBFTDI
Run OpenOCD:
openocd -f board/esp32-wrover-kit-3.3v.cfg
In another terminal window, load FTDI serial port driver again:
sudo kextload -b com.FTDI.driver.FTDIUSBSerialDriver
Note
If you need to restart OpenOCD, there is no need to unload FTDI driver again — just stop OpenOCD and start it again. The driver only needs to be unloaded if ESP-WROVER-KIT was reconnected or power was toggled.
This procedure can be wrapped into a shell script, if desired.
Modifying FTDI driver
In a nutshell, this approach requires modification to FTDI driver configuration file, which prevents the driver from being loaded for channel B of FT2232H.
Note
Other boards may use channel A for JTAG, so use this option with caution.
Warning
This approach also needs signature verification of drivers to be disabled, so may not be acceptable for all users.
Open FTDI driver configuration file using a text editor (note
sudo):sudo nano /Library/Extensions/FTDIUSBSerialDriver.kext/Contents/Info.plist
Find and delete the following lines:
<key>FT2232H_B</key>
<dict>
    <key>CFBundleIdentifier</key>
    <string>com.FTDI.driver.FTDIUSBSerialDriver</string>
    <key>IOClass</key>
    <string>FTDIUSBSerialDriver</string>
    <key>IOProviderClass</key>
    <string>IOUSBInterface</string>
    <key>bConfigurationValue</key>
    <integer>1</integer>
    <key>bInterfaceNumber</key>
    <integer>1</integer>
    <key>bcdDevice</key>
    <integer>1792</integer>
    <key>idProduct</key>
    <integer>24592</integer>
    <key>idVendor</key>
    <integer>1027</integer>
</dict>
Save and close the file
Disable driver signature verification:
Open Apple logo menu, choose “Restart…”
When you hear the chime after reboot, press CMD+R immediately
Once Recovery mode starts up, open Terminal
Run the command:
csrutil enable --without kext
Restart again
After these steps, serial port and JTAG can be used at the same time.
To carry on with debugging environment setup, proceed to section Run OpenOCD.