Installing
This guide will show how to install the Arduino-ESP32 support.
Before Installing
We recommend you install the support using your favorite IDE, but other options are available depending on your operating system. To install Arduino-ESP32 support, you can use one of the following options.
Installing using Arduino IDE
This is the way to install Arduino-ESP32 directly from the Arduino IDE.
Note
For overview of SoC’s support, take a look on Supported Soc’s table where you can find if the particular chip is under stable or development release.
Stable release link:
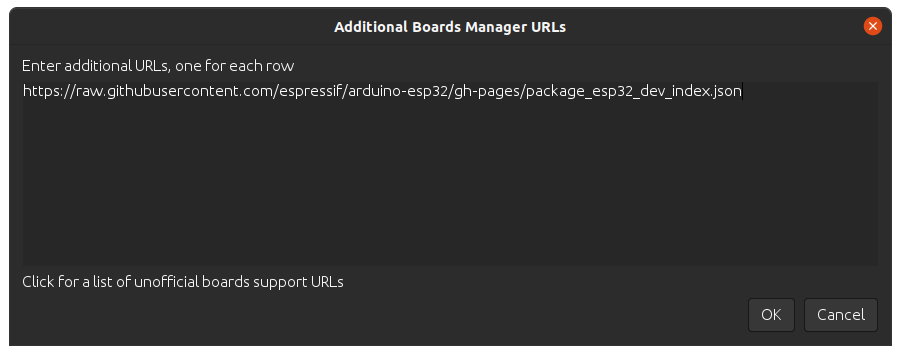
https://espressif.github.io/arduino-esp32/package_esp32_index.json
Development release link:
https://espressif.github.io/arduino-esp32/package_esp32_dev_index.json
Note
Starting with the Arduino IDE version 1.6.4, Arduino allows installation of third-party platform packages using Boards Manager. We have packages available for Windows, macOS, and Linux.
To start the installation process using the Boards Manager, follow these steps:
Install the current upstream Arduino IDE at the 1.8 level or later. The current version is at the arduino.cc website.
Start Arduino and open the Preferences window.
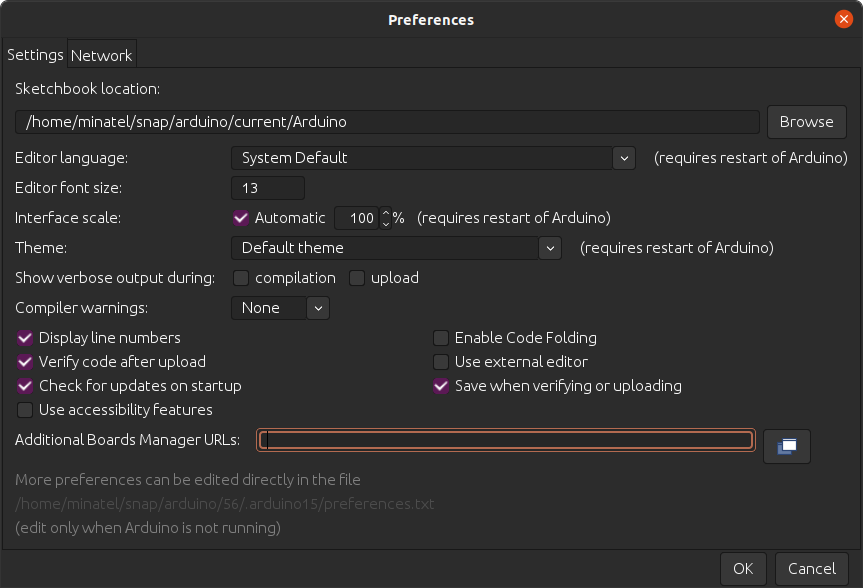
Enter one of the release links above into Additional Board Manager URLs field. You can add multiple URLs, separating them with commas.
Open Boards Manager from Tools > Board menu and install esp32 platform (and do not forget to select your ESP32 board from Tools > Board menu after installation).

Restart Arduino IDE.
Installing using PlatformIO
PlatformIO is a professional collaborative platform for embedded development. It has out-of-the-box support for ESP32 SoCs and allows working with Arduino ESP32 as well as ESP-IDF from Espressif without changing your development environment. PlatformIO includes lots of instruments for the most common development tasks such as debugging, unit testing, and static code analysis.
Warning
Integration of the Arduino Core ESP32 project in PlatformIO is maintained by PlatformIO developers. Arduino Core ESP32 Project Team cannot support PlatformIO-specific issues. Please report these issues in official PlatformIO repositories.
A detailed overview of the PlatformIO ecosystem and its philosophy can be found in the official documentation.
PlatformIO can be used in two flavors:
PlatformIO IDE is a toolset for embedded C/C++ development available on Windows, macOS and Linux platforms
PlatformIO Core (CLI) is a command-line tool that consists of a multi-platform build system, platform and library managers and other integration components. It can be used with a variety of code development environments and allows integration with cloud platforms and web services
To install PlatformIO, you can follow this Getting Started, provided at docs.platformio.org.
Using the stable code
Note
A detailed overview of supported development boards, examples and frameworks can be found on the official Espressif32 dev-platform page in the PlatformIO Registry.
The most reliable and easiest way to get started is to use the latest stable version of the ESP32 development platform that passed all tests/verifications and can be used in production.
Create a new project and select one of the available boards. You can change after by changing the platformio.ini file.
For ESP32
[env:esp32dev]
platform = espressif32
board = esp32dev
framework = arduino
For ESP32-S2 (ESP32-S2-Saola-1 board)
[env:esp32-s2-saola-1]
platform = espressif32
board = esp32-s2-saola-1
framework = arduino
For ESP32-C3 (ESP32-C3-DevKitM-1 board)
[env:esp32-c3-devkitm-1]
platform = espressif32
board = esp32-c3-devkitm-1
framework = arduino
How to update to the latest code
To test the latest Arduino ESP32, you need to change your project platformio.ini accordingly. The following configuration uses the upstream version of the Espressif development platform and the latest Arduino core directly from the Espressif GitHub repository:
[env:esp32-c3-devkitm-1]
platform = https://github.com/platformio/platform-espressif32.git
board = esp32-c3-devkitm-1
framework = arduino
platform_packages =
    framework-arduinoespressif32 @ https://github.com/espressif/arduino-esp32#master
To get more information about PlatformIO, see the following links:
Windows (manual installation)
Warning
Arduino ESP32 core v2.x.x cannot be used on Windows 8.x x86 (32 bits), Windows 7 or earlier. The Windows 32 bits OS is no longer supported by this toolchain.
The Arduino ESP32 v1.0.6 still works on WIN32. You might want to install python 3.8.x because it is the latest release supported by Windows 7.
Steps to install Arduino ESP32 support on Windows:
Step 1
Download and install the latest Arduino IDE
Windows Installerfrom [arduino.cc](https://www.arduino.cc/en/Main/Software)Download and install Git from [git-scm.com](https://git-scm.com/download/win)
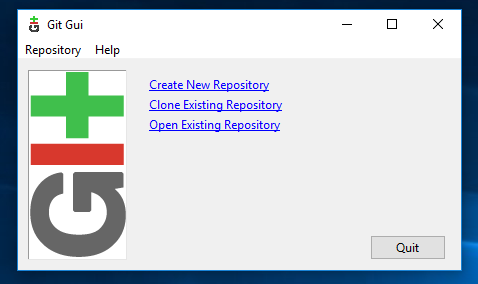
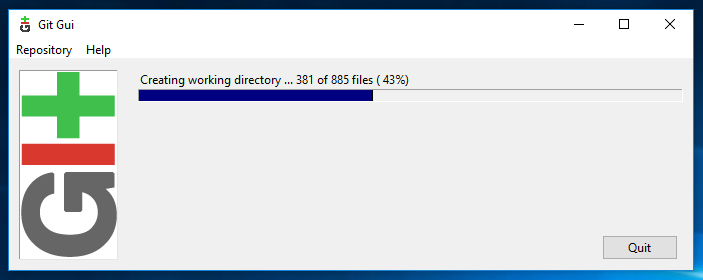
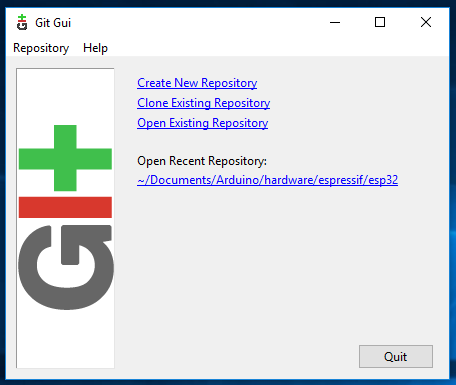
Start
Git GUIand do the following steps:
Select
Clone Existing Repository
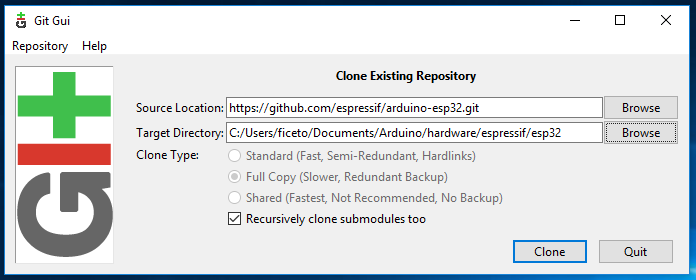
- Select source and destination
Sketchbook Directory: Usually
C:/Users/[YOUR_USER_NAME]/Documents/Arduinoand is listed underneath the “Sketchbook location” in Arduino preferences.Source Location:
https://github.com/espressif/arduino-esp32.gitTarget Directory:
[ARDUINO_SKETCHBOOK_DIR]/hardware/espressif/esp32Click
Cloneto start cloning the repository
Step 2
Step 3
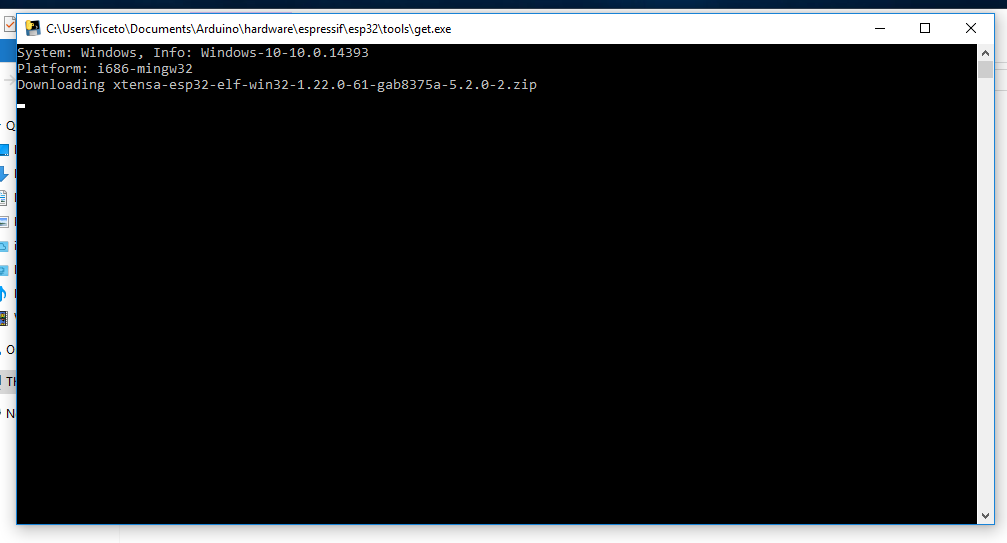
open a Git Bash session pointing to
[ARDUINO_SKETCHBOOK_DIR]/hardware/espressif/esp32and execute`git submodule update --init --recursive`Open
[ARDUINO_SKETCHBOOK_DIR]/hardware/espressif/esp32/toolsand double-clickget.exe
Step 4
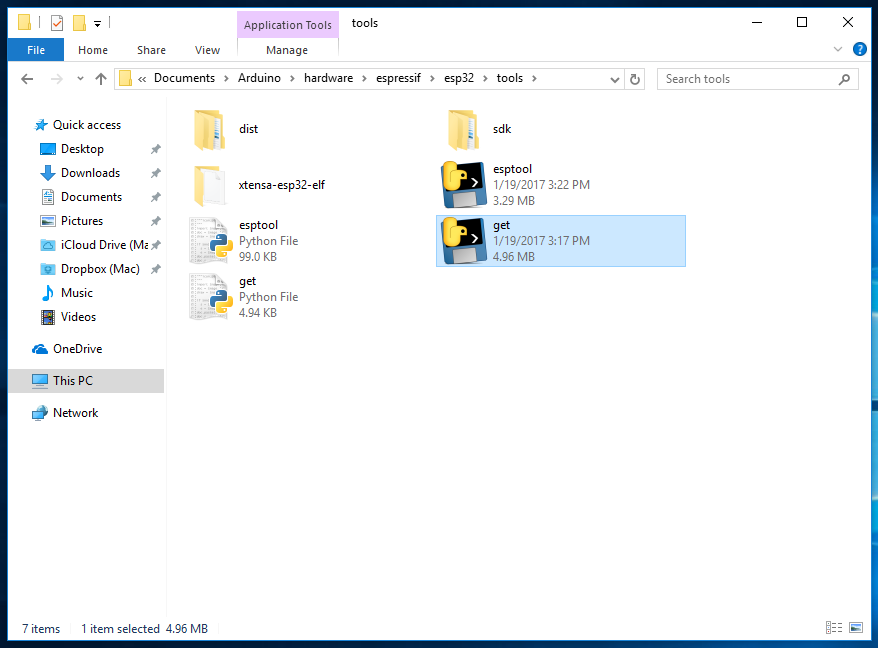
When
`get.exe`finishes, you should see the following files in the directory
Step 5
Plug your ESP32 board and wait for the drivers to install (or install manually any that might be required)
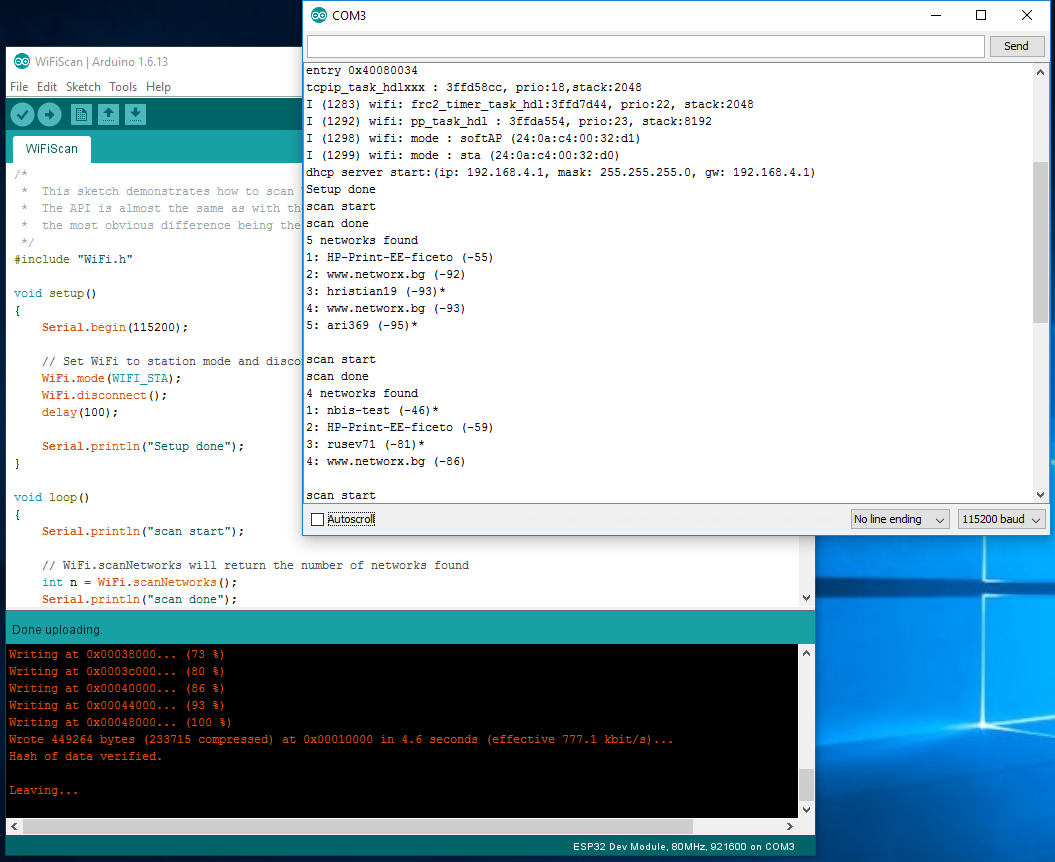
Start Arduino IDE
Select your board in
Tools > BoardmenuSelect the COM port that the board is attached to
Compile and upload (You might need to hold the boot button while uploading)
How to update to the latest code
Start
Git GUIand you should see the repository underOpen Recent Repository. Click on it!
From menu
RemoteselectFetch from>origin
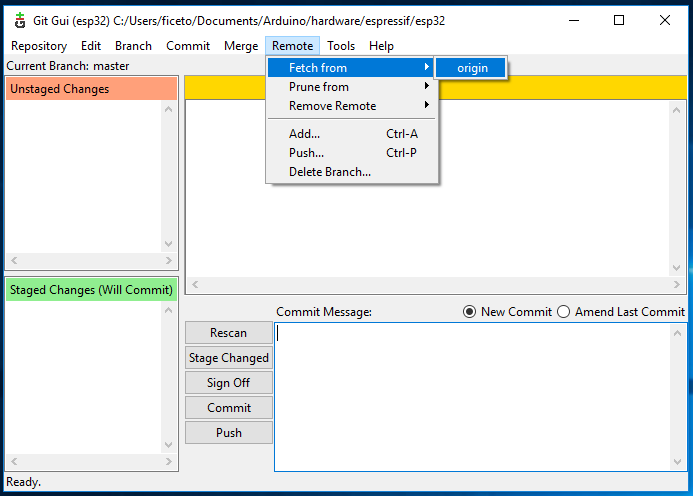
Wait for git to pull any changes and close
Git GUIOpen
[ARDUINO_SKETCHBOOK_DIR]/hardware/espressif/esp32/toolsand double-clickget.exe
Linux
Debian/Ubuntu
Install latest Arduino IDE from arduino.cc.
Open Terminal and execute the following command (copy -> paste and hit enter):
sudo usermod -a -G dialout $USER && \
sudo apt-get install git && \
wget https://bootstrap.pypa.io/get-pip.py && \
sudo python3 get-pip.py && \
sudo pip3 install pyserial && \
mkdir -p ~/Arduino/hardware/espressif && \
cd ~/Arduino/hardware/espressif && \
git clone https://github.com/espressif/arduino-esp32.git esp32 && \
cd esp32/tools && \
python3 get.py
Restart Arduino IDE.
If you have Arduino installed to ~/, modify the installation as follows, beginning at mkdir -p ~/Arduino/hardware:
cd ~/Arduino/hardware
mkdir -p espressif && \
cd espressif && \
git clone https://github.com/espressif/arduino-esp32.git esp32 && \
cd esp32/tools && \
python3 get.py
Fedora
Install the latest Arduino IDE from arduino.cc.
Note
Command $ sudo dnf -y install arduino will most likely install an older release.
Open Terminal and execute the following command (copy -> paste and hit enter):
sudo usermod -a -G dialout $USER && \
sudo dnf install git python3-pip python3-pyserial && \
mkdir -p ~/Arduino/hardware/espressif && \
cd ~/Arduino/hardware/espressif && \
git clone https://github.com/espressif/arduino-esp32.git esp32 && \
cd esp32/tools && \
python get.py
Restart Arduino IDE.
openSUSE
Install the latest Arduino IDE from arduino.cc.
Open Terminal and execute the following command (copy -> paste and hit enter):
sudo usermod -a -G dialout $USER && \
if [ `python --version 2>&1 | grep '2.7' | wc -l` = "1" ]; then \
sudo zypper install git python-pip python-pyserial; \
else \
sudo zypper install git python3-pip python3-pyserial; \
fi && \
mkdir -p ~/Arduino/hardware/espressif && \
cd ~/Arduino/hardware/espressif && \
git clone https://github.com/espressif/arduino-esp32.git esp32 && \
cd esp32/tools && \
python get.py
Restart Arduino IDE.
macOS
Install the latest Arduino IDE from arduino.cc.
Open Terminal and execute the following command (copy -> paste and hit enter):
mkdir -p ~/Documents/Arduino/hardware/espressif && \
cd ~/Documents/Arduino/hardware/espressif && \
git clone https://github.com/espressif/arduino-esp32.git esp32 && \
cd esp32/tools && \
python get.py
Where ~/Documents/Arduino represents your sketch book location as per “Arduino” > “Preferences” > “Sketchbook location” (in the IDE once started). Adjust the command above accordingly.
If you get the error below, install through the command line dev tools with xcode-select –install and try the command above again:
xcrun: error: invalid active developer path (/Library/Developer/CommandLineTools), missing xcrun at: /Library/Developer/CommandLineTools/usr/bin/xcrun
Run the command:
xcode-select --install
Try
python3instead ofpythonif you get the error:IOError: [Errno socket error] [SSL: TLSV1_ALERT_PROTOCOL_VERSION] tlsv1 alert protocol version (_ssl.c:590)when runningpython get.pyIf you get the following error when running
python get.pyurllib.error.URLError: <urlopen error SSL: CERTIFICATE_VERIFY_FAILED, go to Macintosh HD > Applications > Python3.6 folder (or any other python version), and run the following scripts: Install Certificates.command and Update Shell Profile.commandRestart Arduino IDE.