ESP-IDF Tests with Pytest Guide
ESP-IDF provides a variety of testing mechanisms that runs directly on target ESP chips (referred to as target test). These target tests are typically integrated into an ESP-IDF project specifically designed for testing purposes (known as a test app). Similar to standard ESP-IDF projects, test apps follow the same build, flash, and monitoring procedures.
In target testing, a connected host (for instance, a PC) is typically required to trigger specific test cases, provide test data, and evaluate test results.
On the host side, ESP-IDF employs the pytest framework (alongside certain pytest plugins) to automate target testing. This guide delves into pytest in ESP-IDF, covering the following aspects:
Common concepts in ESP-IDF target testing.
Using the pytest framework in Python scripts for target testing automation.
ESP-IDF Continuous Integration (CI) target testing workflow.
Running target tests locally using pytest.
pytest tips and tricks.
Note
In ESP-IDF, we use the following pytest plugins by default:
pytest-embedded with default services
esp,idf
All the concepts and usages introduced in this guide are based on the default behavior of these plugins, thus may not be available in vanilla pytest.
Important
This guide specifically targets ESP-IDF contributors. Some of the concepts, like the custom markers, may not be directly applicable to personal projects using the ESP-IDF SDK. For running pytest-embedded in personal projects, please refer to pytest-embedded documentation, and explore the provided examples.
Installation
All basic dependencies could be installed by running the ESP-IDF install script with the --enable-ci argument:
$ install.sh --enable-ci
Additional test script specific dependencies could be installed separately by running the ESP-IDF install script with the --enable-test-specific argument:
$ install.sh --enable-test-specific
Several mechanisms have been implemented to ensure the successful execution of the installation processes. If you encounter any issues during installation, please submit an issue report to our GitHub issue tracker.
Common Concepts
A test app is a set of binaries which are built from an IDF project that is used to test a particular feature of your project. Test apps are usually located under ${IDF_PATH}/examples, ${IDF_PATH}/tools/test_apps, and ${IDF_PATH}/components/<COMPONENT_NAME>/test_apps.
A Device under test (DUT) is a set of ESP chip(s) which connect to a host (e.g., a PC). The host is responsible for flashing the apps to the DUT, triggering the test cases, and inspecting the test results.
A typical ESP-IDF project that contains a pytest script will have the following structure:
.
└── my_app/
    ├── main/
    │   └── ...
    ├── CMakeLists.txt
    └── pytest_foo.py
Sometimes, for some multi-dut tests, one test case requires multiple test apps. In this case, the test app folder structure would be like this:
.
├── my_app_foo/
│   ├── main/
│   │   └── ...
│   └── CMakeLists.txt
├── my_app_bar/
│   ├── main/
│   │   └── ...
│   └── CMakeLists.txt
└── pytest_foo_bar.py
pytest in ESP-IDF
Single DUT Test Cases
Getting Started
@pytest.mark.parametrize('target', [
    'esp32',
    'esp32s2',
], indirect=True)
@pytest.mark.generic
def test_hello_world(dut) -> None:
    dut.expect('Hello world!')
This is a simple test script that could run with the ESP-IDF getting-started example get-started/hello_world.
In this test script, the @pytest.mark.parametrize decorator is used to parameterize the test case. The target parameter is a special parameter that indicates the target board type. The indirect=True argument indicates that this parameter is pre-calculated before other fixtures.
Next is the environment marker. The @pytest.mark.generic marker indicates that this test case should run on the generic board type.
Note
For the detailed explanation of the environment markers, please refer to env_markers definition
Finally, we have the test function. With a dut fixture. In single-dut test cases, the dut fixture is an instance of IdfDut class, for multi-dut test cases, it is a tuple of IdfDut instances. For more details regarding the IdfDut class, please refer to pytest-embedded IdfDut API reference.
Same App With Different sdkconfig Files
For some test cases, you may need to run the same app with different sdkconfig files. For detailed documentation regarding sdkconfig related concepts, please refer to idf-build-apps Documentation.
Here's a simple example that demonstrates how to run the same app with different sdkconfig files. Assume we have the following folder structure:
.
└── my_app/
    ├── main/
    │   └── ...
    ├── CMakeLists.txt
    ├── sdkconfig.ci.foo
    ├── sdkconfig.ci.bar
    └── pytest_foo.py
If the test case needs to run all supported targets with these two sdkconfig files, you can use the following code:
@pytest.mark.parametrize('target', [
    'esp32',                            # <-- run with esp32 target
    'esp32s2',                          # <-- run with esp32s2 target
], indirect=True)
@pytest.mark.parametrize('config', [    # <-- parameterize the sdkconfig file
    'foo',                              # <-- run with sdkconfig.ci.foo
    'bar',                              # <-- run with sdkconfig.ci.bar
], indirect=True)                       # <-- `indirect=True` is required, indicates this param is pre-calculated before other fixtures
def test_foo_bar(dut, config) -> None:
    if config == 'foo':
      dut.expect('This is from sdkconfig.ci.foo')
    elif config == 'bar':
      dut.expect('This is from sdkconfig.ci.bar')
All markers will impact the test case simultaneously. Overall, this test function would be replicated to 4 test cases:
test_foo_bar, with esp32 target, andsdkconfig.ci.fooas the sdkconfig filetest_foo_bar, with esp32 target, andsdkconfig.ci.baras the sdkconfig filetest_foo_bar, with esp32s2 target, andsdkconfig.ci.fooas the sdkconfig filetest_foo_bar, with esp32s2 target, andsdkconfig.ci.baras the sdkconfig file
Sometimes in the test script or the log file, you may see the following format:
esp32.foo.test_foo_baresp32.bar.test_foo_baresp32s2.foo.test_foo_baresp32s2.bar.test_foo_bar
We call this format the test case ID. The test case ID should be considered as the unique identifier of a test case. It is composed of the following parts:
esp32: the target namefoo: the config nametest_foo_bar: the test function name
The test case ID is used to identify the test case in the JUnit report.
Note
Nearly all the CLI options of pytest-embedded supports parameterization. To see all supported CLI options, you may run pytest --help and check the embedded-... sections for vanilla pytest-embedded ones, and the idf sections for ESP-IDF specific ones.
Same App With Different sdkconfig Files, Different Targets
For some test cases, you may need to run the same app with different sdkconfig files. These sdkconfig files supports different targets. We may use pytest.param to achieve this. Let's use the same folder structure as above.
@pytest.mark.parametrize('config, target', [
    pytest.param('foo', 'esp32'),
    pytest.param('bar', 'esp32s2'),
], indirect=True)
Now this test function would be replicated to 2 test cases (represented as test case IDs):
esp32.foo.test_foo_baresp32s2.bar.test_foo_bar
Testing Serial Output (Expecting)
To ensure that test has executed successfully on target, the test script can test that serial output of the target using the dut.expect() function, for example:
def test_hello_world(dut) -> None:
    dut.expect('\d+')  # <-- `expect`ing from a regex
    dut.expect_exact('Hello world!')  # <-- `expect_exact`ly the string
The dut.expect(...) will first compile the expected string into regex, which in turn is then used to seek through the serial output until the compiled regex is matched, or until a timeout occurs.
Please pay extra attention to the expected string when it contains regex keyword characters (e.g., parentheses, square brackets). Alternatively, you may use dut.expect_exact(...) that will attempt to match the string without converting it into regex.
For more information regarding the different types of expect functions, please refer to the pytest-embedded Expecting documentation.
Multi-DUT Test Cases
Multi-Target Tests with the Same App
In some cases a test may involve multiple targets running the same test app. Parameterize count to the number of DUTs you want to test with.
@pytest.mark.parametrize('count', [
    2,
], indirect=True)
@pytest.mark.parametrize('target', [
  'esp32|esp32s2',
  'esp32s3',
], indirect=True)
def test_hello_world(dut) -> None:
    dut[0].expect('Hello world!')
    dut[1].expect('Hello world!')
The | symbol in all parameterized items is used for separating the settings for each DUT. In this example, the test case would be tested with:
esp32, esp32s2
esp32s3, esp32s3
After setting the param count to 2, all the fixtures are changed into tuples.
Important
count is mandatory for multi-DUT tests.
Note
For detailed multi-dut parametrization documentation, please refer to pytest-embedded Multi-DUT documentation.
Multi-Target Tests with Different Apps
In some cases, a test may involve multiple targets running different test apps (e.g., separate targets to act as master and slave). Usually in ESP-IDF, the folder structure would be like this:
.
├── master/
│   ├── main/
│   │   └── ...
│   └── CMakeLists.txt
├── slave/
│   ├── main/
│   │   └── ...
│   └── CMakeLists.txt
└── pytest_master_slave.py
In this case, we can parameterize the app_path to the path of the test apps you want to test with.
@pytest.mark.multi_dut_generic
@pytest.mark.parametrize('count', [
    2,
], indirect=True)
@pytest.mark.parametrize('app_path, target', [
    (f'{os.path.join(os.path.dirname(__file__), "master")}|{os.path.join(os.path.dirname(__file__), "slave")}', 'esp32|esp32s2'),
    (f'{os.path.join(os.path.dirname(__file__), "master")}|{os.path.join(os.path.dirname(__file__), "slave")}', 'esp32s2|esp32'),
], indirect=True)
def test_master_slave(dut) -> None:
    master = dut[0]
    slave = dut[1]

    master.write('Hello world!')
    slave.expect_exact('Hello world!')
Note
When parametrizing two items, like app_path, target here, make sure you're passing a list of tuples to the parametrize decorator. Each tuple should contain the values for each item.
The test case here will be replicated to 2 test cases:
dut-0, an ESP32, running app
master, and dut-1, an ESP32-S2, running appslavedut-0, an ESP32-S2, running app
master, and dut-1, an ESP32, running appslave
Test Cases with Unity Test Framework
We use the Unity test framework in our unit tests. Overall, we have three types of test cases (Unity test framework):
Normal test cases (single DUT)
Multi-stage test cases (single DUT)
Multi-device test cases (multi-DUT)
All single-DUT test cases (including normal test cases and multi-stage test cases) can be run using the following command:
def test_unity_single_dut(dut: IdfDut):
    dut.run_all_single_board_cases()
Using this command will skip all the test cases containing the [ignore] tag.
If you need to run a group of test cases, you may run:
def test_unity_single_dut(dut: IdfDut):
    dut.run_all_single_board_cases(group='psram')
It would trigger all test cases with the [psram] tag.
If you need to run all test cases except for a specific groups, you may run:
def test_unity_single_dut(dut: IdfDut):
    dut.run_all_single_board_cases(group='!psram')
This code will trigger all test cases except those with the [psram] tag.
If you need to run a group of test cases filtered by specific attributes, you may run:
def test_rtc_xtal32k(dut: Dut) -> None:
    dut.run_all_single_board_cases(attributes={'test_env': 'xtal32k'})
This command will trigger all tests with the attribute test_env equal to xtal32k.
If you need to run tests by specific names, you may run:
def test_dut_run_all_single_board_cases(dut):
    dut.run_all_single_board_cases(name=["normal_case1", "multiple_stages_test"])
This command will trigger normal_case1 and multiple_stages_test
We also provide a fixture case_tester to trigger all kinds of test cases easier. For example:
def test_unity_single_dut(case_tester):
    case_tester.run_all_normal_cases()       # to run all normal test cases
    case_tester.run_all_multi_dev_cases()    # to run all multi-device test cases
    case_tester.run_all_multi_stage_cases()  # to run all multi-stage test cases
For a full list of the available functions, please refer to pytest-embedded case_tester API reference.
Running Target Tests in CI
The workflow in CI is as follows:
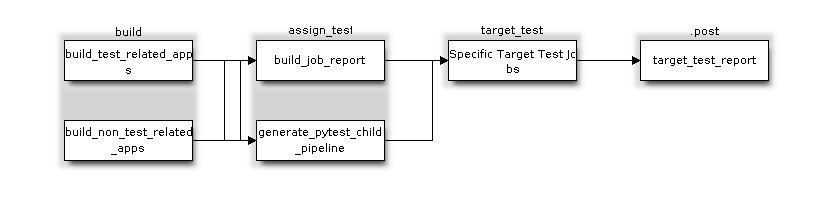
Target Test Child Pipeline Workflow
All build jobs and target test jobs are generated automatically by our CI script tools/ci/dynamic_pipelines.
Build Jobs
In CI, all ESP-IDF projects under components, examples, and tools/test_apps, are built with all supported targets and sdkconfig files. The binaries are built under build_<target>_<config>. For example
.
├── build_esp32_history/
│   └── ...
├── build_esp32_nohistory/
│   └── ...
├── build_esp32s2_history/
│   └── ...
├── ...
├── main/
├── CMakeLists.txt
├── sdkconfig.ci.history
├── sdkconfig.ci.nohistory
└── ...
There are two types of build jobs, build_test_related_apps and build_non_test_related_apps.
For build_test_related_apps, all the built binaries will be uploaded to our internal MinIO server. You may find the download link in the build report posted in the internal MR.
For build_non_test_related_apps, all the built binaries will be removed after the build job is finished. Only the build log files will be uploaded to our internal MinIO server. You may also find the download link in the build report posted in the internal MR.
Target Test Jobs
In CI, all generated target test jobs are named according to the pattern "<targets> - <env_markers>". For example, single-dut test job esp32 - generic, or multi-dut test job esp32,esp32 - multi_dut_generic.
The binaries in the target test jobs are downloaded from our internal MinIO servers. For most of the test cases, only the files that are required by flash (like .bin files, flash_args files, etc) would be downloaded. For some test cases, like jtag test cases, .elf files are also downloaded.
Running Tests Locally
Installation
First you need to install ESP-IDF with additional Python requirements:
$ cd $IDF_PATH
$ bash install.sh --enable-ci
$ . ./export.sh
Build Directories
By default, each test case looks for the required binary files in the following directories (in order):
Directory set by
--build-dircommand line argument, if specified.build_<target>_<sdkconfig>build_<target>build_<sdkconfig>build
As long as one of the above directories exists, the test case uses that directory to flash the binaries. If none of the above directories exists, the test case fails with an error.
Test Your Test Script
Single-DUT Test Cases With sdkconfig.defaults
This is the simplest use case. Let's take examples/get-started/hello_world as an example. Assume we're testing with a ESP32 board.
$ cd $IDF_PATH/examples/get-started/hello_world
$ idf.py set-target esp32 build
$ pytest --target esp32
Single-DUT Test Cases With sdkconfig.ci.xxx
Some test cases may need to run with different sdkconfig files. Let's take examples/system/console/basic as an example. Assume we're testing with a ESP32 board, and test with sdkconfig.ci.history.
$ cd $IDF_PATH/examples/system/console/basic
$ idf.py -DSDKCONFIG_DEFAULTS='sdkconfig.defaults;sdkconfig.ci.history' -B build_esp32_history set-target esp32 build
$ pytest --target esp32 -k "not nohistory"
Note
Here if we use pytest --target esp32 -k history, both test cases will be selected, since pytest -k will use string matching to filter the test cases.
If you want to build and test with all sdkconfig files at the same time, you should use our CI script as an helper script:
$ cd $IDF_PATH/examples/system/console/basic
$ idf-ci build run --target esp32 --only-test-related
$ pytest --target esp32
The app with sdkconfig.ci.history will be built in build_esp32_history, and the app with sdkconfig.ci.nohistory will be built in build_esp32_nohistory. pytest --target esp32 will run tests on both apps.
Multi-DUT Test Cases
Some test cases may need to run with multiple DUTs. Let's take examples/openthread as an example. The test case function looks like this:
@pytest.mark.parametrize(
    'config, count, app_path, target', [
        ('rcp|cli_h2|br', 3,
         f'{os.path.join(os.path.dirname(__file__), "ot_rcp")}'
         f'|{os.path.join(os.path.dirname(__file__), "ot_cli")}'
         f'|{os.path.join(os.path.dirname(__file__), "ot_br")}',
         'esp32c6|esp32h2|esp32s3'),
    ],
    indirect=True,
)
def test_thread_connect(dut:Tuple[IdfDut, IdfDut, IdfDut]) -> None:
    ...
The test cases will run with
ESP32-C6, flashed with
ot_rcpESP32-H2, flashed with
ot_cliESP32-S3, flashed with
ot_br
Of course we can build the required binaries manually, but we can also use our CI script as an helper script:
$ cd $IDF_PATH/examples/openthread
$ idf-ci build run --only-test-related -k test_thread_connect
$ pytest -k test_thread_connect
Important
It is mandatory to list all the targets for multi-DUT test cases. Otherwise, the test case would fail with an error.
Debug CI Test Cases
Sometimes you can't reproduce the CI test case failure locally. In this case, you may need to debug the test case with the binaries built in CI.
Run pytest with --pipeline-id <pipeline_id> to force pytest to download the binaries from CI. For example:
$ cd $IDF_PATH/examples/get-started/hello_world
$ pytest --target esp32 --pipeline-id 123456
Even if you have build_esp32_default, or build directory locally, pytest would still download the binaries from pipeline 123456 and place the binaries in build_esp32_default. Then run the test case with this binary.
Note
<pipeline_id> should be the parent pipeline id. You can copy it in your MR page.
Pytest Tips & Tricks
Custom Classes
Usually, you may want to write a custom class under these conditions:
Add more reusable functions for a certain number of DUTs.
Add custom setup and teardown functions
This code example is taken from panic/conftest.py .
class PanicTestDut(IdfDut):
    ...

@pytest.fixture(scope='module')
def monkeypatch_module(request: FixtureRequest) -> MonkeyPatch:
    mp = MonkeyPatch()
    request.addfinalizer(mp.undo)
    return mp


@pytest.fixture(scope='module', autouse=True)
def replace_dut_class(monkeypatch_module: MonkeyPatch) -> None:
    monkeypatch_module.setattr('pytest_embedded_idf.dut.IdfDut', PanicTestDut)
monkeypatch_module provides a module-scoped monkeypatch fixture.
replace_dut_class is a module-scoped autouse fixture. This function replaces the IdfDut class with your custom class.
Mark Flaky Tests
Certain test cases are based on Ethernet or Wi-Fi. However, the test may be flaky due to networking issues. Thus, it is possible to mark a particular test case as flaky.
This code example is taken from pytest_esp_eth.py .
@pytest.mark.flaky(reruns=3, reruns_delay=5)
def test_esp_eth_ip101(dut: IdfDut) -> None:
    ...
This flaky marker means that if the test function failed, the test case would rerun for a maximum of 3 times with 5 seconds delay.
Mark Known Failures
Sometimes, a test can consistently fail for the following reasons:
The feature under test (or the test itself) has a bug.
The test environment is unstable (e.g., due to network issues) leading to a high failure ratio.
Now you may mark this test case with marker xfail with a user-friendly readable reason.
This code example is taken from pytest_panic.py
@pytest.mark.xfail('config.getvalue("target") == "esp32s2"', reason='raised IllegalInstruction instead')
def test_cache_error(dut: PanicTestDut, config: str, test_func_name: str) -> None:
This marker means that test is a known failure on the ESP32-S2.
Mark Nightly Run Test Cases
Some test cases are only triggered in nightly run pipelines due to a lack of runners.
@pytest.mark.nightly_run
This marker means that the test case would only be run with env var NIGHTLY_RUN or INCLUDE_NIGHTLY_RUN.
Mark Temporarily Disabled in CI
Some test cases which can pass locally may need to be temporarily disabled in CI due to a lack of runners.
@pytest.mark.temp_skip_ci(targets=['esp32', 'esp32s2'], reason='lack of runners')
This marker means that the test case could still be run locally with pytest --target esp32, but will not run in CI.
Add New Markers
We currently use two types of custom markers. The target marker indicates which target chips the test case supports, and the env marker specifies that the test case should be assigned to a CI runner with the corresponding tag.
You can add new markers by adding one line under the pytest.ini. If it is a marker that specifies a type of test environment, it should be added into env_markers section. Otherwise, it should be added into markers section. The syntax should be: <marker_name>: <marker_description>.
Skip Auto Flash Binary
Skipping auto-flash binary every time would be useful when you are debugging your test script.
You can call pytest with --skip-autoflash y to achieve it.
Record Statistics
Sometimes you may need to record some statistics while running the tests, like the performance test statistics.
You can use record_xml_attribute fixture in your test script, and the statistics would be recorded as attributes in the JUnit report.
Logging System
Sometimes you may need to add some extra logging lines while running the test cases.
You can use Python logging module to achieve this.
Here are some logging functions provided as fixtures,
log_performance
def test_hello_world(
    dut: IdfDut,
    log_performance: Callable[[str, object], None],
) -> None:
    log_performance('test', 1)
The above example would log the performance item with pre-defined format: [performance][test]: 1 and record it under the properties tag in the JUnit report if --junitxml <filepath> is specified. The JUnit test case node would look like:
<testcase classname="examples.get-started.hello_world.pytest_hello_world" file="examples/get-started/hello_world/pytest_hello_world.py" line="13" name="esp32.default.test_hello_world" time="8.389">
    <properties>
        <property name="test" value="1"/>
    </properties>
</testcase>
check_performance
We provide C macros TEST_PERFORMANCE_LESS_THAN and TEST_PERFORMANCE_GREATER_THAN to log the performance item and check if the value is in the valid range. Sometimes the performance item value could not be measured in C code, so we also provide a Python function for the same purpose. Please note that using C macros is the preferred approach, since the Python function could not recognize the threshold values of the same performance item under different #ifdef blocks well.
def test_hello_world(
    dut: IdfDut,
    check_performance: Callable[[str, float, str], None],
) -> None:
    check_performance('RSA_2048KEY_PUBLIC_OP', 123, 'esp32')
    check_performance('RSA_2048KEY_PUBLIC_OP', 19001, 'esp32')
The above example would first get the threshold values of the performance item RSA_2048KEY_PUBLIC_OP from components/idf_test/include/idf_performance.h and the target-specific one components/idf_test/include/esp32/idf_performance_target.h, then check if the value reached the minimum limit or exceeded the maximum limit.
Let us assume the value of IDF_PERFORMANCE_MAX_RSA_2048KEY_PUBLIC_OP is 19000. so the first check_performance line would pass and the second one would fail with warning: [Performance] RSA_2048KEY_PUBLIC_OP value is 19001, doesn\'t meet pass standard 19000.0.