Documenting Code
The purpose of this description is to provide quick summary on documentation style used in espressif/esp-idf repository and how to add new documentation.
Introduction
When documenting code for this repository, please follow Doxygen style. You are doing it by inserting special commands, for instance @param, into standard comments blocks, for example:
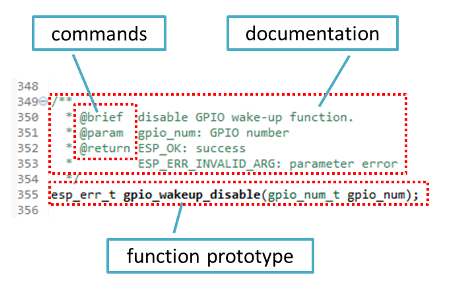
/**
 * @param ratio this is oxygen to air ratio
 */
Doxygen is phrasing the code, extracting the commands together with subsequent text, and building documentation out of it.
Typical comment block, that contains documentation of a function, looks like below.
Doxygen supports couple of formatting styles. It also gives you great flexibility on level of details to include in documentation. To get familiar with available features, please check data rich and very well organized Doxygen Manual.
Why we need it?
The ultimate goal is to ensure that all the code is consistently documented, so we can use tools like Sphinx and Breathe to aid preparation and automatic updates of API documentation when the code changes.
With these tools the above piece of code renders like below:

Go for it!
When writing code for this repository, please follow guidelines below.
Document all building blocks of code: functions, structs, typedefs, enums, macros, etc. Provide enough information on purpose, functionality and limitations of documented items, as you would like to see them documented when reading the code by others.
Documentation of function should describe what this function does. If it accepts input parameters and returns some value, all of them should be explained.
Do not add a data type before parameter or any other characters besides spaces. All spaces and line breaks are compressed into a single space. If you like to break a line, then break it twice.
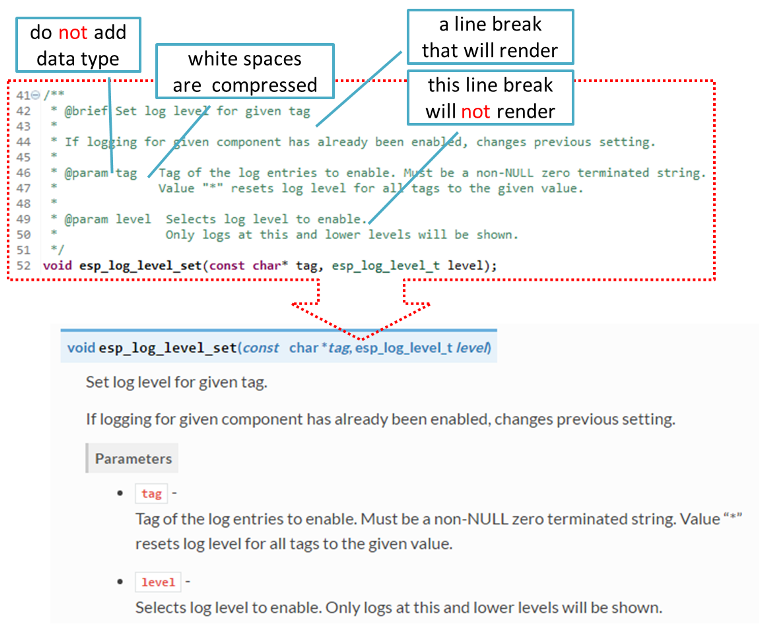
If function has void input or does not return any value, then skip
@paramor@return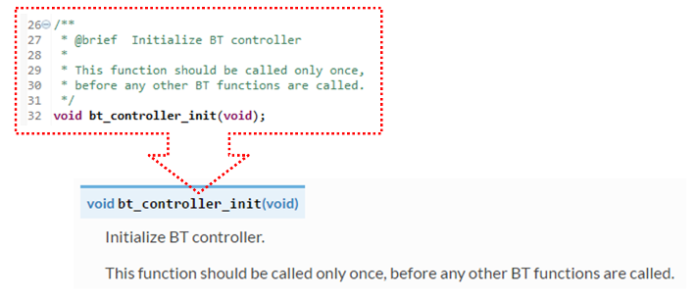
When documenting a
defineas well as members of astructorenum, place specific comment like below after each member.
To provide well formatted lists, break the line after command (like
@returnin example below).* * @return * - ESP_OK if erase operation was successful * - ESP_ERR_NVS_INVALID_HANDLE if handle has been closed or is NULL * - ESP_ERR_NVS_READ_ONLY if handle was opened as read only * - ESP_ERR_NVS_NOT_FOUND if the requested key doesn't exist * - other error codes from the underlying storage driver *
Overview of functionality of documented header file, or group of files that make a library, should be placed in the same directory in a separate
README.rstfile. If directory contains header files for different APIs, then the file name should beapiname-readme.rst.
Go one extra mile
There is couple of tips, how you can make your documentation even better and more useful to the reader.
Add code snippets to illustrate implementation. To do so, enclose snippet using
@code{c}and@endcodecommands.* * @code{c} * // Example of using nvs_get_i32: * int32_t max_buffer_size = 4096; // default value * esp_err_t err = nvs_get_i32(my_handle, "max_buffer_size", &max_buffer_size); * assert(err == ESP_OK || err == ESP_ERR_NVS_NOT_FOUND); * // if ESP_ERR_NVS_NOT_FOUND was returned, max_buffer_size will still * // have its default value. * @endcode *
The code snippet should be enclosed in a comment block of the function that it illustrates.
To highlight some important information use command
@attentionor@note.* * @attention * 1. This API only impact WIFI_MODE_STA or WIFI_MODE_APSTA mode * 2. If the ESP32 is connected to an AP, call esp_wifi_disconnect to disconnect. *
Above example also shows how to use a numbered list.
To provide common description to a group of similar functions, enclose them using
/**@{*/and/**@}*/markup commands:/**@{*/ /** * @brief common description of similar functions * */ void first_similar_function (void); void second_similar_function (void); /**@}*/
For practical example see nvs_flash/include/nvs.h.
You may want to go even further and skip some code like e.g. repetitive defines or enumerations. In such case enclose the code within
/** @cond */and/** @endcond */commands. Example of such implementation is provided in driver/include/driver/gpio.h.Use markdown to make your documentation even more readable. You will add headers, links, tables and more.
*
* [ESP32-S2 Technical Reference Manual](https://www.espressif.com/sites/default/files/documentation/esp32-s2_technical_reference_manual_en.pdf)
*
Note
Code snippets, notes, links, etc. will not make it to the documentation, if not enclosed in a comment block associated with one of documented objects.
Prepare one or more complete code examples together with description. Place description in a separate file
README.mdin specific folder of examples directory.
Linking Examples
When linking to examples on GitHub do not use absolute / hardcoded URLs. Instead, use docutils custom roles that will generate links for you. These auto-generated links point to the tree or blob for the git commit ID (or tag) of the repository. This is needed to ensure that links do not get broken when files in master branch are moved around or deleted. The roles will transparently handle files that are located in submodules and will link to the submodule’s repository with the correct commit ID.
The following roles are provided:
:idf:`path`- points to directory inside ESP-IDF:idf_file:`path`- points to file inside ESP-IDF:idf_raw:`path`- points to raw view of the file inside ESP-IDF:component:`path`- points to directory inside ESP-IDF components dir:component_file:`path`- points to file inside ESP-IDF components dir:component_raw:`path`- points to raw view of the file inside ESP-IDF components dir:example:`path`- points to directory inside ESP-IDF examples dir:example_file:`path`- points to file inside ESP-IDF examples dir:example_raw:`path`- points to raw view of the file inside ESP-IDF examples dir
Example implementation:
* :example:`get-started/hello_world`
* :example:`Hello World! <get-started/hello_world>`
How it renders:
A check is added to the CI build script, which searches RST files for presence of hard-coded links (identified by tree/master, blob/master, or raw/master part of the URL). This check can be run manually: cd docs and then make gh-linkcheck.
Linking Language Versions
Switching between documentation in different languages may be done using :link_to_translation: custom role. The role placed on a page of documentation provides a link to the same page in a language specified as a parameter. Examples below show how to enter links to Chinese and English versions of documentation:
:link_to_translation:`zh_CN:中文版`
:link_to_translation:`en:English`
The language is specified using standard abbreviations like en or zh_CN. The text after last semicolon is not standardized and may be entered depending on the context where the link is placed, e.g.:
:link_to_translation:`en:see description in English`
Add Illustrations
Consider adding diagrams and pictures to illustrate described concepts.
Sometimes it is better to add an illustration than writing a lengthy paragraph to describe a complex idea, a data structure or an algorithm. This repository is using blockdiag suite of tools to generate diagram images from simple text files.
The following types of diagrams are supported:
With this suite of tools it is possible to generate beautiful diagram images from simple text format (similar to graphviz’s DOT format). The diagram elements are laid out automatically. The diagram code is then converted into “.png” graphics and integrated “behind the scenes” into Sphinx documents.
For the diagram preparation you can use an on-line interactive shell that instantly shows the rendered image.
Below are couple of diagram examples:
Simple block diagram /
blockdiag- Wi-Fi Buffer ConfigurationSlightly more complicated block diagram - Wi-Fi programming model
Sequence diagram /
seqdiag- Scan for a Specific AP in All ChannelsPacket diagram /
packetdiag- NVS Page Structure
Try them out by modifying the source code and see the diagram instantly rendering below.
Note
There may be slight differences in rendering of font used by the interactive shell compared to the font used in the esp-idf documentation.
Add Notes
Working on a document, you might need to:
Place some suggestions on what should be added or modified in future.
Leave a reminder for yourself or somebody else to follow up.
In this case, add a todo note to your reST file using the directive .. todo::. For example:
.. todo::

   Add a package diagram.
If you add .. todolist:: to a reST file, the directive will be replaced by a list of all todo notes from the whole documentation.
By default, the directives .. todo:: and .. todolist:: are ignored by documentation builders. If you want the notes and the list of notes to be visible in your locally built documentation, do the following:
Open your local
conf_common.pyfile.Find the parameter
todo_include_todos.Change its value from
FalsetoTrue.
Before pushing your changes to origin, please set the value of todo_include_todos back to False.
For more details about the extension, see sphinx.ext.todo documentation.
Writing generic documentation for multiple chips
The documentation for all of Espressif’s chips is built from the same files. To faciliate the writing of documents that can be re-used for multiple different chips (called below “targets”), we provide you with the following functionality:
Exclusion of content based on chip-target
Occasionally there will be content that is only relevant for one of targets. When this is the case, you can exclude that content by using the ‘’.. only:: TAG’’ directive, where you replace ‘TAG’ with one of the following names:
Chip name:
esp32
esp32s2
Define identifiers from ‘sdkconfig.h’, generated by the default menuconfig settings for the target, e.g:
CONFIG_FREERTOS_UNICORE
Define identifiers from the soc ‘*_caps’ headers, e.g:
SOC_BT_SUPPORTED
SOC_CAN_SUPPORTED
Example:
.. only:: esp32

    ESP32 specific content.
This directive also supports the boolean operators ‘and’, ‘or’ and ‘not’. Example:
.. only:: SOC_BT_SUPPORTED and CONFIG_FREERTOS_UNICORE

    BT specific content only relevant for single-core targets.
This functionality is provided by the Sphinx selective exclude extension.
A weakness in this extension is that it does not correctly handle the case were you exclude a section, and that is directly followed by a labeled new section. In these cases everything will render correctly, but the label will not correctly link to the section that follows. A temporary work-around for the cases were this can’t be avoided is the following:
.. only:: esp32

    .. _section_1_label:

    Section 1
    ^^^^^^^^^

    Section one content

    .. _section_2_label:

.. only:: esp32s2

    _section_2_label:

Section 2
^^^^^^^^^
Section 2 content
The :TAG: role is used for excluding content from a table of content tree. For example:
.. toctree::
    :maxdepth: 1

    :esp32: configure-wrover
    configure-other-jtag
When building the documents, Sphinx will use the above mentioned directive and role to include or exclude content based on the target tag it was called with.
Note
If excluding an entire document from the toctree based on targets, it’s necessary to also update the exclude_patterns list in docs/conf_common.py to exclude the file for other targets, or a Sphinx warning “WARNING: document isn’t included in any toctree” will be generated..
The recommended way of doing it is adding the document to one of the list that gets included in conditional_include_dict in docs/conf_common.py, e.g. a document which should only be shown for BT capable targets should be added to BT_DOCS. docs/idf_extensions/exclude_docs.py will then take care of adding it to exclude_patterns if the corresponding tag is not set.
If you need to exclude content inside a list or bullet points then this should be done by using the ‘’:TAG:’’ role inside the ‘’.. list:: ‘’ directive.
.. list::

    :esp32: - ESP32 specific content
    :SOC_BT_SUPPORTED: - BT specific content
    - Common bullet point
    - Also common bullet point
Substitution macros
When you need to refer to the chip’s name, toolchain name, path or other common names that depend on the target type you can consider using the substitution macros supplied by docs/idf_extensions/format_idf_target.py.
For example, the following reStructuredText content:
This is a {IDF_TARGET_NAME}, with /{IDF_TARGET_PATH_NAME}/soc.c, compiled with xtensa-{IDF_TARGET_TOOLCHAIN_NAME}-elf-gcc with CONFIG_{IDF_TARGET_CFG_PREFIX}_MULTI_DOC
Would render in the documentation as:
This is a ESP32-S2, with /esp32s2/soc.c, compiled with xtensa-esp32s2-elf-gcc with CONFIG_ESP32S2_MULTI_DOC.
This extension also supports markup for defining local (within a single source file) substitutions. Place a definition like the following into a single line of the RST file:
{\IDF_TARGET_SUFFIX:default="DEFAULT_VALUE", esp32="ESP32_VALUE", esp32s2="ESP32S2_VALUE"}
This will define a target-dependent substitution of the tag {IDF_TARGET_SUFFIX} in the current RST file. For example:
{\IDF_TARGET_TX_PIN:default="IO3", esp32="IO4", esp32s2="IO5"}
Will define a substitution for the tag {IDF_TARGET_TX_PIN}, which would be replaced by the text IO5 if sphinx was called with the tag esp32s2.
Note
These single-file definitions can be placed anywhere in the .rst file (on their own line), but the name of the directive must start with IDF_TARGET_.
Put it all together
Once documentation is ready, follow instruction in API Documentation Template and create a single file, that will merge all individual pieces of prepared documentation. Finally add a link to this file to respective .. toctree:: in index.rst file located in /docs folder or subfolders.
OK, but I am new to Sphinx!
No worries. All the software you need is well documented. It is also open source and free. Start by checking Sphinx documentation. If you are not clear how to write using rst markup language, see reStructuredText Primer. You can also use markdown (.md) files, and find out about more about the specific markdown syntax that we use on Recommonmark parser’s documentation page.
Check the source files of this documentation to understand what is behind of what you see now on the screen. Sources are maintained on GitHub in espressif/esp-idf repository in docs folder. You can go directly to the source file of this page by scrolling up and clicking the link in the top right corner. When on GitHub, see what’s really inside, open source files by clicking
Rawbutton.You will likely want to see how documentation builds and looks like before posting it on the GitHub. There are two options to do so:
Install Sphinx, Breathe, Blockdiag and Doxygen to build it locally, see chapter below.
Set up an account on Read the Docs and build documentation in the cloud. Read the Docs provides document building and hosting for free and their service works really quick and great.
To preview documentation before building, use Sublime Text editor together with OmniMarkupPreviewer plugin.
Setup for building documentation locally
Install Dependencies
You can setup environment to build documentation locally on your PC by installing:
Doxygen - http://doxygen.nl/
Sphinx - https://github.com/sphinx-doc/sphinx/#readme-for-sphinx
Document theme “sphinx_idf_theme” - https://github.com/espressif/sphinx_idf_theme
Custom 404 page “sphinx-notfound-page” - https://github.com/readthedocs/sphinx-notfound-page
Blockdiag - http://blockdiag.com/en/index.html
Recommonmark - https://github.com/rtfd/recommonmark
The package “sphinx_idf_theme” is added to have the same “look and feel” of ESP-IDF Programming Guide.
Do not worry about being confronted with several packages to install. Besides Doxygen, all remaining packages are written in pure Python. Therefore installation of all of them is combined into one simple step.
Important
Docs building now supports Python 3 only. Python 2 installations will not work.
Doxygen
Installation of Doxygen is OS dependent:
Linux
sudo apt-get install doxygen
Windows - install in MSYS2 console
pacman -S doxygen
MacOS
brew install doxygen
Note
If you are installing on Windows MSYS2 system (Linux and MacOS users should skip this note, Windows users who don’t use MSYS2 will need to find other alternatives), before going further, execute two extra steps below. These steps are required to install dependencies of “blockdiag” discussed under Add Illustrations.
Update all the system packages:
$ pacman -Syu
This process will likely require restarting of the MSYS2 MINGW32 console and repeating above commands, until update is complete.
Install pillow, that is one of dependences of the blockdiag:
$ pacman -S mingw32/mingw-w64-i686-python-pillow
Check the log on the screen that
mingw-w64-i686-python-pillow-4.3.0-1or newer is installed. Previous versions of pillow will not work.
A downside of Windows installation is that fonts of the blockdiag pictures <add-illustrations> do not render correctly, you will see some random characters instead. Until this issue is fixed, you can use the interactive shell to see how the complete picture looks like.
Remaining applications
All remaining applications are Python packages and you can install them in one step as follows:
cd ~/esp/esp-idf/docs
pip install --user -r requirements.txt
Note
Installation steps assume that ESP-IDF is placed in ~/esp/esp-idf directory, that is default location of ESP-IDF used in documentation.
Building Documentation
cd ~/esp/esp-idf/docs
Now you should be ready to build documentation by invoking:
./build_docs.py build
This will build docs for all supported ESP-IDF languages & targets. This can take some time, although jobs will run in parallel up to the number of CPU cores you have (can modify this with the --sphinx-parallel-builds option, see ./build_docs.py --help for details).
To build for a single language and target combination only:
./build_docs.py -l en -t esp32 build
Choices for language (-l) are en and zh_CN. Choices for target (-t) are any supported ESP-IDF build system target (for example esp32 and esp32s2).
Build documentation will be placed in _build/<language>/<target>/html folder. To see it, open the index.html inside this directory in a web browser.
Building a subset of the documentation
Since building the full documentation can be quite slow, it might be useful to just build just the subset of the documentation you are interested in.
This can be achieved by listing the document you want to build:
./build_docs.py -l en -t esp32 -i api-reference/peripherals/can.rst build
Building multiple documents is also possible:
./build_docs.py -l en -t esp32 -i api-reference/peripherals/can.rst api-reference/peripherals/adc.rst build
As well as wildcards:
./build_docs.py -l en -t esp32 -i api-reference/peripherals/* build
Note that this is a feature intended to simply testing and debugging during writing of documentation. The HTML output won’t be perfect, i.e. it will not build a proper index that lists all the documents, and any references to documents that are not built will result in warnings.
Building PDF
It is also possible to build latex files and a PDF of the documentation using build_docs.py. To do this the following Latex packages are required to be installed:
latexmk
texlive-latex-recommended
texlive-fonts-recommended
texlive-xetex
The following fonts are also required to be installed:
Freefont Serif, Sans and Mono OpenType fonts, available as the package
fonts-freefont-otfon UbuntuLmodern, available as the package
fonts-lmodernon UbuntuFandol, can be downloaded from here
Now you can build the PDF for a target by invoking:
./build_docs.py -bs latex -l en -t esp32 build
Or alternatively build both html and PDF:
./build_docs.py -bs html latex -l en -t esp32 build
Latex files and the PDF will be placed in _build/<language>/<target>/latex folder.
Wrap up
We love good code that is doing cool things. We love it even better, if it is well documented, so we can quickly make it run and also do the cool things.
Go ahead, contribute your code and documentation!