Get Started
This document is intended to help you set up the software development environment for the hardware based on the ESP32-C3 chip by Espressif.
After that, a simple example will show you how to use ESP-IDF (Espressif IoT Development Framework) for menu configuration, then for building and flashing firmware onto an ESP32-C3 board.
Note
This is documentation for stable version v4.3 of ESP-IDF. Other ESP-IDF Versions are also available.
Introduction
ESP32-C3 is a system on a chip that integrates the following features:
Wi-Fi (2.4 GHz band)
Bluetooth Low Energy
High performance 32-bit RISC-V single-core processor
Multiple peripherals
Built-in security hardware
Powered by 40 nm technology, ESP32-C3 provides a robust, highly integrated platform, which helps meet the continuous demands for efficient power usage, compact design, security, high performance, and reliability.
Espressif provides basic hardware and software resources to help application developers realize their ideas using the ESP32-C3 series hardware. The software development framework by Espressif is intended for development of Internet-of-Things (IoT) applications with Wi-Fi, Bluetooth, power management and several other system features.
What You Need
Hardware:
An ESP32-C3 board
USB cable - USB A / micro USB B
Computer running Windows, Linux, or macOS
Software:
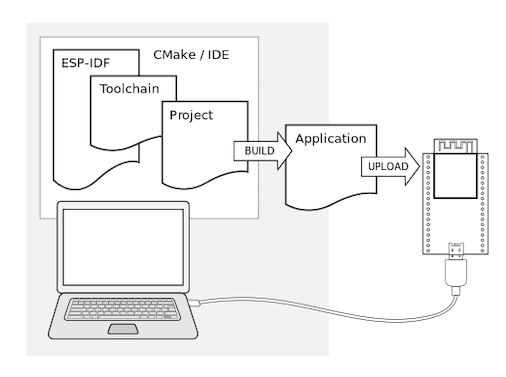
You have a choice to either download and install the following software manually
Toolchain to compile code for ESP32-C3
Build tools - CMake and Ninja to build a full Application for ESP32-C3
ESP-IDF that essentially contains API (software libraries and source code) for ESP32-C3 and scripts to operate the Toolchain
or get through the onboarding process using the following official plugins for integrated development environments (IDE) described in separate documents
Development of applications for ESP32-C3
Development Board Overviews
If you have one of ESP32-C3 development boards listed below, you can click on the link to learn more about its hardware.
Installation Step by Step
This is a detailed roadmap to walk you through the installation process.
Setting up Development Environment
Step 1. Install prerequisites
Some tools need to be installed on the computer before proceeding to the next steps. Follow the links below for the instructions for your OS:
|
|
|
Note
This guide uses the directory ~/esp on Linux and macOS or %userprofile%\esp on Windows as an installation folder for ESP-IDF. You can use any directory, but you will need to adjust paths for the commands respectively. Keep in mind that ESP-IDF does not support spaces in paths.
Step 2. Get ESP-IDF
To build applications for the ESP32-C3, you need the software libraries provided by Espressif in ESP-IDF repository.
To get ESP-IDF, navigate to your installation directory and clone the repository with git clone, following instructions below specific to your operating system.
Linux and macOS
Open Terminal, and run the following commands:
mkdir -p ~/esp
cd ~/esp
git clone -b v4.3 --recursive https://github.com/espressif/esp-idf.git
ESP-IDF will be downloaded into ~/esp/esp-idf.
Consult ESP-IDF Versions for information about which ESP-IDF version to use in a given situation.
Windows
In addition to installing the tools, ESP-IDF Tools Installer for Windows introduced in Step 1 can also download a copy of ESP-IDF.
Consult ESP-IDF Versions for information about which ESP-IDF version to use in a given situation.
If you wish to download ESP-IDF without the help of ESP-IDF Tools Installer, refer to these instructions.
Step 3. Set up the tools
Aside from the ESP-IDF, you also need to install the tools used by ESP-IDF, such as the compiler, debugger, Python packages, etc.
Windows
ESP-IDF Tools Installer for Windows introduced in Step 1 installs all the required tools.
If you want to install the tools without the help of ESP-IDF Tools Installer, open the Command Prompt and follow these steps:
cd %userprofile%\esp\esp-idf
install.bat
or with Windows PowerShell
cd ~/esp/esp-idf
./install.ps1
Linux and macOS
cd ~/esp/esp-idf
./install.sh
Alternative File Downloads
The tools installer downloads a number of files attached to GitHub Releases. If accessing GitHub is slow then it is possible to set an environment variable to prefer Espressif’s download server for GitHub asset downloads.
Note
This setting only controls individual tools downloaded from GitHub releases, it doesn’t change the URLs used to access any Git repositories.
Windows
To prefer the Espressif download server when running the ESP-IDF Tools Installer or installing tools from the command line, open the System control panel, then click on Advanced Settings. Add a new Environment Variable (of type either User or System) with the name IDF_GITHUB_ASSETS and value dl.espressif.com/github_assets. Click OK once done.
If the command line window or ESP-IDF Tools Installer window was already open before you added the new environment variable, you will need to close and reopen it.
While this environment variable is still set, the ESP-IDF Tools Installer and the command line installer will prefer the Espressif download server.
Linux and macOS
To prefer the Espressif download server when installing tools, use the following sequence of commands when running install.sh:
cd ~/esp/esp-idf
export IDF_GITHUB_ASSETS="dl.espressif.com/github_assets"
./install.sh
Customizing the tools installation path
The scripts introduced in this step install compilation tools required by ESP-IDF inside the user home directory: $HOME/.espressif on Linux and macOS, %USERPROFILE%\.espressif on Windows. If you wish to install the tools into a different directory, set the environment variable IDF_TOOLS_PATH before running the installation scripts. Make sure that your user account has sufficient permissions to read and write this path.
If changing the IDF_TOOLS_PATH, make sure it is set to the same value every time the Install script (install.bat, install.ps1 or install.sh) and an Export script (export.bat, export.ps1 or export.sh) are executed.
Step 4. Set up the environment variables
The installed tools are not yet added to the PATH environment variable. To make the tools usable from the command line, some environment variables must be set. ESP-IDF provides another script which does that.
Windows
ESP-IDF Tools Installer for Windows creates an “ESP-IDF Command Prompt” shortcut in the Start Menu. This shortcut opens the Command Prompt and sets up all the required environment variables. You can open this shortcut and proceed to the next step.
Alternatively, if you want to use ESP-IDF in an existing Command Prompt window, you can run:
%userprofile%\esp\esp-idf\export.bat
or with Windows PowerShell
.$HOME/esp/esp-idf/export.ps1
Linux and macOS
In the terminal where you are going to use ESP-IDF, run:
. $HOME/esp/esp-idf/export.sh
or for fish (supported only since fish version 3.0.0):
. $HOME/esp/esp-idf/export.fish
Note the space between the leading dot and the path!
If you plan to use esp-idf frequently, you can create an alias for executing export.sh:
Copy and paste the following command to your shell’s profile (
.profile,.bashrc,.zprofile, etc.)alias get_idf='. $HOME/esp/esp-idf/export.sh'
Refresh the configuration by restarting the terminal session or by running
source [path to profile], for example,source ~/.bashrc.
Now you can run get_idf to set up or refresh the esp-idf environment in any terminal session.
Technically, you can add export.sh to your shell’s profile directly; however, it is not recommended. Doing so activates IDF virtual environment in every terminal session (including those where IDF is not needed), defeating the purpose of the virtual environment and likely affecting other software.
Step 5. Start a Project
Now you are ready to prepare your application for ESP32-C3. You can start with get-started/hello_world project from examples directory in IDF.
Copy the project get-started/hello_world to ~/esp directory:
Linux and macOS
cd ~/esp
cp -r $IDF_PATH/examples/get-started/hello_world .
Windows
cd %userprofile%\esp
xcopy /e /i %IDF_PATH%\examples\get-started\hello_world hello_world
There is a range of example projects in the examples directory in ESP-IDF. You can copy any project in the same way as presented above and run it.
It is also possible to build examples in-place, without copying them first.
Important
The ESP-IDF build system does not support spaces in the paths to either ESP-IDF or to projects.
Step 6. Connect Your Device
Now connect your ESP32-C3 board to the computer and check under what serial port the board is visible.
Serial ports have the following patterns in their names:
Windows: names like
COM1Linux: starting with
/dev/ttymacOS: starting with
/dev/cu.
If you are not sure how to check the serial port name, please refer to Establish Serial Connection with ESP32-C3 for full details.
Note
Keep the port name handy as you will need it in the next steps.
Step 7. Configure
Navigate to your hello_world directory from Step 5. Start a Project, set ESP32-C3 chip as the target and run the project configuration utility menuconfig.
Linux and macOS
cd ~/esp/hello_world
idf.py set-target esp32c3
idf.py menuconfig
Windows
cd %userprofile%\esp\hello_world
idf.py set-target esp32c3
idf.py menuconfig
Setting the target with idf.py set-target esp32c3 should be done once, after opening a new project. If the project contains some existing builds and configuration, they will be cleared and initialized. The target may be saved in environment variable to skip this step at all. See Selecting the Target for additional information.
If the previous steps have been done correctly, the following menu appears:
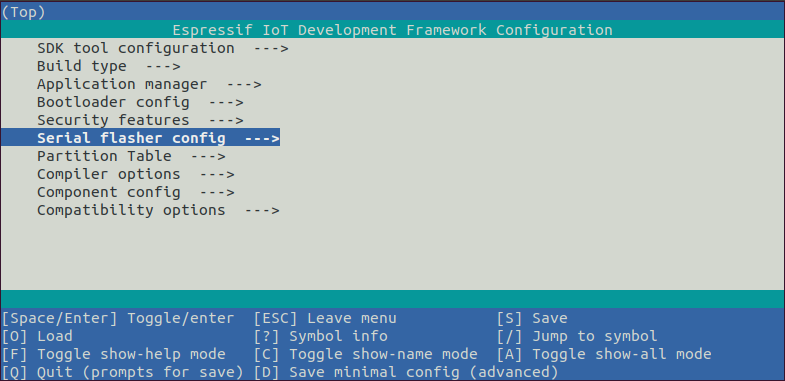
Project configuration - Home window
You are using this menu to set up project specific variables, e.g. Wi-Fi network name and password, the processor speed, etc. Setting up the project with menuconfig may be skipped for “hello_word”. This example will run with default configuration.
Note
The colors of the menu could be different in your terminal. You can change the appearance with the option
--style. Please run idf.py menuconfig --help for further information.
Step 8. Build the Project
Build the project by running:
idf.py build
This command will compile the application and all ESP-IDF components, then it will generate the bootloader, partition table, and application binaries.
$ idf.py build
Running cmake in directory /path/to/hello_world/build
Executing "cmake -G Ninja --warn-uninitialized /path/to/hello_world"...
Warn about uninitialized values.
-- Found Git: /usr/bin/git (found version "2.17.0")
-- Building empty aws_iot component due to configuration
-- Component names: ...
-- Component paths: ...

... (more lines of build system output)

[527/527] Generating hello-world.bin
esptool.py v2.3.1

Project build complete. To flash, run this command:
../../../components/esptool_py/esptool/esptool.py -p (PORT) -b 921600 write_flash --flash_mode dio --flash_size detect --flash_freq 40m 0x10000 build/hello-world.bin  build 0x1000 build/bootloader/bootloader.bin 0x8000 build/partition_table/partition-table.bin
or run 'idf.py -p PORT flash'
If there are no errors, the build will finish by generating the firmware binary .bin files.
Step 9. Flash onto the Device
Flash the binaries that you just built (bootloader.bin, partition-table.bin and hello-world.bin) onto your ESP32-C3 board by running:
idf.py -p PORT [-b BAUD] flash
Replace PORT with your ESP32-C3 board’s serial port name from Step 6. Connect Your Device.
You can also change the flasher baud rate by replacing BAUD with the baud rate you need. The default baud rate is 460800.
For more information on idf.py arguments, see idf.py.
Note
The option flash automatically builds and flashes the project, so running idf.py build is not necessary.
Encountered Issues While Flashing?
If you run the given command and see errors such as “Failed to connect”, there might be several reasons for this. One of the reasons might be issues encountered by esptool.py, the utility that is called by the build system to reset the chip, interact with the ROM bootloader, and flash firmware. One simple solution to try is manual reset described below, and if it does not help you can find more details about possible issues in Troubleshooting.
esptool.py resets ESP32-C3 automatically by asserting DTR and RTS control lines of the USB to serial converter chip, i.e., FTDI or CP210x (for more information, see Establish Serial Connection with ESP32-C3). The DTR and RTS control lines are in turn connected to GPIO9 and CHIP_PU (EN) pins of ESP32-C3, thus changes in the voltage levels of DTR and RTS will boot ESP32-C3 into Firmware Download mode. As an example, check the schematic for the ESP32 DevKitC development board.
In general, you should have no problems with the official esp-idf development boards. However, esptool.py is not able to reset your hardware automatically in the following cases:
Your hardware does not have the DTR and RTS lines connected to
GPIO9andCHIP_PUThe DTR and RTS lines are configured differently
There are no such serial control lines at all
Depending on the kind of hardware you have, it may also be possible to manually put your ESP32-C3 board into Firmware Download mode (reset).
For development boards produced by Espressif, this information can be found in the respective getting started guides or user guides. For example, to manually reset an esp-idf development board, hold down the Boot button (
GPIO9) and press the EN button (CHIP_PU).For other types of hardware, try pulling
GPIO9down.
Normal Operation
When flashing, you will see the output log similar to the following:
...
esptool.py --chip esp32c3 -p /dev/ttyUSB0 -b 460800 --before=default_reset --after=hard_reset write_flash --flash_mode dio --flash_freq 80m --flash_size 2MB 0x8000 partition_table/partition-table.bin 0x0 bootloader/bootloader.bin 0x10000 hello-world.bin
esptool.py v3.0
Serial port /dev/ttyUSB0
Connecting....
Chip is ESP32-C3
Features: Wi-Fi
Crystal is 40MHz
MAC: 7c:df:a1:40:02:a4
Uploading stub...
Running stub...
Stub running...
Changing baud rate to 460800
Changed.
Configuring flash size...
Compressed 3072 bytes to 103...
Writing at 0x00008000... (100 %)
Wrote 3072 bytes (103 compressed) at 0x00008000 in 0.0 seconds (effective 4238.1 kbit/s)...
Hash of data verified.
Compressed 18960 bytes to 11311...
Writing at 0x00000000... (100 %)
Wrote 18960 bytes (11311 compressed) at 0x00000000 in 0.3 seconds (effective 584.9 kbit/s)...
Hash of data verified.
Compressed 145520 bytes to 71984...
Writing at 0x00010000... (20 %)
Writing at 0x00014000... (40 %)
Writing at 0x00018000... (60 %)
Writing at 0x0001c000... (80 %)
Writing at 0x00020000... (100 %)
Wrote 145520 bytes (71984 compressed) at 0x00010000 in 2.3 seconds (effective 504.4 kbit/s)...
Hash of data verified.

Leaving...
Hard resetting via RTS pin...
Done
If there are no issues by the end of the flash process, the board will reboot and start up the “hello_world” application.
If you’d like to use the Eclipse or VS Code IDE instead of running idf.py, check out the Eclipse guide, VS Code guide.
Step 10. Monitor
To check if “hello_world” is indeed running, type idf.py -p PORT monitor (Do not forget to replace PORT with your serial port name).
This command launches the IDF Monitor application:
$ idf.py -p /dev/ttyUSB0 monitor
Running idf_monitor in directory [...]/esp/hello_world/build
Executing "python [...]/esp-idf/tools/idf_monitor.py -b 115200 [...]/esp/hello_world/build/hello-world.elf"...
--- idf_monitor on /dev/ttyUSB0 115200 ---
--- Quit: Ctrl+] | Menu: Ctrl+T | Help: Ctrl+T followed by Ctrl+H ---
ets Jun  8 2016 00:22:57

rst:0x1 (POWERON_RESET),boot:0x13 (SPI_FAST_FLASH_BOOT)
ets Jun  8 2016 00:22:57
...
After startup and diagnostic logs scroll up, you should see “Hello world!” printed out by the application.
...
Hello world!
Restarting in 10 seconds...
This is esp32c3 chip with 1 CPU core(s), WiFi/BLE, silicon revision 0, 2MB external flash
Minimum free heap size: 337332 bytes
Restarting in 9 seconds...
Restarting in 8 seconds...
Restarting in 7 seconds...
To exit IDF monitor use the shortcut Ctrl+].
Note
You can combine building, flashing and monitoring into one step by running:
idf.py -p PORT flash monitor
See also:
IDF Monitor for handy shortcuts and more details on using IDF monitor.
idf.py for a full reference of
idf.pycommands and options.
That’s all that you need to get started with ESP32-C3!
Now you are ready to try some other examples, or go straight to developing your own applications.
Important
Some of examples do not support ESP32-C3 because required hardware is not included in ESP32-C3 so it cannot be supported.
If building an example, please check the README file for the Supported Targets table. If this is present including ESP32-C3 target, or the table does not exist at all, the example will work on ESP32-C3.
Updating ESP-IDF
You should update ESP-IDF from time to time, as newer versions fix bugs and provide new features. The simplest way to do the update is to delete the existing esp-idf folder and clone it again, as if performing the initial installation described in Step 2. Get ESP-IDF.
Another solution is to update only what has changed. The update procedure depends on the version of ESP-IDF you are using.
After updating ESP-IDF, execute the Install script again, in case the new ESP-IDF version requires different versions of tools. See instructions at Step 3. Set up the tools.
Once the new tools are installed, update the environment using the Export script. See instructions at Step 4. Set up the environment variables.