在 Windows 上通过命令行构建项目
本指南将介绍如何使用命令行在 Windows 上创建 ESP32-S31 项目,构建、烧录和监控设备输出。
激活环境
备注
本章节描述了 ESP-IDF v6.0 及以上版本激活环境的默认和推荐步骤。如使用 Windows 上更新 ESP-IDF 工具的传统方法,可跳过本章节。
在使用 ESP-IDF 工具之前,需要先激活 ESP-IDF 开发环境。您可以通过图形用户界面 (GUI) 或命令行界面 (CLI) 两种方式来激活。
使用 EIM GUI 激活
打开 ESP-IDF 安装管理器应用程序 eim。
在 管理安装 下,点击 打开仪表板。
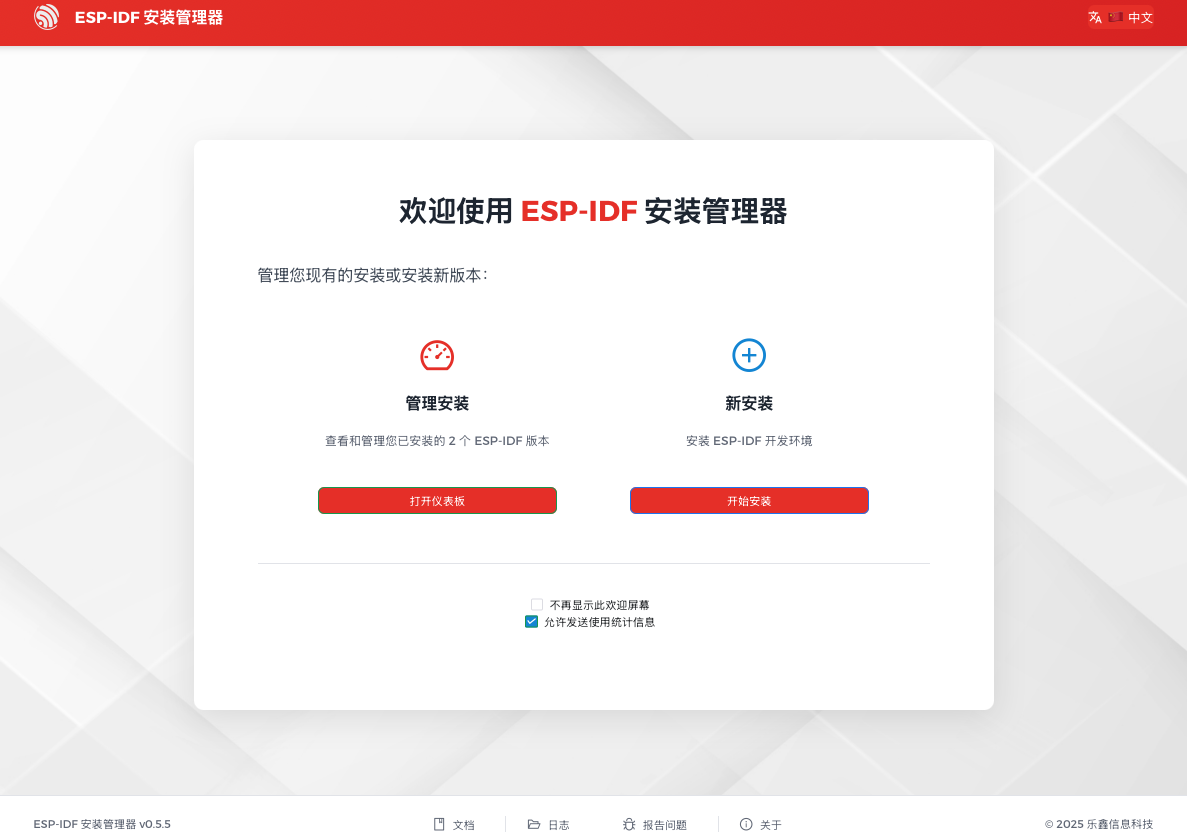
EIM 管理安装
在仪表板中,会看到所有已安装的 ESP-IDF 版本。选择要使用的版本,然后点击 打开 IDF 终端,启动已激活 ESP-IDF 环境的终端。
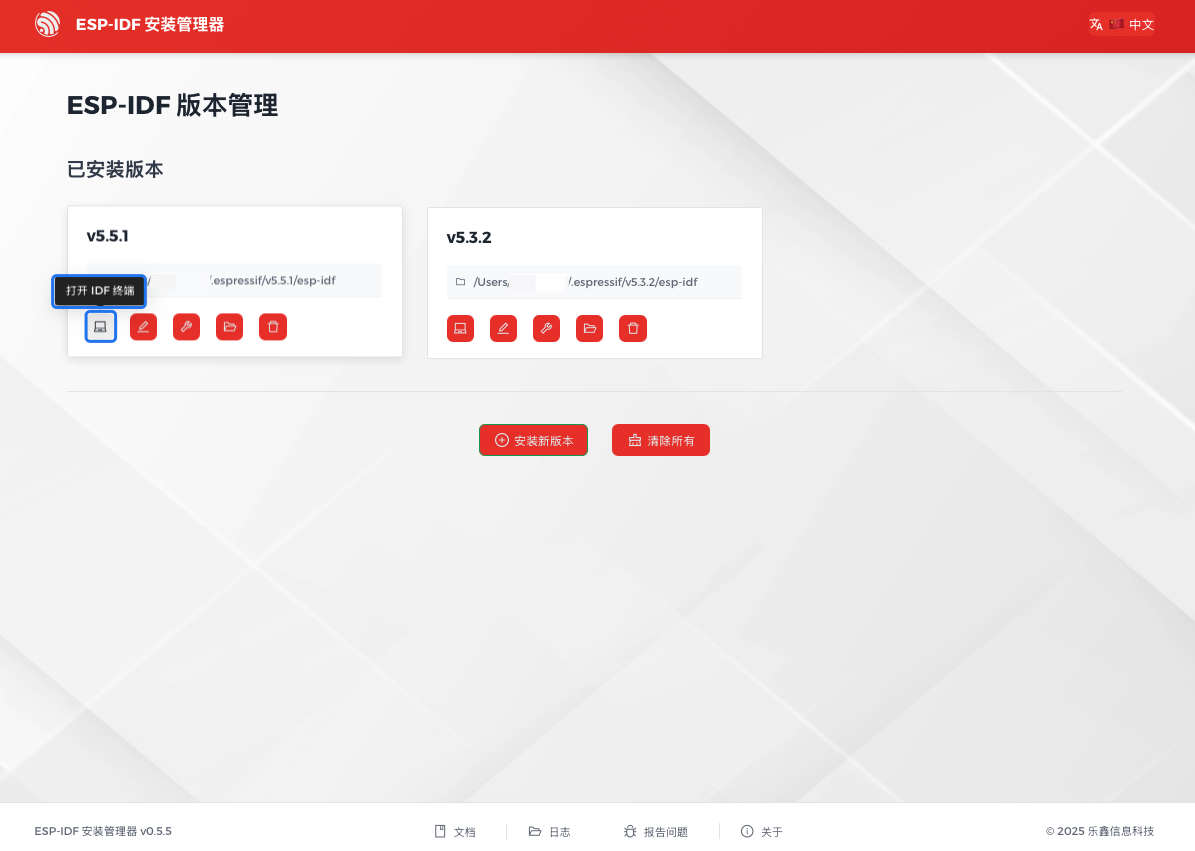
EIM 打开 IDF 终端
使用 EIM CLI 激活
ESP-IDF 安装完成后,EIM 会在桌面上创建 快捷方式,用于启动已激活 ESP-IDF 环境的终端。
例如,点击 IDF_v5.4.2_Powershell 快捷方式,打开已设置好环境的 PowerShell 终端。
至此,您已成功在终端中激活 ESP-IDF 环境。后续所有 ESP-IDF 相关命令都需在已激活的终端中运行。
开始创建项目
现在,可以准备开发 ESP32-S31 应用程序了。可以从 ESP-IDF 中 examples 目录下的 get-started/hello_world 项目开始。
重要
ESP-IDF 编译系统不支持 ESP-IDF 路径或其项目路径中带有空格。
将 get-started/hello_world 项目复制至本地的 ~/esp 目录下:
cd %userprofile%\esp
xcopy /e /i %IDF_PATH%\examples\get-started\hello_world hello_world
备注
ESP-IDF 的 examples 目录下有一系列示例项目,可以按照上述方法复制并运行其中的任何示例,也可以直接编译示例,无需进行复制。
连接设备
现在,请将 ESP32-S31 开发板连接到 PC,并查看开发板使用的串口。
在 Windows 操作系统中,串口名称通常以 COM 开头。
有关如何查看串口名称的详细信息,请见 与 ESP32-S31 创建串口连接。
备注
请记住串口名,以便后续使用。
配置项目
请进入 hello_world 目录,设置 ESP32-S31 为目标芯片,然后运行项目配置工具 menuconfig。
Windows
cd %userprofile%\esp\hello_world
idf.py set-target esp32s31
idf.py menuconfig
打开一个新项目后,应首先使用 idf.py set-target esp32s31 设置“目标”芯片。注意,此操作将清除并初始化项目之前的编译和配置(如有)。也可以直接将“目标”配置为环境变量(此时可跳过该步骤)。更多信息,请见 选择目标芯片:set-target。
正确操作上述步骤后,系统将显示以下菜单:
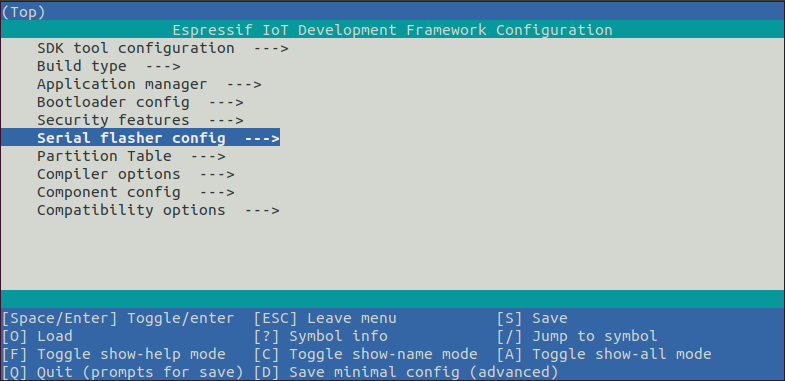
项目配置 — 主窗口
可以通过此菜单设置项目的具体变量,包括 Wi-Fi 网络名称、密码和处理器速度等。hello_world 示例项目会以默认配置运行,因此在这一项目中,可以跳过使用 menuconfig 进行项目配置这一步骤。
备注
终端窗口中显示出的菜单颜色可能会与上图不同。可以通过选项 --style 来改变外观。请运行 idf.py menuconfig --help 命令,获取更多信息。
编译项目
请使用以下命令,编译烧录项目:
idf.py build
运行以上命令可以编译应用程序和所有 ESP-IDF 组件,接着生成引导加载程序、分区表和应用程序二进制文件。
$ idf.py build
Running cmake in directory /path/to/hello_world/build
Executing "cmake -G Ninja --warn-uninitialized /path/to/hello_world"...
Warn about uninitialized values.
-- Found Git: /usr/bin/git (found version "2.17.0")
-- Building empty aws_iot component due to configuration
-- Component names: ...
-- Component paths: ...

... (more lines of build system output)

[527/527] Generating hello_world.bin
esptool v5.0.2

Project build complete. To flash, run:
  idf.py flash
or
  idf.py -p PORT flash
or
  esptool -p (PORT) -b 921600 write-flash --flash-mode dio --flash-size detect --flash-freq 40m 0x10000 build/hello_world.bin  build 0x1000 build/bootloader/bootloader.bin 0x8000 build/partition_table/partition-table.bin
如果一切正常,编译完成后将生成 .bin 文件。
烧录到设备
请运行以下命令,将刚刚生成的二进制文件烧录至 ESP32-S31 开发板:
idf.py -p PORT flash
请将 PORT 替换为 ESP32-S31 开发板的串口名称。如果 PORT 未经定义,idf.py 将尝试使用可用的串口自动连接。
更多有关 idf.py 参数的详情,请见 idf.py。
备注
勾选 flash 选项将自动编译并烧录项目,因此无需再运行 idf.py build。
若在烧录过程中遇到问题,请参考下文中的“其他提示”。也可以前往 烧录故障排除 或 与 ESP32-S31 创建串口连接 获取更多详细信息。
常规操作
在烧录过程中,会看到类似如下的输出日志:
...
esptool --chip esp32s31 -p /dev/ttyUSB0 -b 460800 --before=default-reset --after=hard-reset --no-stub write-flash --flash-mode dio --flash-freq 80m --flash-size 2MB 0x2000 bootloader/bootloader.bin 0x8000 partition_table/partition-table.bin 0x10000 hello_world.bin
esptool v5.3.1
Connected to ESP32-S31 on /dev/ttyUSB0:
Chip type:          ESP32-S31 (revision v0.0)
Features:           Wi-Fi 6, BT 5.4 (LE), IEEE802.15.4, Dual Core + LP Core, 300MHz
Crystal frequency:  40MHz
MAC:                30:ed:a0:f3:dc:70

Changing baud rate to 460800...
Changed.

Enabling default SPI flash mode...
Configuring flash size...

Writing 'bootloader/bootloader.bin' at 0x00002000...
SHA digest in image updated.
Flash will be erased from 0x00002000 to 0x00007fff...
Wrote 21392 bytes at 0x00002000 in 0.9 seconds (193.6 kbit/s).
Hash of data verified.

Writing 'partition_table/partition-table.bin' at 0x00008000...
Flash will be erased from 0x00008000 to 0x00008fff...
Wrote 3072 bytes at 0x00008000 in 0.1 seconds (192.1 kbit/s).
Hash of data verified.

Writing 'hello_world.bin' at 0x00010000...
Flash will be erased from 0x00010000 to 0x00034fff...
Wrote 149968 bytes at 0x00010000 in 6.3 seconds (191.7 kbit/s).
Hash of data verified.

Hard resetting via RTS pin...
如果一切顺利,烧录完成后,开发板将会复位,应用程序 "hello_world" 开始运行。
如果希望使用 Eclipse 或是 VS Code IDE,而非 idf.py,请参考 Eclipse Plugin,以及 VSCode Extension。
监视输出
可以使用 idf.py -p PORT monitor 命令,监视 “hello_world” 项目的运行情况。注意,不要忘记将 PORT 替换为自己的串口名称。
运行该命令后,IDF 监视器 应用程序将启动。
$ idf.py -p <PORT> monitor
Running idf_monitor in directory [...]/esp/hello_world/build
Executing "python [...]/esp-idf/tools/idf_monitor.py -b 115200 [...]/esp/hello_world/build/hello_world.elf"...
--- idf_monitor on <PORT> 115200 ---
--- Quit: Ctrl+] | Menu: Ctrl+T | Help: Ctrl+T followed by Ctrl+H ---
ets Jun  8 2016 00:22:57

rst:0x1 (POWERON_RESET),boot:0x13 (SPI_FAST_FLASH_BOOT)
ets Jun  8 2016 00:22:57
...
此时,就可以在启动日志和诊断日志之后,看到打印的 “Hello world!” 了。
    ...
    Hello world!
    Restarting in 10 seconds...
    This is esp32s31 chip with 2 CPU core(s), WiFi/BT/BLE, 802.15.4 (Zigbee/Thread), silicon revision v0.0, 2 MB external flash
Minimum free heap size: 480544 bytes
    Restarting in 9 seconds...
    Restarting in 8 seconds...
    Restarting in 7 seconds...
使用快捷键 Ctrl+],可退出 ESP-IDF 监视器。
备注
也可以运行以下命令,一次性执行构建、烧录和监视过程:
idf.py -p PORT flash monitor
此外,
恭喜完成 ESP32-S31 的入门学习!
现在,可以尝试一些其他 examples,或者直接开发自己的应用程序。
重要
一些示例程序不支持 ESP32-S31,因为 ESP32-S31 中不包含所需的硬件。
在编译示例程序前请查看 README 文件中 Supported Targets 表格。如果表格中包含 ESP32-S31, 或者不存在这个表格,那么即表示 ESP32-S31 支持这个示例程序。
其他提示
权限问题
使用某些 Linux 版本向 ESP32-S31 烧录固件时,可能会出现类似 Could not open port <PORT>: Permission denied: '<PORT>' 错误消息。此时可以在 Linux 将用户添加至 dialout 组或 uucp 组 来解决此类问题。
兼容的 Python 版本
ESP-IDF 支持 Python 3.11 及以上版本,建议升级操作系统到最新版本从而更新 Python。也可选择从 源码 安装最新版 Python,或使用 Python 管理系统如 pyenv 对版本进行升级管理。
擦除 flash
ESP-IDF 支持擦除 flash。请运行以下命令,擦除整个 flash:
idf.py -p PORT erase-flash
若存在需要擦除的 OTA 数据,请运行以下命令:
idf.py -p PORT erase-otadata
擦除 flash 需要一段时间,在擦除过程中,请勿断开设备连接。