ESP-IDF pytest 指南
ESP-IDF 有多种类型的测试需在 ESP 芯片上执行(即 目标测试)。目标测试通常作为 IDF 测试项目(即 测试应用程序)的一部分进行编译,在这个过程中,测试应用程序和其他标准 IDF 项目遵循同样的构建、烧录和监控流程。
通常,目标测试需要连接一台主机(如个人电脑),负责触发特定的测试用例、提供测试数据、检查测试结果。
ESP-IDF 在主机端使用 pytest 框架(以及一些 pytest 插件)来自动进行目标测试。本文档介绍 ESP-IDF 中的 pytest,并介绍以下内容:
ESP-IDF 目标测试的常见概念。
将 pytest 框架应用于 Python 测试脚本,进行自动化目标测试。
ESP-IDF CI (Continuous Integration) 板载测试流程。
使用 pytest 在本地执行目标测试。
pytest 的使用技巧。
重要
本指南专门面向 ESP-IDF 贡献者。一些概念(如自定义标记)可能不直接适用于使用 ESP-IDF SDK 的个人项目。要在个人项目中运行 pytest-embedded,请参阅 pytest-embedded 文档 和 提供的示例。
安装
基础依赖项可以通过执行 ESP-IDF 安装脚本 --enable-ci 进行安装:
$ install.sh --enable-ci
额外的测试脚本依赖项可以通过执行 ESP-IDF 安装脚本 --enable-test-specific 进行安装:
$ install.sh --enable-test-specific
上面的脚本已预先实现了一些机制,以确保所有安装过程顺利进行。如果您在安装过程中遇到任何问题,请在 GitHub Issue 版块 上提交问题说明。
常见概念
测试应用程序 是一组二进制文件,从一个 IDF 项目构建,用于测试项目的特定功能。测试应用程序通常位于 ${IDF_PATH}/examples,${IDF_PATH}/tools/test_apps,和 ${IDF_PATH}/components/<COMPONENT_NAME>/test_apps。
测试设备 (DUT) 是指一组连接到主机(例如 PC)的 ESP 芯片。主机负责将应用程序烧录到 DUT 上,触发测试用例,并检查测试结果。
一个包含 pytest 脚本的典型 ESP-IDF 项目通常具有以下结构:
.
└── my_app/
    ├── main/
    │   └── ...
    ├── CMakeLists.txt
    └── pytest_foo.py
有时,对于一些多 DUT 测试,一个测试用例需要多个测试应用程序。在这种情况下,测试应用程序的文件夹结构如下所示:
.
├── my_app_foo/
│   ├── main/
│   │   └── ...
│   └── CMakeLists.txt
├── my_app_bar/
│   ├── main/
│   │   └── ...
│   └── CMakeLists.txt
└── pytest_foo_bar.py
在 ESP-IDF 中使用 pytest
单个 DUT 测试用例
入门教程
@pytest.mark.parametrize('target', [
    'esp32',
    'esp32s2',
], indirect=True)
@pytest.mark.generic
def test_hello_world(dut) -> None:
    dut.expect('Hello world!')
这是一个简单的测试脚本,可以与入门示例 get-started/hello_world 一起运行。
在这个测试脚本中,使用了 @pytest.mark.parametrize 装饰器来参数化测试用例。target 参数是一个特殊参数,用于指示目标板类型。indirect=True 参数表示此参数在其他 fixture 之前被预先计算。
紧接着是环境标记。@pytest.mark.generic 标记表示此测试用例应在 generic 板类型上运行。
备注
有关环境标记的详细解释,请参阅 env_markers 定义 。
关于测试函数,使用了一个 dut fixture。在单一 DUT 测试用例中,dut fixture 是 IdfDut 类的一个实例,对于多个 DUT 测试用例,它是 IdfDut 实例的一个元组。有关 IdfDut 类的更多详细信息,请参阅 pytest-embedded IdfDut API 参考。
使用不同的 sdkconfig 文件运行相同的应用程序
某些测试用例可能需要使用不同的 sdkconfig 文件运行相同的应用程序。与 sdkconfig 相关概念的详细文档,请参阅 idf-build-apps 文档。
以下是一个简单的示例,演示了如何使用不同的 sdkconfig 文件运行相同的应用程序。假设我们有以下文件夹结构:
.
└── my_app/
    ├── main/
    │   └── ...
    ├── CMakeLists.txt
    ├── sdkconfig.ci.foo
    ├── sdkconfig.ci.bar
    └── pytest_foo.py
如果测试用例需要使用这两个 sdkconfig 文件运行所有支持的目标芯片,您可以使用以下代码:
@pytest.mark.parametrize('target', [
    'esp32',                            # <-- run with esp32 target
    'esp32s2',                          # <-- run with esp32s2 target
], indirect=True)
@pytest.mark.parametrize('config', [    # <-- parameterize the sdkconfig file
    'foo',                              # <-- run with sdkconfig.ci.foo
    'bar',                              # <-- run with sdkconfig.ci.bar
], indirect=True)                       # <-- `indirect=True` is required, indicates this param is pre-calculated before other fixtures
def test_foo_bar(dut, config) -> None:
    if config == 'foo':
      dut.expect('This is from sdkconfig.ci.foo')
    elif config == 'bar':
      dut.expect('This is from sdkconfig.ci.bar')
所有标记将一并影响测试用例。总体而言,此测试函数将被复制为 4 个测试用例:
test_foo_bar使用 esp32 目标芯片,将 sdkconfig.ci.foo 作为 sdkconfig 文件test_foo_bar使用 esp32 目标芯片,将 sdkconfig.ci.bar 作为 sdkconfig 文件test_foo_bar使用 esp32s2 目标芯片,将 sdkconfig.ci.foo 作为 sdkconfig 文件test_foo_bar使用 esp32s2 目标芯片,将 sdkconfig.ci.bar 作为 sdkconfig 文件
有时在测试脚本或日志文件中,可能会看到以下格式:
esp32.foo.test_foo_baresp32.bar.test_foo_baresp32s2.foo.test_foo_baresp32s2.bar.test_foo_bar
这种格式为 测试用例 ID。测试用例 ID 应被视为测试用例的唯一标识符。它由以下部分组成:
esp32:目标名称foo:配置名称test_foo_bar:测试函数名称
测试用例 ID 用于在 JUnit 报告中标识测试用例。
备注
几乎所有 pytest-embedded 的 CLI 选项都支持参数化。要查看所有支持的 CLI 选项,您可以运行 pytest --help 命令,并检查 embedded-... 部分以查看普通 pytest-embedded 选项,以及 idf 部分以查看 ESP-IDF 特定选项。
使用不同的 sdkconfig 文件运行相同的应用程序,支持不同的目标芯片
对于某些测试用例,可能需要使用不同的 sdkconfig 文件运行相同的应用程序。这些 sdkconfig 文件支持不同的目标芯片。可以使用 pytest.param 来实现。使用与上文相同的文件夹结构。
@pytest.mark.parametrize('config, target', [
    pytest.param('foo', 'esp32'),
    pytest.param('bar', 'esp32s2'),
], indirect=True)
此时,这个测试函数将被复制为 2 个测试用例(测试用例 ID):
esp32.foo.test_foo_baresp32s2.bar.test_foo_bar
测试串行输出
为确保测试在目标芯片上顺利执行,测试脚本可使用 dut.expect() 函数来测试目标芯片上的串行输出:
def test_hello_world(dut) -> None:
    dut.expect('\d+')  # <-- `expect`ing from a regex
    dut.expect_exact('Hello world!')  # <-- `expect_exact`ly the string
在执行 dut.expect(...) 时,首先会将预期字符串编译成正则表达式用于搜索串行输出结果,直到找到与该编译后的正则表达式匹配的结果或运行超时。
如果预期字符串中包含正则表达式关键字(如括号或方括号),则需格外注意。或者,也可以使用 dut.expect_exact(...),它会尝试直接匹配字符串,而不将其转换为正则表达式。
如需了解关于 expect 函数类型的更多信息,请参考 pytest-embedded 辅助文档。
多个 DUT 的测试用例
用同一应用程序进行多个 DUT 测试
有时,一个测试可能涉及多个目标芯片运行同一测试程序。在这种情况下,可以使用 count 将想要进行测试的 DUT 数量参数化。
@pytest.mark.parametrize('count', [
    2,
], indirect=True)
@pytest.mark.parametrize('target', [
  'esp32|esp32s2',
  'esp32s3',
], indirect=True)
def test_hello_world(dut) -> None:
    dut[0].expect('Hello world!')
    dut[1].expect('Hello world!')
所有参数化项中的 | 符号用于分隔每个 DUT 的设置。在这个例子中,以下芯片将用于测试:
esp32, esp32s2
esp32s3, esp32s3
将参数 count 设置为 2 后,所有 fixture 都会改为元组。
重要
count 对于多个 DUT 测试是必需的。
备注
有关详细的多个 DUT 参数化文档,请参阅 pytest-embedded Multi-DUT 文档。
用不同应用程序和目标芯片进行多目标测试
在某些情况下,一个测试可能涉及多个目标芯片运行不同的测试应用程序(例如,将不同的目标用作主节点和从节点)。通常在 ESP-IDF 中,文件夹结构会是这样的:
.
├── master/
│   ├── main/
│   │   └── ...
│   └── CMakeLists.txt
├── slave/
│   ├── main/
│   │   └── ...
│   └── CMakeLists.txt
└── pytest_master_slave.py
在这种情况下,可以将测试应用程序的路径 app_path 作为参数提供给测试用例。
@pytest.mark.multi_dut_generic
@pytest.mark.parametrize('count', [
    2,
], indirect=True)
@pytest.mark.parametrize('app_path, target', [
    (f'{os.path.join(os.path.dirname(__file__), "master")}|{os.path.join(os.path.dirname(__file__), "slave")}', 'esp32|esp32s2'),
    (f'{os.path.join(os.path.dirname(__file__), "master")}|{os.path.join(os.path.dirname(__file__), "slave")}', 'esp32s2|esp32'),
], indirect=True)
def test_master_slave(dut) -> None:
    master = dut[0]
    slave = dut[1]

    master.write('Hello world!')
    slave.expect_exact('Hello world!')
备注
当两个项作为参数时,比如 app_path, target 项,应确保将一个元组列表传递给 parametrize 装饰器。每个元组应包含每个项的值。
此测试用例会被复制为 2 个测试用例:
dut-0, ESP32 运行
master应用程序, dut-1, ESP32-S2 运行slave应用程序dut-0, ESP32-S2 运行
master应用程序, dut-1, ESP32运行slave应用程序
运行 Unity 测试用例
使用 Unity 测试框架 进行单元测试。共有三种测试用例( Unity 测试框架):
普通测试用例(单个 DUT)
多阶段测试用例(单个 DUT)
多设备测试用例(多个 DUT)
以下代码即可执行所有的单个 DUT 测试用例,包括普通测试用例和多阶段测试用例:
def test_unity_single_dut(dut: IdfDut):
    dut.run_all_single_board_cases()
此代码将跳过所有 tag 为 [ignore] 的测试用例。
如需按组执行测试用例,可运行:
def test_unity_single_dut(dut: IdfDut):
    dut.run_all_single_board_cases(group='psram')
此代码会触发模块包含 [psram] tag 的所有测试用例。
如需除了某个特定组之外执行测试用例,可运行:
def test_unity_single_dut(dut: IdfDut):
    dut.run_all_single_board_cases(group='!psram')
此代码会触发模块包含 [psram] tag 以外的所有测试用例。
如需按特定属性执行测试用例,可运行:
def test_rtc_xtal32k(dut: Dut) -> None:
    dut.run_all_single_board_cases(attributes={'test_env': 'xtal32k'})
这此代码会触发模块包含具有属性 test_env 等于 xtal32k 的测试用例。
如需按特定名称执行测试用例,可运行:
def test_dut_run_all_single_board_cases(dut):
    dut.run_all_single_board_cases(name=["normal_case1", "multiple_stages_test"])
这此代码会触发模块包含具有 normal_case1 和 multiple_stages_test 名称的测试用例。
我们的 case_tester 夹具让执行各种测试用例更加简便。例如:
def test_unity_single_dut(case_tester):
    case_tester.run_all_normal_cases()       # to run all normal test cases
    case_tester.run_all_multi_dev_cases()    # to run all multi-device test cases
    case_tester.run_all_multi_stage_cases()  # to run all multi-stage test cases
有关可用函数的完整列表,请参阅 pytest-embedded case_tester API 参考。
在 CI 中执行板载测试
CI 的工作流程如下所示:
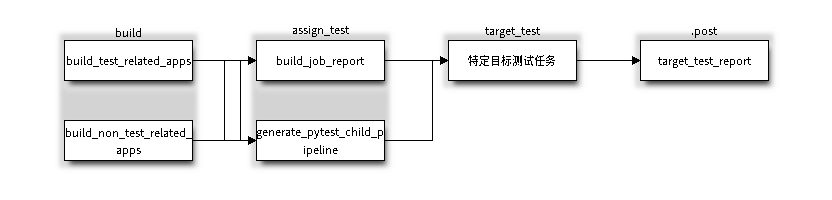
目标测试子流水线工作流程
所有编译和目标测试都是由我们的 CI 脚本 tools/ci/dynamic_pipelines 自动生成。
编译
在 CI 中,所有位于 components、examples 和 tools/test_apps 下的 ESP-IDF 项目都会使用所有支持的目标芯片和 sdkconfig 文件进行编译。二进制文件将编译在 build_<target>_<config> 下。例如:
.
├── build_esp32_history/
│   └── ...
├── build_esp32_nohistory/
│   └── ...
├── build_esp32s2_history/
│   └── ...
├── ...
├── main/
├── CMakeLists.txt
├── sdkconfig.ci.history
├── sdkconfig.ci.nohistory
└── ...
有两种类型的编译任务,build_test_related_apps 和 build_non_test_related_apps。
对于 build_test_related_apps,所有编译的二进制文件将上传到内部 MinIO 服务器。下载链接可以在内部 MR 中发布的编译报告中获取。
对于 build_non_test_related_apps,在编译完成后,所有编译的二进制文件将被删除。只有编译日志文件将上传到内部 MinIO 服务器。下载链接可以在内部 MR 中发布的编译报告中获取。
板载测试任务
在CI中,所有板载测试任务都以 "<targets> - <env_markers>" 格式命名。例如,单个 DUT 测试任务 esp32 - generic 或多个 DUT 测试任务 esp32,esp32 - multi_dut_generic。
板载测试任务中的二进制文件是从内部 MinIO 服务器下载的。对于大多数测试用例,仅下载烧录所需的文件(如 .bin 文件、flash_args 文件等)。对于某些测试用例,如 jtag 测试用例,还会下载 .elf 文件。
本地测试
安装
首先,你需为 ESP-IDF 安装 Python 依赖:
$ cd $IDF_PATH
$ bash install.sh --enable-ci
$ . ./export.sh
编译目录
默认情况下,pytest 脚本会按照以下顺序查找编译目录:
由
--build-dir命令行参数设置的目录(当指定时)。build_<target>_<sdkconfig>build_<target>build_<sdkconfig>build
上述目录中如有任一个存在,测试用例就会使用该目录来烧录二进制文件。如果都不存在,测试用例将因错误而失败。
测试脚本
包含 sdkconfig.defaults 的单个 DUT 测试用例
这是最简单的用例。以 examples/get-started/hello_world 为例。假设使用 ESP32 板进行测试。
$ cd $IDF_PATH/examples/get-started/hello_world
$ idf.py set-target esp32 build
$ pytest --target esp32
包含 sdkconfig.ci.xxx 的单个 DUT 测试用例
一些测试用例可能需要运行不同的 sdkconfig 文件。以 examples/system/console/basic 为例。假设使用 ESP32 板进行测试,并使用 sdkconfig.ci.history 进行测试。
$ cd $IDF_PATH/examples/system/console/basic
$ idf.py -DSDKCONFIG_DEFAULTS='sdkconfig.defaults;sdkconfig.ci.history' -B build_esp32_history set-target esp32 build
$ pytest --target esp32 -k "not nohistory"
备注
在这里,如果使用 pytest --target esp32 -k history,两个测试用例都会被选中,因为 pytest -k 会使用字符串匹配来过滤测试用例。
如果你想同时编译测试所有 sdkconfig 文件,则需运行我们的 CI 脚本作为辅助脚本:
$ cd $IDF_PATH/examples/system/console/basic
$ idf-ci build run --target esp32 --only-test-related
$ pytest --target esp32
包含 sdkconfig.ci.history 配置的应用程序会编译到 build_esp32_history 中,而包含 sdkconfig.ci.nohistory 配置的应用程序会编译到 build_esp32_nohistory 中。 pytest --target esp32 命令会在这两个应用程序上运行测试。
多个 DUT 测试用例
一些测试用例可能需要运行多个 DUT。以 examples/openthread 为例,测试用例函数如下所示:
@pytest.mark.parametrize(
    'config, count, app_path, target', [
        ('rcp|cli_h2|br', 3,
         f'{os.path.join(os.path.dirname(__file__), "ot_rcp")}'
         f'|{os.path.join(os.path.dirname(__file__), "ot_cli")}'
         f'|{os.path.join(os.path.dirname(__file__), "ot_br")}',
         'esp32c6|esp32h2|esp32s3'),
    ],
    indirect=True,
)
def test_thread_connect(dut:Tuple[IdfDut, IdfDut, IdfDut]) -> None:
    ...
测试用例将使用以下芯片运行:
使用
ot_rcp烧录的 ESP32-C6使用
ot_cli烧录的 ESP32-H2使用
ot_br烧录的 ESP32-S3
当然,我们可以手动编译所需的二进制文件,或者使用我们的 CI 脚本作为辅助脚本:
$ cd $IDF_PATH/examples/openthread
$ idf-ci build run --only-test-related -k test_thread_connect
$ pytest -k test_thread_connect
重要
多个 DUT 的测试用例,必须列出所有目标芯片。否则,测试用例将因错误而失败。
调试 CI 测试用例
有时无法在本地重现 CI 测试用例的失败。在这种情况下,可能需要借助 CI 中编译后的文件来调试测试用例。
运行带有 --pipeline-id <pipeline_id> 的 pytest,命令 pytest 从 CI 下载二进制文件。例如:
$ cd $IDF_PATH/examples/get-started/hello_world
$ pytest --target esp32 --pipeline-id 123456
即使你在本地有 build_esp32_default 或 build 目录,pytest 仍会从流水线 123456 下载二进制文件,并将这些二进制文件放置在 build_esp32_default 目录中,然后使用该二进制文件运行测试用例。
备注
<pipeline_id> 应该是父流水线 ID。你可以在你的 MR 页面上复制它。
Pytest 使用技巧
自定义类
通常,可能会在下列情况下编写自定义类:
向一定数量的 DUT 添加更多可复用功能。
为不同阶段添加自定义的前置和后置函数。
以下代码示例来自 panic/conftest.py 。
class PanicTestDut(IdfDut):
    ...

@pytest.fixture(scope='module')
def monkeypatch_module(request: FixtureRequest) -> MonkeyPatch:
    mp = MonkeyPatch()
    request.addfinalizer(mp.undo)
    return mp


@pytest.fixture(scope='module', autouse=True)
def replace_dut_class(monkeypatch_module: MonkeyPatch) -> None:
    monkeypatch_module.setattr('pytest_embedded_idf.dut.IdfDut', PanicTestDut)
monkeypatch_module 提供了一个 基于模块 的 monkeypatch fixture。
replace_dut_class 是一个 基于模块 的 自动执行 fixture。 该函数会用你的自定义类替换 IdfDut 类。
标记不稳定测试
某些测试用例基于以太网或 Wi-Fi。然而由于网络问题,测试可能会不稳定。此时,可以将某个测试用例标记为不稳定的测试用例。
以下代码示例来自 pytest_esp_eth.py 。
@pytest.mark.flaky(reruns=3, reruns_delay=5)
def test_esp_eth_ip101(dut: IdfDut) -> None:
    ...
这一 marker 表示,如果该测试函数失败,其测试用例会每隔 5 秒钟再运行一次,最多运行三次。
标记已知失败
有时,测试会因以下原因而持续失败:
测试的功能(或测试本身)存在错误。
测试环境不稳定(例如网络问题),导致失败率较高。
可使用 xfail marker 来标记此测试用例,并写出原因。
以下代码来自 pytest_panic.py 。
@pytest.mark.xfail('config.getvalue("target") == "esp32s2"', reason='raised IllegalInstruction instead')
def test_cache_error(dut: PanicTestDut, config: str, test_func_name: str) -> None:
这一 marker 表示该测试在 ESP32-S2 上是一个已知失败。
标记夜间运行的测试用例
在缺少 runner 时,一些测试用例仅在夜间运行的管道中触发。
@pytest.mark.nightly_run
这一 marker 表示,此测试用例仅在环境变量为 NIGHTLY_RUN 或 INCLUDE_NIGHTLY_RUN 时运行。
标记在 CI 中暂时禁用的测试用例
在缺少 runner 时,可以在 CI 中禁用一些本地能够通过测试的测试用例。
@pytest.mark.temp_skip_ci(targets=['esp32', 'esp32s2'], reason='lack of runners')
这一 marker 表明,此测试用例仍可以在本地用 pytest --target esp32 执行,但不会在 CI 中执行。
添加新 marker
我们目前使用两种自定义 marker。target marker 是指测试用例支持此目标芯片,env marker 是指测试用例应分配到 CI 中具有相应 tag 的 runner 上。
你可以通过在 pytest.ini 文件中添加一行来添加新的 marker。如果该 marker 指定了一类测试环境,应将其添加到 env_markers 部分。否则,应将其添加到 markers 部分。语法应为:<marker_name>: <marker_description>。
跳过自动烧录二进制文件
调试测试脚本时最好跳过自动烧录二进制文件。
调用 pytest 执行 --skip-autoflash y 即可实现。
记录数据
在执行测试时,你有时需要记录一些数据,例如性能测试数据。
在测试脚本中使用 record_xml_attribute fixture,数据就会记录在 JUnit 报告的属性中。
日志系统
在执行测试用例时,你有时可能需要添加一些额外的日志行。
这可通过使用 Python 日志模块 实现。
以下是其他日志函数(作为 fixture)
log_performance
def test_hello_world(
    dut: IdfDut,
    log_performance: Callable[[str, object], None],
) -> None:
    log_performance('test', 1)
以上示例可实现用预定义格式 [performance][test]: 1 记录性能数据,并在指定 --junitxml <filepath> 的情况下将其记录在 JUnit 报告的 properties tag 下。相应的 JUnit 测试用例节点如下所示:
<testcase classname="examples.get-started.hello_world.pytest_hello_world" file="examples/get-started/hello_world/pytest_hello_world.py" line="13" name="esp32.default.test_hello_world" time="8.389">
    <properties>
        <property name="test" value="1"/>
    </properties>
</testcase>
check_performance
我们提供了 TEST_PERFORMANCE_LESS_THAN 和 TEST_PERFORMANCE_GREATER_THAN 宏来记录性能项,并检测性能项的数值是否在有效范围内。有时 C 宏无法检测一些性能项的值,为此,我们提供了 Python 函数实现相同的目的。注意,由于该 Python 函数不能很好地识别不同的 ifdef 块下同一性能项的阈值,请尽量使用 C 宏。
def test_hello_world(
    dut: IdfDut,
    check_performance: Callable[[str, float, str], None],
) -> None:
    check_performance('RSA_2048KEY_PUBLIC_OP', 123, 'esp32')
    check_performance('RSA_2048KEY_PUBLIC_OP', 19001, 'esp32')
以上示例会首先从 components/idf_test/include/idf_performance.h 和指定目标芯片的 components/idf_test/include/esp32/idf_performance_target.h 头文件中获取性能项 RSA_2048KEY_PUBLIC_OP 的阈值,然后检查该值是否达到了最小值或超过了最大值。
例如,假设 IDF_PERFORMANCE_MAX_RSA_2048KEY_PUBLIC_OP 的值为 19000,则上例中第一行 check_performance 会通过测试,第二行会失败并警告:[Performance] RSA_2048KEY_PUBLIC_OP value is 19001, doesn\'t meet pass standard 19000.0。