Network Configuration
In the previous example, we had hard-coded the Wi-Fi credentials into the firmware. This obviously doesn’t work for an end-user product.
In this step we will build a firmware such that the end-user can configure her Wi-Fi network’s credentials into the device at run-time. Since a user’s network credentials will be stored persistently on the device, we will also provide a Reset to Factory action where a user’s configurations can be erased from the device. You may refer to the 4_network_config/ directory of esp-jumpstart for looking at this code.
Overview
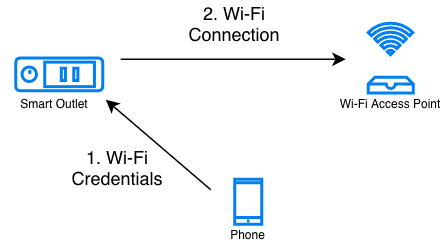
As can be seen in this figure, in the network configuration stage, the end-user typically uses her smart-phone to securely configure her Wi-Fi credentials into your device. Once the devices acquires these credentials, it can then connect to her home Wi-Fi network.
Network Configuration Process
There can be multiple channels through which your device can receive the Wi-Fi credentials. ESP-Jumpstart supports the following mechanisms:
SoftAP
Bluetooth Low Energy (BLE)
Each of these have their own pros and cons. There is no single way of doing this, some developers may pick one way, and some the other, depending upon what they value more.
SoftAP
In the SoftAP mechanism your outlet will launch its own temporary Wi-Fi Access Point. The user can then connect their smart-phones to this temporary Wi-Fi network. And then use this connection to transfer the Home Wi-Fi’s credentials to the outlet. Many connected devices in the market today use this kind of mechanism. In this network configuration workflow, the user has to
switch their phone’s Wi-Fi network to your outlet’s temporary Wi-Fi network
launch your phone application
enter her home Wi-Fi credentials that will be then transferred to the outlet over the SoftAP connection
From a user experience perspective, the first step of this requires the user to change their phone’s Wi-Fi network. This may be confusing to some users. Changing the Wi-Fi network programmatically through the phone application may not always be possible (iOS and some variants of Android don’t allow phone apps to do this). But the advantage of this method is that it is very reliable (SoftAP being just Wi-Fi, is an established mechanism), and doesn’t require a lot of additional code (footprint) in the device firmware.
BLE
In the Bluetooth Low Energy (BLE) method, your outlet will be doing a BLE advertisement. Phones in the vicinity can see this advertisement, and ask the user to do a BLE connection with your device. Then this network is used to transfer the credentials to the outlet. In this network configuration workflow, the user doesn’t have to do the hard task of switching between Wi-Fi networks. Additionally, both iOS and Android allow phone application to scan for BLE devices in the vicinity and also connect to them through the app. This means a much smoother end-user experience.
One side-effect, though, of using the BLE based network configuration is that it also pulls in the code for Bluetooth. This means your flash requirement may be affected since your firmware size will increase. During the network configuration mode, BLE will also consume memory until the network configuration is complete.
Demo
Before getting into the details of the network configuration workflow, let us get a feel for how an end-user will configure the network using the provided application. You may refer to the 4_network_config/ directory of esp-jumpstart for trying this out.
Go to the 4_network_config application.
Build, flash and load the application.
By default, the firmware is launched in BLE provisioning mode.
Install the companion phone application for network configuration. Android: https://play.google.com/store/apps/details?id=com.espressif.provble, iOS: https://apps.apple.com/in/app/esp-ble-provisioning/id1473590141.
Launch the application and follow the wizard.
If all goes well, your device would be connected to your Home Wi-Fi network.
If you now reboot the device, it will NOT enter the network-configuration mode. Instead it will go and connect to the Wi-Fi network that is configured. This is the end product experience that we want.
Network Provisioning
Espressif provides a Network Provisioning component for assisting you with your network configuration. This component is available through the ESP Component Registry and provides a modern, unified interface for Wi-Fi provisioning. When this component is invoked from your firmware executable, the component takes care of managing all the state transitions (like starting/stopping the softAP/BLE interface, exchanging the credentials securely, storing them for subsequent use etc).
Extensible Protocol: The protocol is completely flexible and it offers the ability for the developers to send custom configuration in the provisioning process. The data representation too is left to the application to decide.
Transport Flexibility: The protocol can work on Wi-Fi (SoftAP + HTTP server) or on BLE as a transport protocol. The framework provides an ability to add support for any other transport easily as long as command-response behaviour can be supported on the transport.
Security Scheme Flexibility: It’s understood that each use-case may require different security scheme to secure the data that is exchanged in the provisioning process. Some applications may work with SoftAP that’s WPA2 protected or BLE with “just-works” security. Or the applications may consider the transport to be insecure and may want application level security. The network provisioning framework allows application to choose the security as deemed suitable.
Compact Data Representation: The protocol uses Google Protocol Buffers as a data representation for session setup and Wi-Fi provisioning. They provide a compact data representation and ability to parse the data in multiple programming languages in native format. Please note that this data representation is not forced on application specific data and the developers may choose the representation of their choice.
The following components are offered as part of the provisioning infrastructure:
Network Provisioning Specification: A specification to securely transfer Wi-Fi credentials to the device, independent of the transport (SoftAP, BLE). More details can be found here: https://docs.espressif.com/projects/esp-idf/en/latest/esp32/api-reference/provisioning/provisioning.html.
Component Registry Component: The network provisioning component available through ESP Component Registry (espressif/network_provisioning) that implements this specification in the device firmware.
Phone apps: Android: BLE Provisioning(https://play.google.com/store/apps/details?id=com.espressif.provble), SoftAP Provisioning(https://play.google.com/store/apps/details?id=com.espressif.provsoftap). iOS: BLE Provisioning(https://apps.apple.com/in/app/esp-ble-provisioning/id1473590141), SoftAP Provisioning(https://apps.apple.com/in/app/esp-softap-provisioning/id1474040630)
- Phone App sources: Sources for the phone apps for
Android (https://github.com/espressif/esp-idf-provisioning-android) and iOS (https://github.com/espressif/esp-idf-provisioning-ios) are available for testing during your development, or for skinning with your brand’s elements.
The Code
The code for invoking the network provisioning through your firmware is shown below:
network_prov_mgr_init(config);
if (network_prov_mgr_is_wifi_provisioned(&provisioned) != ESP_OK) {
    return;
}

if (provisioned != true) {
    /* Start provisioning service */
    network_prov_mgr_start_wifi_provisioning(security, pop,
                service_name, service_key);
} else {
    /* Start the station */
    wifi_init_sta();
}
The network_provisioning component provides a wrapper over the unified provisioning interface. Some notes about the code above:
The network_prov_mgr_init API initialises the network provisioning manager. This should be the first API call before invoking any other network provisioning APIs.
The network_prov_mgr_is_wifi_provisioned() API checks whether Wi-Fi network credentials have already been configured or not. These are typically stored in a flash partition called the NVS. More about NVS later in this Chapter.
If no Wi-Fi network credentials are available, the firmware launches the network provisioning using the call network_prov_mgr_start_wifi_provisioning(). This API will take care of everything, specifically:
It will start the SoftAP or BLE transport as configured
It will enable the necessary advertisements using the Wi-Fi or BLE standards
It will securely accept any network credentials from a phone application
It will store these credentials, for future use, in the NVS
Finally, it will deinitialise any components (SoftAP, BLE, HTTP Server etc) that were required by the network provisioning mechanism. This ensures once provisioning is complete there is almost no memory overhead from the network provisioning module.
If a Wi-Fi network configuration was found in NVS, we directly start the Wi-Fi station interface using wifi_init_sta().
These steps ensure that the firmware launches the network provisioning module when no configuration is found, and if a configuration is available, then starts the Wi-Fi station interface.
The network provisioning module also needs to know the state transitions of the Wi-Fi interface. The event handler should be structured to handle both network provisioning events and Wi-Fi/IP events:
static void event_handler(void* arg, esp_event_base_t event_base,
                          int32_t event_id, void* event_data)
{
    if (event_base == NETWORK_PROV_EVENT) {
        switch (event_id) {
            case NETWORK_PROV_START:
                ESP_LOGI(TAG, "Provisioning started");
                break;
            case NETWORK_PROV_WIFI_CRED_RECV:
                /* Handle Wi-Fi credential received */
                break;
            case NETWORK_PROV_WIFI_CRED_SUCCESS:
                ESP_LOGI(TAG, "Provisioning successful");
                break;
            case NETWORK_PROV_END:
                network_prov_mgr_deinit();
                break;
        }
    } else if (event_base == WIFI_EVENT && event_id == WIFI_EVENT_STA_START) {
        esp_wifi_connect();
    } else if (event_base == IP_EVENT && event_id == IP_EVENT_STA_GOT_IP) {
        ip_event_got_ip_t* event = (ip_event_got_ip_t*) event_data;
        ESP_LOGI(TAG, "Connected with IP Address:" IPSTR, IP2STR(&event->ip_info.ip));
    } else if (event_base == WIFI_EVENT && event_id == WIFI_EVENT_STA_DISCONNECTED) {
        ESP_LOGI(TAG, "Disconnected. Connecting to the AP again...");
        esp_wifi_connect();
    }
}
Configurable Options
In the code above, we first initialise the Network Provisioning manager with a config structure, an example of which is as below:
/* Configuration for the provisioning manager */
network_prov_mgr_config_t config = {
    .scheme = network_prov_scheme_ble,
    .scheme_event_handler = NETWORK_PROV_SCHEME_BLE_EVENT_HANDLER_FREE_BTDM,
    .app_event_handler = {
        .event_cb = prov_event_handler,
        .user_data = NULL
    }
};
network_prov_mgr_init(config);
The parameters are as follows:
Scheme: What is the Provisioning Scheme that we want? SoftAP (network_prov_scheme_softap) or BLE (network_prov_scheme_ble)?
- Scheme Event Handler: Any default scheme specific event handler that you would like to choose.
Normally, this is used just to reclaim some memory after provisioning is done.
- NETWORK_PROV_SCHEME_BLE_EVENT_HANDLER_FREE_BTDM - Free both classic BT and BLE (BTDM) memory.
Used when main application doesn’t require Bluetooth at all
- NETWORK_PROV_SCHEME_BLE_EVENT_HANDLER_FREE_BLE - Free only BLE memory.
Used when main application requires classic BT.
- NETWORK_PROV_SCHEME_BLE_EVENT_HANDLER_FREE_BT - Free only classic BT.
Used when main application requires BLE. In this case freeing happens right when the manager is initialized.
- NETWORK_PROV_EVENT_HANDLER_NONE Don’t use any scheme specific handler.
Used when provisioning scheme is not BLE (i.e. SoftAP or Console), or when main application wants to handle the memory reclaiming on its own, or needs both BLE and classic BT to function.
Application Event Handler: Applications may want to use the provisioning events. A handler for that can be registered here. Any application specific user data can also be indicated here, which will be passed to the event handler.
After initialising, we have used the following call for starting the provisioning:
/* Start provisioning service */
network_prov_mgr_start_wifi_provisioning(security, pop, service_name, service_key);
Let us now look at the parameters, or the configuration options of this API:
Security: The network provisioning module currently supports two security methods for transferring the credentials: security0 and security1. Security0 uses no security for exchanging the credentials. This is primarily used for development purposes. Security1 uses secure communication which consists of secure handshake using X25519 key exchange and proof of possession (pop) and AES-CTR for encryption/decryption of messages.
Proof of Possession: When a user brings in a new smart device, the device launches its provisioning network (BLE, SoftAP) for configuration. How do you make sure that only the owner of the device configures the device and not their neighbours? This configurable option is for that. Please read the following subsection for more details about this option.
Service Name: When the user launches the network configuration app, the user will be presented with a list of unconfigured devices, in her vicinity. The service name is this name that will be visible to the user. You may choose a name that identifies your device conveniently (abc-thermostat). It is common practice to have some element in the service name that is unique or random. This helps in scenarios when there could be multiple unconfigured devices that the user is configuring at the same time. When the provisioning mode is SoftAP, the service name appears as the SSID of the temporary Wi-Fi access point. When the provisioning mode is BLE, this appears as the BLE device name.
Service Key: Service Key is an optional parameter, which, if used serves as a password to protect the transport from being accessed by unauthorized users. This is useful when the mode of transport is SoftAP and you want the temporary Wi-Fi access point to be password protected. When the provisioning mode is BLE, this option is ignored altogether as BLE uses “just-works” pairing method.
Proof of Possession
When a user brings in a new smart device, the device launches its provisioning network (BLE, SoftAP) for configuration. How do you make sure that only the owner of the device configures the device and not their neighbours?
Some products expect the user configuring the device to provide a proof that they really own (or posses) the device that they are configuring. The proof of possession can be provided by taking some physical action on the device, or by entering some unique random key that is pasted on the device’s packaging box, or by displaying on a screen, if the device is equipped with one.
At manufacturing, every device can be programmed with a unique random key. This key could then be provided to the network provisioning module as a proof of possession option. When the user configures the device using the phone application, the phone application transfers the proof of possession to the device. The network provisioning module then validates that the proof of possession matches and then confirms the configuration.
Additional Details
More details about Network provisioning and the unified provisioning abstraction layer are available at: https://docs.espressif.com/projects/esp-idf/en/latest/esp32/api-reference/provisioning/provisioning.html and the ESP Component Registry page: https://components.espressif.com/components/espressif/network_provisioning
NVS: Persistent key-value store
In the Network Provisioning section above, we mentioned in passing that the Wi-Fi credentials are stored in the NVS. The NVS is a software component that maintains a persistent storage of key-value pairs. Since the storage is persistent this information is available even across reboots and power shutdowns. The NVS uses a dedicated section of the flash to store this information.
The NVS is designed in such a manner so as to be resilient to metadata corruption across power loss events. It also takes care of wear-levelling of the flash by distributing the writes throughout the NVS partition.
Application developers can also use the NVS to store any additional data that you wish to maintain as part of your application firmware. Data types like integers, NULL-terminated strings and binary blobs can be stored in the NVS. This can be used to maintain any user configurations for your product. Simple APIs like the following can be used to read and write values to the NVS.
/* Store the value of key 'my_key' to NVS */
nvs_set_u32(nvs_handle, "my_key", chosen_value);

/* Read the value of key 'my_key' from NVS */
nvs_get_u32(nvs_handle, "my_key", &chosen_value);
Additional Details
More details about NVS are available at: https://docs.espressif.com/projects/esp-idf/en/latest/esp32/api-reference/storage/nvs_flash.html
Reset to Factory
Another common behaviour that is expected of products is Reset to Factory Settings. Once the user configuration is stored into the NVS as discussed above, reset to factory behaviour can be achieved by simply erasing the NVS partition.
Generally, this action is triggered by long-pressing a button available on the product. This can easily be configured using the iot_button_() functions
The Code
In the 4_network_config/ application, we use a long-press action of the same toggle push-button to configure the reset to factory behaviour.
/* Register 3-second long press callback */
button_event_args_t long_press_args = {
    .long_press.press_time = 3000,
};
iot_button_register_cb(btn_handle, BUTTON_LONG_PRESS_START, &long_press_args, button_press_3sec_cb, NULL);
This function makes the configuration such that the button_press_3sec_cb() function gets called whenever the button associated with the btn_handle is pressed and held for longer than 3 seconds. Remember we had initialised the btn_handle in Section The Code
The callback function can then be written as follows:
static void button_press_3sec_cb(void *button_handle, void *usr_data)
{
    nvs_flash_erase();
    esp_restart();
}
This code basically erases all the contents of the NVS, and then triggers a restart. Since the NVS is now wiped, the next time the device boots-up it will go back into the unconfigured mode.
If you have loaded and configured the device with the 4_network_config/ application, you can see this in action and by pressing the toggle button for more than 3 seconds and then releasing it.
Progress so far
Now we have a smart outlet that the user can configure, through a phone app, to their home Wi-Fi network. Once configured, the outlet will keep connecting to this configured network. We also have the ability to erase these settings on a long-press of a push-button.
As of now, the outlet functionality and the connectivity functionality are separate. As our next step, let’s control and monitor the state of the outlet (on/off) remotely.