Host integration, Wi-Fi configuration and recovery
First-time Wi-Fi setup and wireless connection
Connect a Wi-Fi-capable board running compatible ESP-VISION firmware to your computer with a USB data cable. The computer and board need a mutually reachable LAN. See LAN discovery protocol and board defaults for board support and Build vision applications with AI for first-time firmware installation.
Set up Wi-Fi on the website
You can also configure Wi-Fi directly on the ESP-VISION website without installing local host tools.
Connect the board over USB and leave ESP-VISION firmware running normally. Open the website in a desktop browser supporting Web Serial, such as Chrome or Edge, and find the browser flashing panel.
Under “Flash Mode”, choose “Configure Wi-Fi Only”, click “Connect Serial”, and select the board’s running serial port in the browser dialog.
Under “Device Wi-Fi setup”, enter the Wi-Fi SSID and password, then click “Save”.
Wait for “Wi-Fi Connected” and the TCP address. The configuration is saved on the board for automatic reconnection after power-on. To check again, click “Read Status Again”.
Click “Disconnect” to release the website’s device connection, then connect your AI assistant or another host tool to the board over the LAN.
“Configure Wi-Fi Only” updates network settings without reinstalling firmware. Use it directly when compatible firmware is already installed; after first-time firmware installation, you can also complete setup on the website’s follow-up Wi-Fi page.
Set up Wi-Fi with an AI assistant
After installing the ESP-VISION plugin, describe what you want:
Note
Connect my board to Wi-Fi so I can update its program and view the camera over a wireless connection.
Keep USB connected, give the assistant the Wi-Fi name, and follow the password-entry prompt.
Wait for the assistant to confirm setup and report the board’s LAN address. Initial setup needs time to obtain an IP address and save the configuration.
Continue with an application request over the wireless connection, such as “Track red objects with the camera and show me the result on my computer.”
Once the wireless connection works, you can use a separate power supply suitable for the board. On subsequent boots, the board reconnects using its saved configuration.
Set up Wi-Fi with the CLI
For manual setup, install Device CLI and its serial dependencies as described in Device management CLI. In the commands below, replace the example values COM3, MyWiFi and 192.168.1.100 with the discovered serial port, your network name and the IP address reported by the board.
Find the board connected over USB:
esp-vision-device inspect --interface serialConfigure Wi-Fi and enable the network service; enter the password at the terminal prompt, which hides your input:
esp-vision-device configure --port COM3 --ssid "MyWiFi" --network-enabled true --timeout 60000The command waits for the network configuration transaction to finish, with the wait budget set to 60 seconds here. It returns
ok: trueon success; setup succeeds only after obtaining an IP address and saving the configuration. For non-interactive input, see--password-stdinin the CLI reference.Check the board’s network status and address over USB:
esp-vision-device inspect --port COM3 --fields identity,networkCheck that
networkreportsenabledandconfiguredastrueandstateasonline, then noteipv4. If a command times out or fails, inspect this status and errors inoperation/lastOperationbefore deciding whether to configure again.Discover LAN devices and verify wireless access using the reported IP address:
esp-vision-device inspect --interface tcp
esp-vision-device inspect --tcp 192.168.1.100:3232 --fields identity,network
Compare identity with the USB result to confirm it is the same board. Once connected, CLI file management, Python script execution and image capture can use
--tcp; see Preview, debug capture, backpressure and statistics for continuous image preview. Keep the board powered during wireless development; firmware flashing still uses USB serial.
If setup fails or the board is not discovered
Incorrect password or network not found: check the Wi-Fi name, password, signal and the board’s supported frequency bands, then configure again over USB.
Connected but unable to obtain an IP address: check the router’s DHCP service and inspect network status over USB.
The board has an IP address but is missing from discovery: try connecting directly to that IP; check LAN reachability, guest-network isolation, firewall rules and mDNS filtering.
Address changes or connection drops: discover the board again; if it remains unreachable, keep USB power and connectivity and use the network status command above to investigate.
Recommended host stack
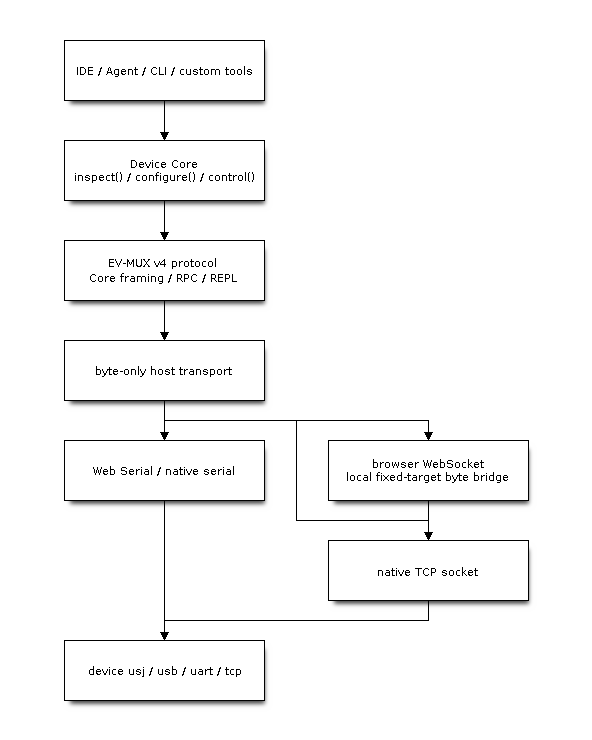
Figure 21: Shared Core owns protocol state; transport carries bytes. A network bridge must not acquire again, re-encode frames or execute Python, creating duplicate owners/correlation logic.
@esp-vision/device-core in host/device-core provides the shared protocol implementation. IDE, independent Agent and firmware hardware checks all use Core; Agent workflows, model providers and MCP plugins belong to the Agent host, not Core or firmware communication. Applications obtain the public API through createDevice(). Parser, framed REPL and session keepalive remain internal rather than being assembled again by each host.
See Device Core integration guide for complete Node TCP, browser Web Serial and high-level API examples. Hardware testing uses the package’s single npm run test:hardware entry point. Its serial adapter only forwards bytes; it is not a second Python EV-MUX client. See Communication acceptance, closed-loop tests and troubleshooting for camera and LCD check selection.
This adapter detail expands the shared Solution Architecture diagram: host applications → Device Core → EV-MUX → device firmware. Core owns protocol/session state; native serial, Web Serial, TCP and WebSocket bridges only move bytes. DNS-SD discovery precedes connection and ROM flashing is a separate loader path, not EV-MUX image transfer.
Integration sequence
Select a physical endpoint, verify device/USB topology and open transport.
Serial performs one bounded startup drain before its first request; TCP acquires immediately.
Start the continuous reader, acquire through hello with a new nonce, validate evMuxVersion/correlation and retain session.
Query capabilities/firmware identity and negotiate command/REPL budgets/timeouts.
Start reported-interval keepalive; keep the reader active throughout application operations.
Wait for current-epoch vmReady and verify executable REPL before VM work.
Coordinate files, run, stop and reset serially while receiving logs/preview.
Release session when possible before closing transport, reader and pending requests.
Why serial startup drain runs only once
Opening USB serial may reveal old complete/partial frames, tracebacks and IDF startup text; it does not trigger a discovery hello. serial.flush() normally waits for host TX rather than reading/clearing device replies.
At connection startup Core receives and processes startup bytes through the same parser for a target 300 ms; this does not establish a business session. If a possible incomplete header/body crosses that window, Core continues receiving within the parser’s remaining progress and total frame budgets (both default to 12 seconds). It keeps rejecting startup frames and sends no hello until parsing reaches a complete frame boundary. The total deadline is fixed when this extra wait begins; successive frames cannot extend it. Cancellation, disconnection or an expired receive budget fails the connection and cleans up. A parser timeout that discards an incomplete frame is a failure, not a completed boundary; Core never flushes or truncates buffered bytes to manufacture success.
Drain reduces observed old data; it neither proves every device/USB/host buffer empty nor diagnoses USB completion failures. Never clear input before every subsequent request, losing keepalive/preview/replies.
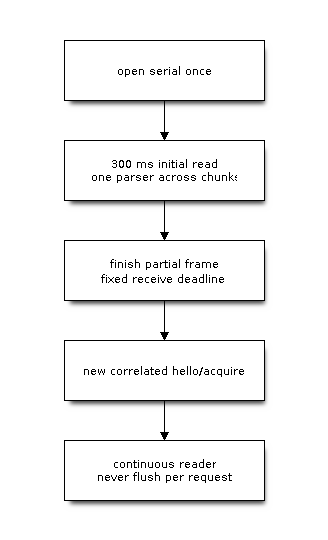
Figure 22: Drain prepares integration; it does not replace completion correlation. Continue rejecting stale seq/session/epoch.
One hardware-test entry point
Run from the repository root with Node.js 22. Serial mode uses npm native bindings; neither serial nor TCP requires host Python. First verify identity and camera on an online device, then run all checks on USB:
npm --prefix host/device-core run test:hardware -- --tcp <device-ipv4>:3232 --checks identity,camera
npm --prefix host/device-core run test:hardware -- --serial <selected-port> --role usj --checks all --timeout 600000
Checks stop existing Python programs and may initialize the camera or display a test pattern. Schedule exclusive device use and close the owning IDE/terminal first; switching interfaces does not bypass a valid owner. See Communication acceptance, closed-loop tests and troubleshooting for checks, LCD JPEG output and acceptance evidence.
Actual Wi-Fi/NVS state machine
Initial configuration requires an acquired connection, usually USB/USJ/UART. An unconfigured TCP server cannot provide entirely wireless first-time provisioning. Native/Hosted Wi-Fi and Python WLAN share the underlying instance; background service creates no second WLAN driver.
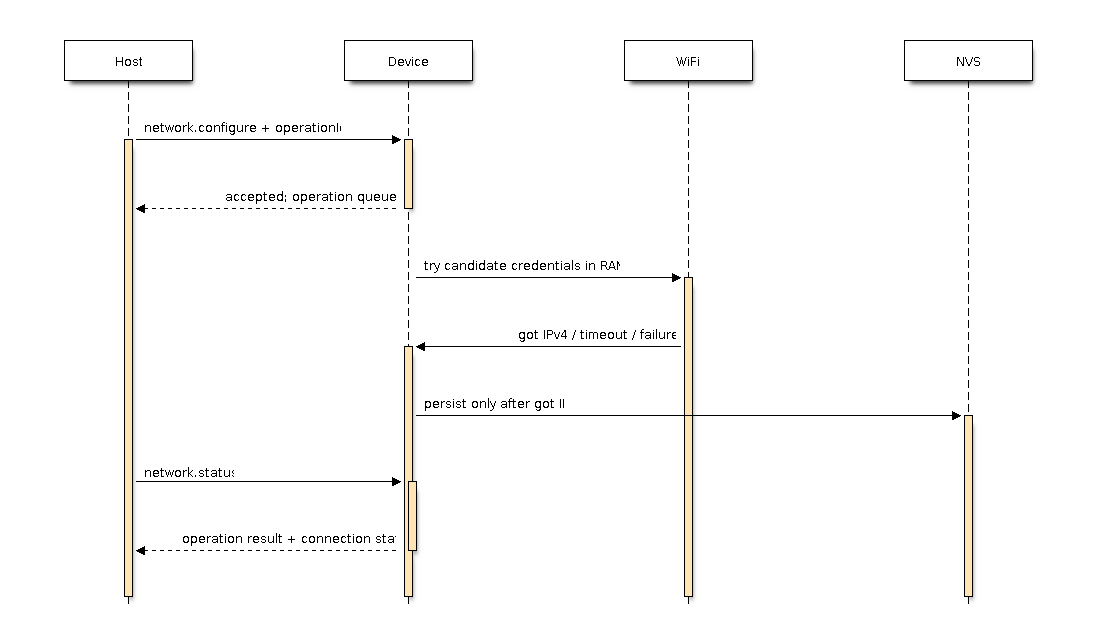
Figure 23: Acceptance, connection and persistence need separate confirmation. Changes start after accepted-reply TX, waiting at most about 1000 ms. Configure tries the candidate in RAM, persists only after obtaining IP within approximately 30 seconds, and restores saved configuration on failure.
{
  "action": "network.configure",
  "operationId": "fedcba9876543210fedcba9876543210",
  "ssid": "<wifi-ssid>",
  "password": "<wifi-password>"
}
Send through user.rpc/device.control with current sessionId in metadata. Network control does not require idle VM. network.status queries final state, network.enable controls persisted enablement and network.forget persists forgotten configuration; these are not Python WLAN method names pasted into RPC.
Use a fresh 32-character operationId per mutation, reusing it only to recover the same transaction with identical payload. network.changed hints at change; status is a bounded correlated query. Never infer latest transaction state from old events after reset/disconnect.
Existing NVS records take priority, including disabled, forgotten-empty and corrupt records; factory macros do not override them. Factory defaults persist then attempt connection only when no record exists. RPC user configuration obtains IP before saving: distinct source flows.
Python WLAN mutations return EBUSY during background transactions. Ordinary Python changes may temporarily affect runtime without implicitly rewriting persistent service records. Disabling background service still allows explicit Python WLAN use; TCP service and policy follow service lifecycle.
Examples use placeholder credentials; redact host logs/diagnostics. This TCP implementation has no authentication/encryption and follows a trusted development-network boundary.
Browser network integration
Browsers cannot open arbitrary TCP sockets. IDE uses a local fixed-target WebSocket-to-TCP binary bridge with explicit origins, a fixed device address, one active browser and TCP closure on browser disconnect. The bridge neither interprets EV-MUX nor acquires sessions.
The bridge belongs to the separate IDE repository; do not assume its npm scripts exist in the firmware root:
npm run network:bridge -- --device <device-ipv4>
Local IDE typically uses http://127.0.0.1:8766/ and ws://127.0.0.1:8766/device. Remote HTTPS needs the exact permitted origin and browser local-network/security permissions; use a trusted WSS proxy when TLS is needed. USB Web Serial and network bridges use the same createDevice API and byte-transport contract.
Confirming reset and cancellation
Soft reset: wait for the same owner with new vmEpoch, vmReady and REPL barrier. Asynchronous event/hello has a separate observation budget; absence alone is not reset failure, and presence alone is not executable REPL.
Hard reset/ROM: invalidate sessions/requests, await enumeration/runtime, reacquire and verify firmware identity. Record flashing verification/reset states separately; full readback verified without observed runtime restoration does not justify automatically rewriting images.
Cancellation: stop further upload/execution, interrupt target work where possible and confirm state. Preserve unknown completion where necessary. Recover network transactions by operationId; ordinary RPCs, REPL input and file append have no universal replay guarantee.
Host timeout budgets must remain distinct
Discovery/capabilities: reference correlated RPC default about 6 seconds.
Keepalive: about 3 seconds per request, within firmware total lease.
Serial startup drain: target 300 ms, once on initial connection; a crossing partial frame may finish within its remaining receive budgets, without extending the fixed total deadline.
Host RX frame assembly: reference budget about 12 seconds, allowing multi-second TCP read gaps.
Device RX: approximately 3/10 seconds idle/frame; opposite direction from host large-image reception.
VM queue: expires around 5 seconds; longer host waits do not enlarge it.
File readFile: Core total default 30 seconds; tested IDE scenarios use bounded 60 seconds.
Wi-Fi configure: attempt about 30 seconds; accepted only starts it, requiring final-state queries.
These are current defaults/reference values. Use actual capabilities and client options. Retry within bounds only for explicitly idempotent recovery; slow networking does not justify indefinite waits or automatic duplicate application commands.