Build vision applications with AI
Describe an idea to your AI assistant and develop it into a Python script running on an ESP-VISION board. The assistant can find examples, prepare firmware and models, deploy the application, inspect camera images and logs, and improve the result with you.
Firmware-matched knowledge
The plugin reads the selected board’s actual firmware version before querying APIs, capabilities or examples. The online Knowledge service retains historical snapshots and requires an exact firmware version for every content query. Updating the plugin does not require updating the firmware; an older board can continue using its matching snapshot.
After flashing or switching boards, the assistant inspects the device again. If the firmware version is missing or no matching snapshot exists, it explains the limitation and offers an official firmware update. If you explicitly choose not to update, it uses the latest available official firmware Knowledge snapshot, tells you the selected version and warns that its APIs may differ from your device. The official catalog designates the latest firmware; the assistant preserves its exact TAG instead of guessing order from its spelling. It waits for your choice and never silently switches versions. A failed update or unavailable catalog does not trigger fallback. This choice is reset after switching devices, reconnecting or flashing. Development-version suffixes are preserved. For offline questions, state the target firmware version explicitly, for example: “Explain camera capture for firmware 2026.10.21.” The assistant can list supported versions before proceeding.
Connect your AI assistant
The ESP-VISION plugin connects your assistant to official knowledge and local device tools. Choose the setup path for your client in the official getting-started guide.
WorkBuddy and QoderWork
Install through the application marketplace: search for esp-vision and select the listing below. These are the listing titles shown by the official website.
Client |
Listing |
|---|---|
WorkBuddy |
嵌入式视觉开发专家 | ESP-Vision AI视觉 |
QoderWork |
ESP-Vision 嵌入式 AI 视觉开发 |
Codex and Claude Code
For Codex, start with:
Note
Help me use ESP-VISION in Codex. Official installation guide: https://www.npmjs.com/package/@esp-vision/plugin
For Claude Code:
Note
Help me use ESP-VISION in Claude Code. Official installation guide: https://www.npmjs.com/package/@esp-vision/plugin
Cursor and other assistants
For Cursor and other clients, see the plugin installation guide.
Note
I want to use ESP-VISION in my current AI assistant. Official setup guide: https://github.com/espressif/esp-vision/blob/master/host/esp-vision-plugin/README.md
After setup, start a new conversation in your project. For USB development, the AI assistant needs access to the computer connected to the board.
Connect a board and run an application
Connect a board supported by ESP-VISION to your computer with a USB data cable. For first use, the assistant can download and flash official firmware to prepare the board for vision applications:
Note
This is a new board supported by ESP-VISION. Install ESP-VISION firmware so I can take pictures with its camera. There is no data on the board that I need to keep.
After the initial firmware installation, start developing an application. A board that already has compatible firmware can begin with the application request; a device with networking configured can also connect over the local network.
Note
Show live camera video on the board’s screen with a frame counter, and leave it running for me to see.
Once running, the screen shows a continuously updating camera view and frame counter. You also receive the Python script to adapt and reuse.
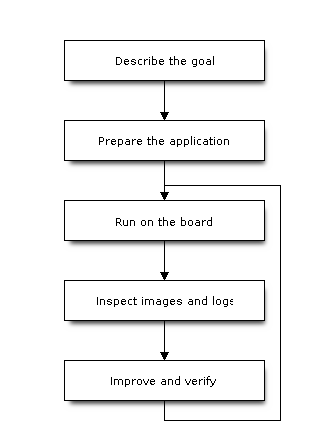
Everyday tasks
Start with the feature, use case or problem you have in mind. The plugin’s workflow handles implementation, while you can continue shaping the result.
Color tracking
Note
Track red objects in the camera view and draw a box around them in real time. The box should follow the object as it moves.
Move a red object in front of the camera and see how well the box follows it. You can add requirements for a different color, object or movement speed.
Update firmware
Note
Update the board to the latest compatible official ESP-VISION firmware, keeping my scripts and settings.
After the update, you receive the installed version and the device’s running results.
Learn about the connected device
Note
What model is the board connected to my computer, what firmware does it have, and which vision features does it support?
Device information helps you choose an application direction, such as image processing, object detection or a camera display.
Face detection
Note
Have the board detect faces and draw boxes around them on screen in real time, with the detection frame rate displayed.
Observe what happens when a face enters, moves through and leaves the camera view, and use the displayed frame rate to assess responsiveness.
QR-code recognition
Note
I want to read QR codes with the camera. Outline each code on screen, show its content and keep updating as I move it.
Add requirements for your use case, such as reading smaller QR codes or making their contents easier to read.
Develop over Wi-Fi
Note
Connect my board to Wi-Fi so I can update its program and view the camera over a wireless connection.
For initial setup, connect a Wi-Fi-capable board over USB and provide network details when the assistant asks. Once configured, continue development over the LAN; the board reconnects to its saved network after power-on. Alternatively, open the browser flashing panel on the website, choose “Configure Wi-Fi Only” under “Flash Mode”, connect the serial port, and enter and save your network settings. See Host integration, Wi-Fi configuration and recovery for the complete setup procedure and connection troubleshooting.
USB camera
Note
Turn the board into a USB camera so my computer can show live video with boxes around detected faces.
Use a board with USB-OTG Device support and connect its USB-OTG port. Select ESP-VISION Camera in your computer’s camera application to view the result. See uvc — USB webcam output for supported image formats, resolution and APIs.
Investigate and fix a problem
Note
The board’s screen goes black after the camera program starts. Please fix it.
Share what you observed, along with any available error message or image. You can also describe how the application behaved before the problem appeared.
Improve the result through conversation
Keep working in the same conversation so the assistant can use the project, device and previous results as context. For the tracking application, you could follow up with:
Note
The red-object tracking box flickers in dim lighting. I want the tracking to stay stable in low light.
For the detection application:
Note
The status text is too small. Make it larger and add the detection frame rate.
Describe the next goal in terms of your experience: steadier tracking, faster response, clearer images or more readable text.
Tools behind the conversation
The host-side tools connect natural-language development to official knowledge and real hardware:
Tool |
Role |
|---|---|
Plugin ( |
Gives the AI client the ESP-VISION Skill, bundled Device CLI and official knowledge connection. |
Device CLI ( |
Lets the assistant discover devices, manage firmware and files, run Python scripts and capture images on the local host. |
Knowledge MCP |
Supplies official API documentation, board capabilities and examples for the assistant to consult. |
For further detail, see the Device CLI reference, Python script guidance and host SDK guide.