
Preface
Welcome to our guide to embedded Rust development on Espressif products. This book is designed to help you get started and become comfortable using our tools and ecosystem. Along the way, we’ll introduce the structure of our software stack, and walk through basic workflows using project generation and tooling. By the end, you’ll be ready to explore more advanced material through our reference documentation and external training resources.
Who This Book Is For
This book is intended for Rust developers who are interested in embedded development, even if they don’t have prior experience with embedded systems. While some familiarity with low-level programming concepts can be helpful, we aim to introduce key ideas as they come up. If you would like to expand your baseline knowledge, consider studying the additional Resources.
Stability and Availability
While we strive for stability, users should expect periodic modifications as we improve the API, enhance performance, and introduce new features. Modules that are already stabilized will not be subject to breaking changes, in accordance with semantic versioning - SemVer. However, unstable features—such as parts of the esp-hal and certain drivers are actively being developed and are not covered by SemVer guarantees. This means that using these unstable components may break your project with a simple cargo update, much like working with Rust’s nightly compiler. This kind of instability is common across the broader Rust embedded ecosystem, which is still rapidly evolving. Expect frequent changes and track dependencies closely. For all major crates, we provide migration guides between releases to help you stay up to date.
Additional Resources
If you’re unfamiliar with certain concepts covered in this book or would like to deepen your understanding, the following resources may be helpful:
| Resource | Description |
|---|---|
| The Rust Programming Language | Learn Rust fundamentals before diving into embedded development. |
| The Embedded Rust Book | A collection of resources from Rust’s Embedded Working Group. |
Embedded Rust (no_std) on Espressif | Guide for working in no_std environments with Espressif SoCs. |
| Awesome ESP Rust | A list of resources for development in the Rust programming language for Espressif products |
| Awesome Embedded Rust | A list of resources related to embedded and low-level programming in the Rust programming language, including a selection of useful crates. |
Contributing to This Book
The work on this book is coordinated in this repository.
If you encounter difficulties following the instructions or find unclear sections, please report them in the issue tracker. Contributions in the form of pull requests for typo fixes or clarity improvements are always welcome!
Support and Community
If you need help, have questions, or would like to discuss topics related to esp-rs, you can reach out through the following channels:
- Matrix: Join our community chat.
- GitHub Discussions: Engage with the community.
We hope this book provides you with the knowledge and confidence to build robust, efficient, and safe embedded applications using Rust on Espressif products. Let’s get started!
Introduction
In this introduction, we’ll cover two essential topics that will give you a solid foundation for working with Espressif devices in Rust:
-
Hardware Overview: Understanding the Espressif ecosystem, including the different SoC families, their architectures, and development boards. This knowledge will help you choose the right chip for your project and understand the underlying hardware you’ll be programming.
-
Ancillary Crates Overview: Exploring the ecosystem of crates, these crates provide the building blocks for everything from memory allocation to wireless communication.
Understanding both the hardware capabilities and the software ecosystem will prepare you for the practical aspects covered in the Getting Started chapter, where you’ll set up your development environment and create your first applications.
Let’s begin with an overview of the hardware you’ll be working with.
Hardware Overview
The crates under the esp-rs organization include support for the ESP32, ESP32-S, ESP32-C and ESP32-H Series SoCs.
Each SoC has its own unique features while sharing some common traits. To select the appropriate chip for your project, please use the Espressif Product Selector.
The Espressif portfolio is based on two different system architectures:
- Xtensa: The ESP32 and ESP32-S series are based on the Xtensa architecture.
- RISC-V: The ESP32-C and ESP32-H series are based on the RISC-V architecture.
We won’t go into the details or differences between the two architectures here. Rust’s official support differs between the two architectures. Xtensa is not yet officially supported by Rust; the reason for Rust not supporting Xtensa is that Rust uses LLVM as part of its compiler infrastructure, and LLVM does not yet support Xtensa. For this reason, we maintain custom forks of both LLVM and the Rust compiler that include Xtensa support, and we are actively working to upstream our changes to enable official support in the future.
Note
We are actively working to upstream our forks. Below is the current status:
- LLVM fork: We’ve made significant progress recently. For details, refer to the tracking issue.
- Rust compiler fork: We’ve submitted all feasible Xtensa patches. Further progress depends on these changes being upstreamed into LLVM.
Feel free to refer to the Technical Documentation for more information about the different SoCs.
Note
The ESP8266 is not supported by
esp-hal.However, the ESP32-C2 (ESP8684) and ESP32-C3 (ESP8685) are supported. Notably, the ESP32-C3 is pin-compatible with the ESP8266, making it a suitable drop-in replacement.
Understanding an Espressif DevKit
Let’s take the ESP32-C6-DevKitC-1 as an example. It’s a development board based on ESP32-C6 which comes with:
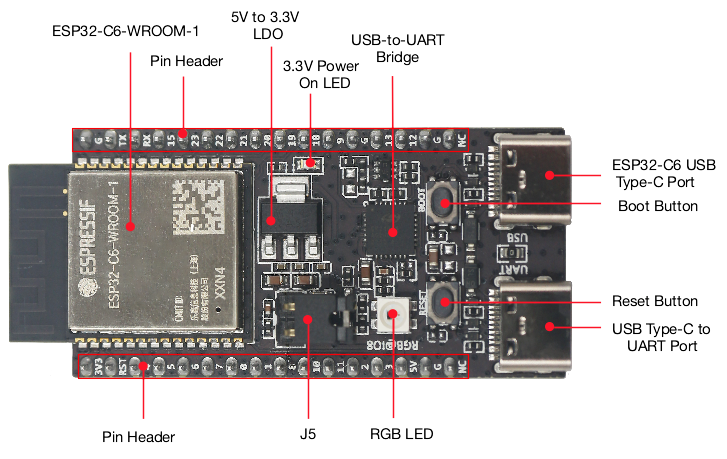
- ESP32-C6-WROOM-1 module:
- Wi-Fi, BLE, and IEEE 802.15.4 support.
- 8 MB SPI flash.
- GPIO pins available for use.
- 2 buttons: Boot and Reset
- Boot button: Download button. Holding down Boot and then pressing Reset initiates Firmware Download mode for downloading firmware through the serial port.
- For more information, see Boot Mode Selection.
- Reset button: Resets the device.
- Boot button: Download button. Holding down Boot and then pressing Reset initiates Firmware Download mode for downloading firmware through the serial port.
- 2 USB-C ports:
- USB-C to UART port: Used for power supply to the board, for flashing applications to the chip, as well as the communication with the ESP32-C6 chip via the on-board USB-to-UART bridge.
- USB-C port: Used for power supply to the board, for flashing applications to the chip, for communication with the chip using USB protocols, as well as for JTAG debugging.
- RGB LED: Addressable RGB LED, driven by GPIO8.
- Note that this is not a standard RGB LED, it is a WS2812B LED.
Ancillary Crates Overview
Before going into a detailed description of the various packages and concepts for writing an application, it might be useful to have a superficial familiarity with the whole ecosystem, both in the esp-hal sense and in the broader Embedded Rust sense.
esp-hal Ecosystem
The first step in working with a project is to create it, the main way to do this is to use esp-generate. Read more about it in the section dedicated to this tool.
The core crate that ties all work with Espressif chips in Rust is the esp-hal crate. Through it, you will be able to perform basic initialization of the chip, as well as access drivers for the peripherals available on the chip. The full esp-hal documentation for selected chip will give unambiguous information about what peripherals are available to use, and the stability of their respective drivers.
Furthermore, you may want to use more advanced functionality of the chip. For example, network and connectivity. This part of the ecosystem is the responsibility of esp-radio, which combines drivers for the communication protocols available on one or another of Espressif’s products: Wi-Fi, BLE, esp-now and low-level IEEE 802.15.4 for the lower layers of communication. More detailed information for each chip is available in the esp-radio sub-repository. It is also worth mentioning that radio support requires the stack to run continuously in the background (timers, interrupts, state machines). esp-radio relies on an implementation of esp-radio-rtos-driver, which defines the scheduling and runtime interface the stack needs to run reliably. esp-rtos is the default backend we ship and support; in principle user is free replace it with another implementation of the driver. esp-generate will add esp-rtos automatically when you enable the appropriate template options.
For more advanced work with chip memory and to use collections from the alloc crate in no_std that require heap allocation, you are welcome to use esp-alloc. A separate chapter in the book is devoted to this.
The table below briefly describes all crates in the esp-hal ecosystem and their purposes:
| Crate | Description | Stability |
|---|---|---|
esp-alloc | Memory allocation utilities. | Unstable |
esp-backtrace | Provides backtraces support. | Unstable |
esp-bootloader-esp-idf | Offers additional support for the ESP-IDF 2nd stage bootloader, including OTA. | Unstable |
esp-build | Build utilities for use with esp-hal and other related packages, intended for use in build scripts. | Unstable |
esp-config | Configuration system. | Unstable |
esp-hal | Bare-metal (no_std) HAL for all Espressif ESP32 devices. | Stable* |
esp-hal-proc-macros | Procedural macros for use with the esp-hal family of HAL packages. | Unstable |
esp-lp-hal | Bare-metal (no_std) HAL for the low power and ultra-low power cores found in some Espressif devices. | Unstable |
esp-metadata | Metadata for Espressif devices, primarily intended for use in build scripts. | Unstable |
esp-preempt | Threading and thread-aware synchronization primitives, primarily used for esp-radio. | Unstable |
esp-println | Print and logging functionality for Espressif devices. | Unstable |
esp-riscv-rt | Minimal startup/runtime for RISC-V CPUs from Espressif. | Unstable |
esp-rom-sys | ROM code support. | Unstable |
esp-rtos | Scheduler implementation for esp-radio, embassy support for esp-hal. | Unstable |
esp-sync | Synchronization primitives for Espressif devices. | Unstable |
esp-storage | Storage utilities for Espressif devices. | Unstable |
esp-radio | Wi‑Fi, BLE, IEEE 802.15.4, and ESP‑NOW functionality for Espressif devices. | Unstable |
xtensa-lx | Low-level access to Xtensa LX processors and peripherals. | Unstable |
xtensa-lx-rt | Minimal startup/runtime for Xtensa LX CPUs from Espressif. | Unstable |
Note
The stability of individual peripheral drivers within
esp-halvaries. Refer to the Peripheral support section for per-peripheral stability details.
You can find details about any of these packages in the esp-rs documentation.
Embedded Rust Ecosystem Integration
The most popular Hardware Abstraction Layer in the Embedded Rust environment is embedded-hal, which provides a number of traits for several peripherals that allow writing HAL agnostic device drivers. esp-hal implements these traits within its drivers. In addition, various traits from different crates used in the embedded Rust industry have also been implemented, such as rand_core traits for our Random Number Generator (RNG) peripheral, as well as embedded-io traits, which are analogues of std::io traits for no_std applications.
Getting Started
This chapter guides you through setting up your development environment for building applications with Rust on Espressif devices.
Toolchain Installation
Toolchain Installation
Rust Installation
Make sure you have Rust installed. If not, see the instructions on the rustup website.
Warning
When using Unix based systems, installing Rust via a system package manager (e.g.
brew,apt,dnf, etc.) can result in various issues and incompatibilities, so it’s best to use rustup instead.
When using Windows, make sure you have installed one of the ABIs listed below. For more details, see the Windows chapter in The rustup book.
-
MSVC: Recommended ABI, included in the list of
rustupdefault requirements. Use it for interoperability with the software produced by Visual Studio.When in doubt, this is what you want to use.
-
GNU: ABI used by the GCC toolchain. Install it yourself for interoperability with the software built with the MinGW/MSYS2 toolchain.
See also alternative installation methods.
RISC-V Devices
To build Rust applications for the Espressif chips based on RISC-V architecture (if you’re unsure what your device is, see hardware overview), do the following:
-
Install the proper toolchain with the
rust-srccomponent:- You can use either
stableornightly:
orrustup toolchain install stable --component rust-srcrustup toolchain install nightly --component rust-src
Note
Other components such as
rustfmt,clippyorrust-analyzerare not required, but they are highly recommended. - You can use either
-
Install the target:
rustup target add riscv32imc-unknown-none-elf # For ESP32-C2 and ESP32-C3
rustup target add riscv32imac-unknown-none-elf # For ESP32-C6 and ESP32-H2
Those targets are currently Tier 2. Note the different flavors of
riscv32targets in Rust covering different RISC-V extensions.
If you are not going to use ESP32, ESP32-S2 or ESP32-S3 you are done and can skip to Tooling Installation.
Xtensa Devices
As mentioned in hardware overview ESP32, ESP32-S2 and ESP32-S3 are based on Xtensa architecture. If you are going to target these chips you will need to use a fork of the Rust compiler for now.
espup is a tool that simplifies installing and maintaining the toolchains required to develop Rust applications for these targets.
- Install
espup:
You can also directly download pre-compiled release binaries or usecargo install espup --lockedcargo-binstall. - Install all necessary toolchains for all supported Espressif targets by running:
espup install - On Unix systems, set up the Environment Variables: See the different methods in
espupReadme. Windows users don’t need to do anything else.
What espup Installs
To enable support for Espressif targets, espup installs:
- Espressif Rust fork with support for Espressif targets
stabletoolchain with support for RISC-V targets- LLVM fork with support for Xtensa targets
- GCC toolchain that links the final binary
The forked compiler can coexist with the standard Rust compiler, allowing both to be installed on your system. The forked compiler is invoked when using any of the available overriding methods.
Tooling Installation
With the toolchain in place, it’s time to install some additional tools that will simplify and enhance the development of Rust applications for Espressif chips.
esp-generate
esp-generate is a project generation tool that assists users in creating a functional project with most of their desired configurations pre-applied.
Installation
To install esp-generate:
cargo install esp-generate --locked
You can also directly download pre-compiled release binaries or use cargo-binstall.
What esp-generate Сonfigures
esp-generate provides more than dependency selection: it applies a known set of crates and feature combinations corresponding to the chosen template options, reducing the amount of manual configuration required to produce a working project.
When options are selected for the template, esp-generate updates the generated Cargo.toml with the crates and Cargo features those choices require. The templates aim to keep that list as short as practical while still creating a skeleton of an applications that builds and runs for the selected profile, without the need to manually configure the dependencies for the first successful build.
The Ancillary Crates chapter describes how wireless, async, and networking choices map onto individual crates when that level of detail is needed.
Some options have coupled configurations. Logging is configured either via defmt or log with a corresponding frontend. Certain crates are also included as part of the standard baseline because they support common embedded workflows. For example, esp-bootloader-esp-idf includes additional support of 2nd stage bootloader, and critical-section is included because many embedded crates rely on it to implement interrupt-critical regions.
Tip
Each version of
esp-generatetargets a specific version of the ecosystem crates. Make sure to updateesp-generateif you want to use the latest released versions.
espflash
espflash is a serial flasher utility designed for Espressif SoCs and modules. It natively supports all chips compatible with esp-hal.
Installation
To install espflash, execute the following command:
cargo install espflash --locked
Alternatively, you can use cargo-binstall to download pre-compiled artifacts from the releases and use them instead:
cargo binstall espflash
Note
The default baudrate used by
espflashis 115200 - you might want to increase it to make flashing faster. The easiest way to do that is setting theESPFLASH_BAUDenvironment variable.
probe-rs
The probe-rs project offers a suite of tools for interacting with embedded microcontrollers using various debug probes, with robust support for Espressif chips.
Besides flashing and monitoring, it also provides robust debugging capabilities.
If you’re unsure whether you need it right now, you can skip the installation and come back to it later.
Espressif devices equipped with the USB-JTAG-SERIAL peripheral can use probe-rs without any external hardware. For devices lacking this peripheral, you’ll need an external programmer like the ESP-Prog.
Note
USB-JTAG-SERIALperipheral is available in ESP32-C6, ESP32-H2, ESP32-S3 and ESP32-C3 (revision 0.3 or later)
Installation
Refer to the installation and setup guide available on the probe-rs website.
esp-config (Optional)
esp-config is a tool to edit configuration options via a TUI. Using it is entirely optional, see the Configuration chapter for details on how config files are organized and how to manually edit them without using the TUI.
Installation
To install esp-config:
cargo install esp-config --features=tui --locked
Using esp-generate
With all the necessary tools installed, you’re ready to create your first Rust project running on an Espressif chip.
Generating a Project
To start, launch the interactive configuration tool by running:
esp-generate
esp-generate will prompt you for your chip, and a project name, before launching into a TUI with options to configure the project generation process.

Adjust the options as needed for your project. See Available Options section of the README. There is a small description of each option at the bottom of the TUI.
Flashing Options
There are two options for flashing the code to the target device:
espflash: Default flashing tool.probe-rs: Enables Real Time Transfer (RTT) based options and allows on chip debugging.- Make sure to enable
Use probe-rs to flash and monitor instead of espflash.(probe-rsoption) when generating your project.
- Make sure to enable
Tip
When using
espflashyou might want to enableUse the log crate to print messages.andUse esp-backtrace as the panic handler.underFlashing, logging and debugging (espflash)
Tip
When using
probe-rs, instead ofespflash, you might want to enableUse defmt to print messages.andUse panic-rtt-target as the panic handler.underFlashing, logging and debugging (probe-rs)
Generating the Project
When you are ready, you can generate the project by pressing s at the root of the TUI. When you save the project the tool will check for the required and optional tools being installed and shows the results, this may include asking you to install any tooling you may have missed, or now require based on the generation options.
Running the Code
Getting your code up and running is as simple as executing:
cargo run --release
This command compiles your application, flashes it to the target device, and starts monitoring the log output.
🎉 Congratulations — you’ve successfully flashed your first Rust program onto an ESP32!
You’re now ready to dive deeper into developing with Rust on the ESP32 platform.
Using esp-config’s TUI (Optional)
If installed, you can launch the tool from your project’s directory by running esp-config, which looks like this:
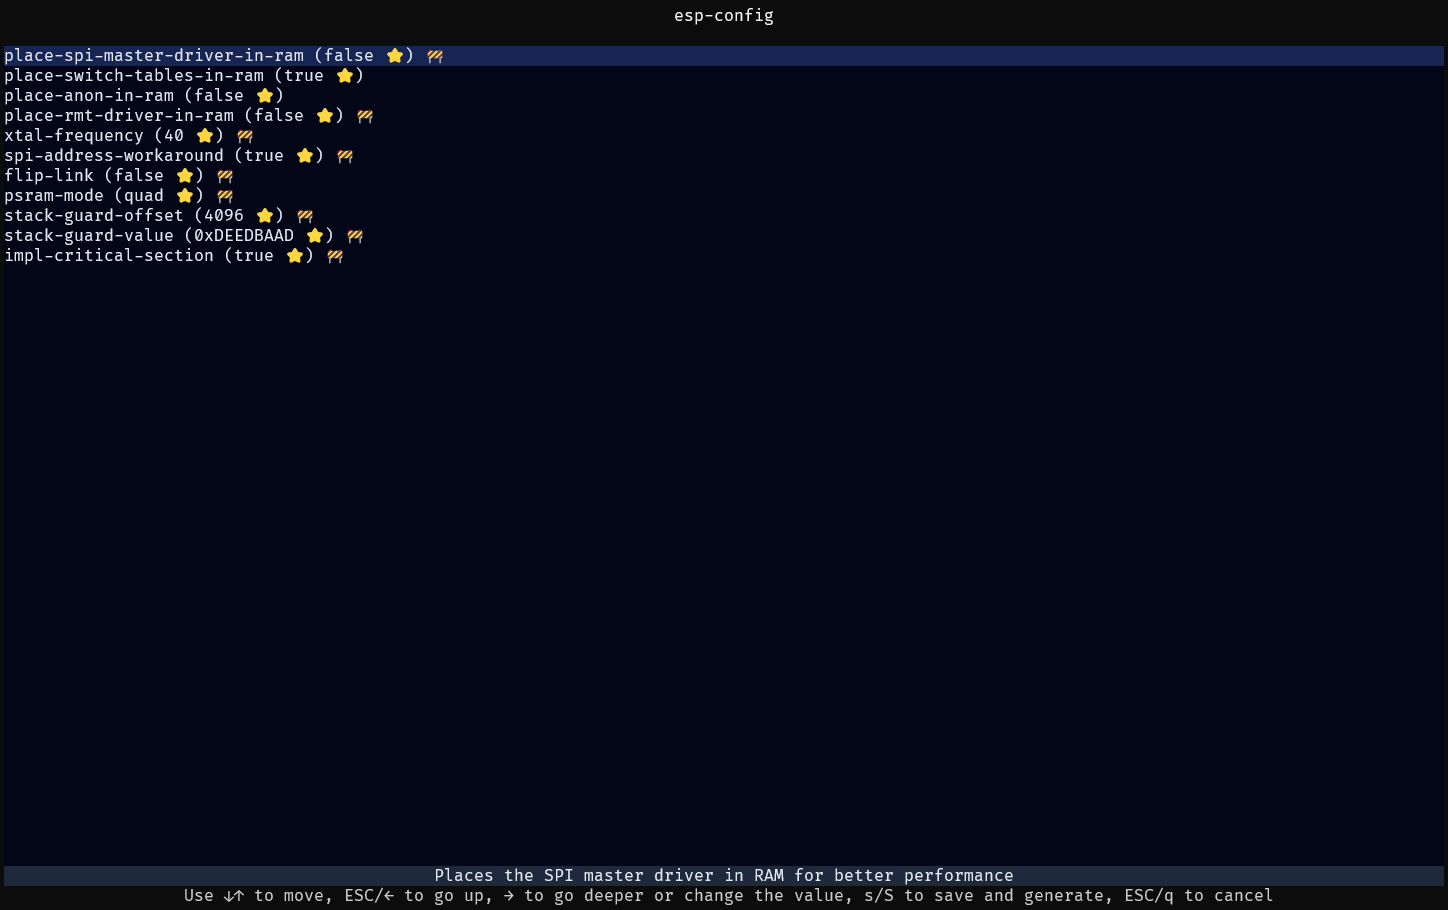
You can also specify the targeted chip and the config file to use if the tool cannot figure it out.
With a project generated via esp-generate this shouldn’t be needed.
See the Configuration chapter for details on how config files are organized and how to manually edit them.
Application Development
Now that you’ve successfully run your first program, let’s fill in some knowledge gaps and show you some options for some common embedded practices.
- Application Startup and Bootloader
- Configuration
- Logging
- Allocating Memory
- Async Options
- Testing
- Over The Air (OTA) Updates
Application Startup and Bootloader
Upon power up, many embedded devices will just start executing code from an address in flash memory. Espressif chips are a bit more complicated, and require some steps to setup flash memory, a cache and some other miscellaneous operations. For this, we require a bootloader which is a simple application that sets up the aforementioned operations, then jumps to executing other code.
To boot an application, Espressif devices use 2 bootloaders:
- First Stage Bootloader (ROM Bootloader): Sets up architecture-specific registers, checks the boot mode and reset reason, and loads the second stage bootloader. This bootloader is burned into ROM, and exists as part of SoC and therefore doesn’t need to be flashed, nor can it be changed.
- Second Stage Bootloader: Loads your application and sets up the memory (RAM, PSRAM or flash).
The second stage bootloader whilst not technically required, is advised as it allows OTA support (the first stage bootloader only loads applications from a fixed offset in flash) and also enables flash encryption and secure boot. For more information, see the OTA section.
For more information about the startup process, please check ESP-IDF documentation. However, note that some aspects may be ESP-IDF specific.
Second Stage Bootloader
At the moment, only ESP-IDF Bootloader is supported as a second stage bootloader, this will change in the future as we plan to add support for other bootloaders, such as MCUBOOT.
ESP-IDF Bootloader
Uses the ESP image format, see more information in ESP-IDF documentation. The ESP-IDF bootloader is used with a partition table to know where to place the binary.
Partition Tables
Flash memory of the Espressif devices can store multiple applications along with various types of data, such as calibration data, filesystems, and parameter storage. To manage this, a partition table is flashed at the default offset device.
The ESP-IDF second stage bootloader will know where to place the binary by looking at the partition table. Each entry in the partition table has a name (label), type (app, data, or something else), subtype and the offset in flash where the partition is loaded.
When working with espflash, if you don’t provide a second stage bootloader or partition table, espflash will use a default bootloader and partition table, but you can also create a custom partition table.
Building a Custom ESP-IDF Bootloader
The espflash and cargo-espflash include pre-built ESP-IDF bootloaders that are compiled using the default settings, making it easy to get started without additional configuration. However, if you require more advanced functionality or custom settings, you will need to build the bootloader yourself to tailor it to your specific needs.
To build a custom ESP-IDF bootloader:
- Install ESP-IDF.
- Create a new project or go to an already existing one.
- Using any examples under the
esp-idf/examplesdirectory is the easiest way.
- Using any examples under the
- Make desired bootloader changes using
idf.py menuconfigor editing thesdkconfigfile.- See Configuration Options Reference for more information.
- Build the bootloader with
idf.py set-target <CHIP_TARGET> build bootloader.- The resulting bootloader binary will be placed under
build/bootloader/bootloader.bin.
- The resulting bootloader binary will be placed under
- Use the built bootloader binary in
espflash/cargo-espflashwith the--bootloaderflag or with the configuration file.
Configuration
The esp-config crate provides a way to manage additional configuration settings that don’t fit into Cargo features, for esp-* crates.
Finding Available Configuration
The full list of available options can be found in the documentation of the crate you are interested. For example, these are esp-hal’s configuration options for the ESP32-C6.
Usage
While creating your project, you may need to configure some additional advanced parameters, for example, place a peripheral in RAM for better performance or change the size of RX/TX queue in some crate. In order to do so you will need to configure some settings provided by the esp-config.
You are free to do this in two ways:
-
By setting the environment variable. For example, in
esp-halif you want to place anonymous symbols in RAM (ESP_HAL_CONFIG_PLACE_ANON_IN_RAM), which is set tofalseby default, you need to create an environment variable with the same name and modify its value. -
By setting the required parameter in
.cargo/config.toml(this method also sets the environment variable):# .cargo/config.toml [env] ESP_HAL_CONFIG_PLACE_ANON_IN_RAM="true"After modifying the
.cargo/config.tomland[env]section, clean build is recommended.
Note
Setting environment variables on the command line will take precedence over the
[env]section.
Multiple Configurations
Depending on your application, you may find yourself wanting to support different boards/chips/targets in the same project. In this case, you may have specific options to set for each target. To do this, we recommend the following setup.
- A baseline
.cargo/config.tomlwhich has your typical build modifying flags (Cargo will always read and respect this file, regardless of other--config’s passed) - A config file for each configuration in
.cargo/ - (Recommended) A Cargo alias to build with the given config, for example
run-config-a = "run --config=./.cargo/config_a.toml --release", but for simple cases you can pass--configon the CLI.
Check out this example repo for a more comprehensive look at multi-config projects.
Defining Your Own Config Options
You may also want to define certain configuration options in your project. To do so, it is necessary to declaratively define these options, their default values, and other parameters and checks inside an esp_config.yml file. Details can be found in the Defining Configuration Options section of the project repository.
Logging
Logging is a crucial aspect of embedded systems development, providing visibility into the system’s behavior and aiding in debugging and monitoring. In the Rust ecosystem, two prominent logging frameworks are commonly used: defmt and log.
Regardless of which of the following tools you choose to use when generating your project, esp-generate will make sure that everything is set up correctly, so that the end user only has to adapt the logging tool used to their needs.
defmt
defmt is a highly efficient logging framework designed for resource-constrained environments, such as embedded systems. It offers compact, binary-encoded log messages, reducing the overhead associated with traditional string-based logging. For more information about see defmt documentation. We recommend pairing defmt with probe-rs for the best results on Espressif chips.
log
The log crate is a widely adopted logging facade in the Rust community. It defines a set of macros (info!, warn!, error!, etc.) to capture log messages at various levels. We offer a logger implementation in esp-println, but you are free to implement your own logger if you wish.
Allocating Memory
In a no_std environment, the alloc crate is available as an option for heap allocation. This enables useful common Rust items such as Vec and Box and other collections that require heap allocation. In some cases, alloc may be required for a dependency you wish to use.
We provide our own no_std heap allocator, esp-alloc. But before enabling it, user should understand why they might want heap allocation and the trade-offs involved.
Why Not Use a Heap?
While heap allocation offers flexibility, it comes with some costs:
- Fragmentation: Over time, dynamic allocation can cause fragmentation: small, scattered allocations may prevent large ones even if total memory is available. This can lead to subtle runtime failures.
- Runtime Overhead: Allocating and freeing memory incurs a computational cost, along with any overhead of the chosen allocator.
Configurable Memory Placement and Reclaimed RAM
Some Espressif chips have non-contiguous memory mapping, not all physical RAM is usable as a single, flat heap. For example, some regions are reserved for ROM code usage, and cannot be overwritten Take the memory layout on the ESP32 for example.
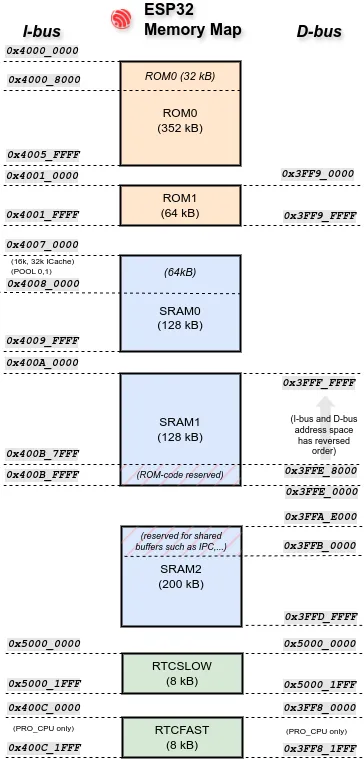
There is also some memory that the 2nd stage bootloader uses during the boot process that can’t be used as stack, but could be used as heap instead once in the main application. You can use the #[ram(reclaimed)] macro in the heap allocator declaration to use this otherwise unused memory.
#![allow(unused)]
fn main() {
// Use 64kB in dram2_seg for the heap, which is otherwise unused.
heap_allocator!(#[ram(reclaimed)] size: 64000);
}
PSRAM
Our chips have a few hundred kilobytes of internal RAM, which could be insufficient for some applications. Some Espressif chips have the ability to use virtual addresses for external PSRAM (Pseudostatic RAM) memory. The external memory is usable in the same way as internal data RAM, with certain restrictions.
Note
On Xtensa chips, atomics in PSRAM do not work correctly — they can cause data races and defeat their purpose. This means that the allocator must not be used to allocate
Atomic*types - either directly or indirectly. ESP32 restrictions can be found here. This does not affect our RISC-V chips, where PSRAM works correctly with atomics.
Allocator Considerations
You can only have one global allocator but the allocator can use multiple regions (e.g. PSRAM, internal RAM or even multiple blocks of them). You can use multiple allocators with the nightly feature allocator_api and with allocator_api2, which esp-alloc implements.
Async Options
Note
This section does not serve as an async tutorial or teaching material. For these purposes, visit official async-book.
esp-hal provides blocking and async API for most of the supported drivers. Drivers are constructed in Blocking mode by default. To set up an async driver, they must be converted to an Async mode using the into_async method. For more information and to get started, check our examples in the esp-hal package.
Note
Our
Asyncdrivers are notSendbecause they register interrupts on the current core. Moving them to another core can cause issues. If user needs to send (move) a driver to another core, they should send theBlockingversion, and then callinto_asyncon the correct core to bind it correctly.
Embassy
Embassy is an asynchronous (async) framework designed specifically for embedded Rust development; its embassy-executor crate provides an async/await executor which executes a fixed number of tasks, statically allocated at startup, though more can be added later. To spawn more tasks later, you may keep copies of the Spawner, for example by passing it as an argument to the initial tasks. For more information about embassy visit Embassy book.
The esp-rtos crate provides integration between esp-hal and the Embassy asynchronous framework. It provides support for:
- Interrupt-mode executor
- Multicore-aware thread-mode embassy executor
- Embassy time driver
- Timer waiter queue
ArielOS
ArielOS is an operating system for secure, memory-safe, low-power IoT. It builds on top of various projects from the Embedded Rust ecosystem, including esp-hal. ArielOS focuses on tight integration, adding missing OS features like a multicore scheduler, secure networking, portable drivers, and a unified build system. The result is a powerful alternative to C-based Real-Time Operating System (RTOS) solutions, but in pure Rust. It has great integrations with embassy, and can be used together with embassy in various ways.
RTIC
Real-Time Interrupt-driven Concurrency (RTIC) is a community supported concurrency framework for building real-time systems. Real time tasks are not async, but “software” tasks are async. Currently, only ESP32-C3 and ESP32-C6 are supported.
Testing
Testing is an integral part of application development. Using the example of how we do it at esp-hal, you can write and run tests for your application that run on the hardware itself.
Host Testing
Where possible, and where it makes sense, you should try to test as much as possible on your host machine, not on the target device. It’s easier to test in CI, faster, and won’t waste flash write cycles on your device. Tests that need the real hardware to run them, should use a Hardware In Loop testing setup instead.
Hardware-in-Loop Testing
Hardware In Loop (HIL) testing is the use of real devices in the testing setup. We use the embedded-test framework to write unit and integration tests, so in principle, the process is only slightly different from normal non-embedded projects. We use probe-rs (check correct revision in hil-test sub-repository) to flash and run tests on the target device. To do this, you must use only the USB-Serial-JTAG port on your DevKit (see Hardware Overview). If your device does not have such a port, you will have to use esp-prog or another suitable programmer and connect it according to the connection instructions (select the desired chip on the page).
Using esp-generate, and selecting embedded-test under probe-rs will set up testing in your project for you, such that you can just run cargo test locally when the device is connected correctly.
embedded-test
embedded-test tests are written as functions placed under the #[test] macro, similar to the std test framework. Typically, the result of the test is the result of this function, i.e. if the code panicked, the test is considered failed and the next test is run. However, there are many ways to customize this process, such as the #[should_panic] attribute macro, where panic is considered a successful test completion, setting timeouts for tests, and much more, which can be found in the embedded-test documentation. It also supports integration with IDE, as it mimics the default Rust test harness.
Over The Air Updates (OTA)
Over The Air Updates (OTA), is the ability to update an application without the need of production flashing tools. OTA is heavily reliant on a bootloader to handle the switching, replacement and rollback of OTA images (firmware updates). For every bootloader we support, we have a bootloader support crate, as we only support the ESP-IDF bootloader right now we only have the esp-bootloader-esp-idf crate.
We have a small OTA example in the esp-hal repository. This example is basic, but shows the building blocks to get OTA functionality working. Be sure to check out the documentation, as this example also provides the instructions to create an OTA binary using espflash.
What’s Left to Explore
We hope this book has prepared you for building real-world applications using Espressif chips and Rust. We’ve only scratched the surface here, there is plenty more to explore outside of this book. Be sure to check out the additional resources, if you haven’t already.
We’re excited to see what you create, be sure to add it to the awesome-esp-rust list or use this list for inspiration.
If you’re keen to contribute to esp-hal or the ancillary crates directly, check out our developer contribution documentation.
Frequently Asked Questions
This chapter addresses common questions and challenges that developers may encounter when working with Rust on ESP chips. Whether you’re setting up your development environment, optimizing your code, or looking to simulate your projects, you’ll find practical solutions and best practices here.
Editor/IDE
When using esp-generate, you can automatically configure recommended settings and extensions for VS Code, Helix, Neovim, and Zed editors during the generation process.
Size and Memory Optimizations
Optimizing Binary Size
- Cargo provides some default profiles; we recommend using the
releaseprofile as it optimizes and removes debug symbols. - Cargo allows different profile settings, which can make a difference in the resulting size of the artifact.
- See Optimizations: the speed size tradeoff of The Embedded Rust Book.
- Be careful when using external dependencies, as they can increase the size of your resulting artifact.
- Filter log messages if they are not going to be useful or read.
- More suggestions can be found in the min-sized-rust repository.
Additionally, the Embassy documentation contains some suggestions with regards to binary sizes in the Frequently Asked Questions section.
Optimizing Memory Usage
We will, again, defer to the Embassy Documentation, specifically the How can I measure resource usage (CPU, RAM, etc.)? section.
Using Crates from Git
The Cargo Book and the Embassy Documentation both contain information on how to specify dependencies from Git repositories:
- Specifying dependencies from
gitrepositories - The
[patch]section - How do I switch to the
mainbranch
Can I Use mem::forget on Drivers?
The mem::forget function should be avoided, as forgetting drivers may result in unintended consequences. Peripheral drivers provide Drop implementations which return the peripheral to its default, unconfigured state, and if necessary cancel any Direct Memory Access (DMA) transactions which are current in progress. Forgetting a driver may result in erroneously configured peripherals and/or DMA transactions which run indefinitely and never complete.
Entering/Exiting Download Mode
Download mode is a boot mode used for firmware programming and debugging. In this mode, the chip does not boot the application from Flash, instead, it waits to receive new firmware data through interfaces such as UART or USB, and writes it to Flash.
Selecting Boot Mode
When a reset ocurs, the ROM bootloader reads the state of specific strapping pins and selects the boot mode based on their levels at that moment:
- If the boot strapping pin is high → the chip enters SPI Boot mode (runs the application from Flash).
- If the boot strapping pin is low → the chip enters Download mode (waits for firmware). See more information about boot mode selection in ESP-IDF documentation
When the device is on download mode you will see the following serial output: “waiting for download”. See ESP-IDF Download Mode documentation
After flashing the chip, the chip needs to return to SPI Boot mode to run the new firmware. This can be achieved by reseting the target, causing the strapping pins to be re-sampled, and the chip boots normally or by using the --after watchdog-reset option of espflash and esptool when in USB-Serial/JTAG Mode, see ESP-IDF Troubleshooting.