Wi-Fi API
About
The Wi-Fi API provides support for the 802.11b/g/n protocol driver. This API includes:
Station mode (STA mode or Wi-Fi client mode). ESP32 connects to an access point
AP mode (aka Soft-AP mode or Access Point mode). Devices connect to the ESP32
Security modes (WPA2, WPA3 etc.)
Scanning for access points
Working as AP
In this mode, the ESP32 is configured as an Access Point (AP) and it’s capable of receiving incoming connections from other devices (stations) by providing a Wi-Fi network.
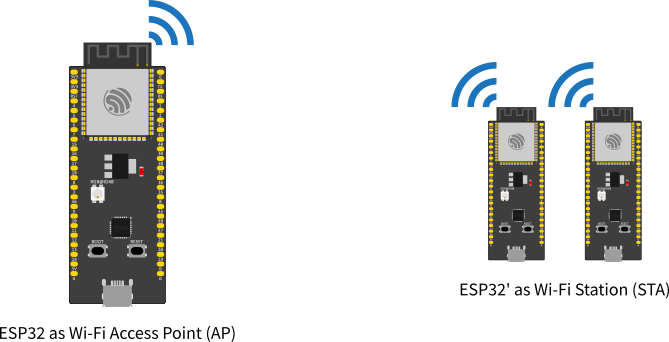
This mode can be used for serving an HTTP or HTTPS server inside the ESP32, for example.
Working as STA
The STA mode is used to connect the ESP32 to a Wi-Fi network, provided by an Access Point.
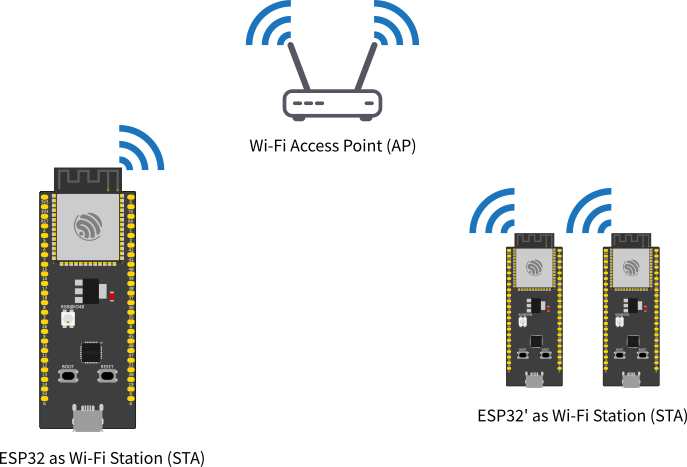
This is the mode to be used if you want to connect your project to the Internet.
API Description
Here is the description of the Wi-Fi API.
Common API
Here are the common APIs that are used for both modes, AP and STA.
onEvent (and removeEvent)
Registers a caller-supplied function to be called when Wi-Fi events occur. Several forms are available.
Function pointer callback taking the event ID:
typedef void (*WiFiEventCb)(arduino_event_id_t);
wifi_event_id_t onEvent(WiFiEventCb, arduino_event_id_t = ARDUINO_EVENT_MAX);
Function pointer callback taking an event-ID-and-info struct:
typedef struct{
    arduino_event_id_t event_id;
    arduino_event_info_t event_info;
} arduino_event_t;

typedef void (*WiFiEventSysCb)(arduino_event_t *);
wifi_event_id_t onEvent(WiFiEventSysCb, arduino_event_id_t = ARDUINO_EVENT_MAX);
Callback using std::function taking event ID and info separately:
typedef std::function<void(arduino_event_id_t, arduino_event_info_t)> WiFiEventFuncCb;
wifi_event_id_t onEvent(WiFiEventFuncCb, arduino_event_id_t = ARDUINO_EVENT_MAX);
A similar set of functions are available to remove callbacks:
void removeEvent(WiFiEventCb, arduino_event_id_t = ARDUINO_EVENT_MAX);
void removeEvent(WiFiEventSysCb, arduino_event_id_t = ARDUINO_EVENT_MAX);
void removeEvent(wifi_event_id_t = ARDUINO_EVENT_MAX);
In all cases, the subscribing function accepts an optional event type to
invoke the callback only for that specific event; with the default
ARDUINO_EVENT_MAX, the callback will be invoked for all Wi-Fi events.
Any callback function is given the event type in a parameter.
Some of the possible callback function formats also take an
arduino_event_info_t (or use arduino_event_t which includes both
ID and info) which is a union of structs with additional information
about different event types.
See WiFiGeneric.h for the list of event types and “info” substructures, and also see a full example of event handling: events example.
Warning
Event callback functions are invoked on a separate
thread
(FreeRTOS task)
independent of the main application thread that runs setup() and
loop(). Callback functions must therefore be
thread-safe;
they must not access shared/global variables directly without locking,
and must only call similarly thread-safe functions.
Some core operations like Serial.print() are thread-safe but many
functions are not. Notably, WiFi.onEvent() and WiFi.removeEvent()
are not thread-safe and should never be invoked from a callback thread.
setHostname (and getHostname)
Sets the name the DHCP client uses to identify itself. In a typical network setup this will be the name that shows up in the Wi-Fi router’s device list. The hostname must be no longer than 32 characters.
setHostname(const char *hostname);
If the hostname is never specified, a default one will be assigned based on the chip type and MAC address. The current hostname (default or custom) may be retrieved:
const char *getHostname();
Warning
The setHostname() function must be called BEFORE Wi-Fi is started with
WiFi.begin(), WiFi.softAP(), WiFi.mode(), or WiFi.run().
To change the name, reset Wi-Fi with WiFi.mode(WIFI_MODE_NULL),
then proceed with WiFi.setHostname(...) and restart WiFi from scratch.
useStaticBuffers
This function is used to set the memory allocation mode for the Wi-Fi buffers.
static void useStaticBuffers(bool bufferMode);
Set
trueto use the Wi-Fi buffers memory allocation as static.Set
falseto set the buffers memory allocation to dynamic.
The use of dynamic allocation is recommended to save memory and reduce resources usage. However, the dynamic performs slightly slower than the static allocation. Use static allocation if you want to have more performance and if your application is multi-tasking.
By default, the memory allocation will be set to dynamic if this function is not being used.
setDualAntennaConfig
Configures the Dual antenna functionality. This function should be used only on the ESP32-WROOM-DA module or any other ESP32 with RF switch.
bool setDualAntennaConfig(uint8_t gpio_ant1, uint8_t gpio_ant2, wifi_rx_ant_t rx_mode, wifi_tx_ant_t tx_mode);
gpio_ant1Configure the GPIO number for the antenna 1 connected to the RF switch (defaultGPIO2on ESP32-WROOM-DA)gpio_ant2Configure the GPIO number for the antenna 2 connected to the RF switch (defaultGPIO25on ESP32-WROOM-DA)rx_modeSet the RX antenna mode. See wifi_rx_ant_t for the options.tx_modeSet the TX antenna mode. See wifi_tx_ant_t for the options.
Return true if the configuration was successful.
For the rx_mode you can use the following configuration:
WIFI_RX_ANT0Selects the antenna 1 for all RX activity.WIFI_RX_ANT1Selects the antenna 2 for all RX activity.WIFI_RX_ANT_AUTOSelects the antenna for RX automatically.
For the tx_mode you can use the following configuration:
WIFI_TX_ANT0Selects the antenna 1 for all TX activity.WIFI_TX_ANT1Selects the antenna 2 for all TX activity.WIFI_TX_ANT_AUTOSelects the antenna for TX automatically.
WiFiAP
The WiFiAP is used to configure and manage the Wi-Fi as an Access Point. This is where you can find the related functions for the AP.
Basic Usage
To start the Wi-Fi as an Access Point.
WiFi.softAP(ssid, password);
Please see the full WiFiAP example in: ap example.
AP Configuration
softAP
Use the function softAP to configure the Wi-Fi AP characteristics:
bool softAP(const char* ssid, const char* passphrase = NULL, int channel = 1, int ssid_hidden = 0, int max_connection = 4, bool ftm_responder = false);
Where:
ssidsets the Wi-Fi network SSID.passphrasesets the Wi-Fi network password. If the network is open, set asNULL.channelconfigures the Wi-Fi channel.ssid_hiddensets the network as hidden.max_connectionsets the maximum number of simultaneous connections. The default is 4.ftm_respondersets the Wi-Fi FTM responder feature. Only for ESP32-S2 and ESP32-C3 SoC!
Return true if the configuration was successful.
softAPConfig
Function used to configure the IP as static (fixed) as well as the gateway and subnet.
bool softAPConfig(IPAddress local_ip, IPAddress gateway, IPAddress subnet);
Where:
local_ipsets the local IP address.gatewaysets the gateway IP.subnetsets the subnet mask.
The function will return true if the configuration is successful.
AP Connection
softAPdisconnect
Function used to force the AP disconnection.
bool softAPdisconnect(bool wifioff = false);
Where:
wifioffsets the Wi-Fi off iftrue.
The function will return true if the configuration is successful.
softAPgetStationNum
This function returns the number of clients connected to the AP.
uint8_t softAPgetStationNum();
softAPIP
Function to get the AP IPv4 address.
IPAddress softAPIP();
The function will return the AP IP address in IPAddress format.
softAPBroadcastIP
Function to get the AP IPv4 broadcast address.
IPAddress softAPBroadcastIP();
The function will return the AP broadcast address in IPAddress format.
softAPNetworkID
Get the softAP network ID.
IPAddress softAPNetworkID();
The function will return the AP network address in IPAddress format.
softAPSubnetCIDR
Get the softAP subnet CIDR.
uint8_t softAPSubnetCIDR();
softAPSubnetMask
Get the softAP subnet mask.
IPAddress softAPSubnetMask();
softAPenableIPv6
Function used to enable the IPv6 support.
bool softAPenableIPv6(bool enable=true);
The function will return true if the configuration is successful.
softAPIPv6
Function to get the IPv6 address.
IPAddress softAPlinkLocalIPv6();
The function will return the AP IPv6 address in IPAddress format.
softAPgetHostname
Function to get the AP hostname.
const char * softAPgetHostname();
softAPsetHostname
Function to set the AP hostname.
bool softAPsetHostname(const char * hostname);
Where:
hostnamesets the device hostname.
The function will return true if the configuration is successful.
softAPmacAddress
Function to define the AP MAC address.
uint8_t* softAPmacAddress(uint8_t* mac);
Where:
macsets the new MAC address.
Function to get the AP MAC address.
String softAPmacAddress(void);
softAPSSID
Function to get the AP SSID.
String softAPSSID(void) const;
Returns the AP SSID.
WiFiSTA
The WiFiSTA is used to configure and manage the Wi-Fi as Station. The related functions for the STA are here.
Basic Usage
The following code shows the basic usage of the WifiSTA functionality.
WiFi.begin(ssid, password);
Where the ssid and password are from the network you want to connect the ESP32.
To check if the connection is successful, you can use:
while (WiFi.status() != WL_CONNECTED) {
    delay(500);
    Serial.print(".");
}
After a successful connection, you can print the IP address given by the network.
Serial.println("IP address: ");
Serial.println(WiFi.localIP());
Please see the full example of the WiFiSTA in: sta example.
STA Configuration
begin
Functions
beginare used to configure and start the Wi-Fi.
wl_status_t begin(const char* ssid, const char *passphrase = NULL, int32_t channel = 0, const uint8_t* bssid = NULL, bool tryConnect = true);
Where:
ssidsets the AP SSID.passphrasesets the AP password. Set asNULLfor open networks.channelsets the Wi-Fi channel.uint8_t* bssidsets the AP BSSID.tryConnectsetstrueto connect to the configured network automatically.
wl_status_t begin(char* ssid, char *passphrase = NULL, int32_t channel = 0, const uint8_t* bssid = NULL, bool tryConnect = true);
Where:
ssidsets the AP SSID.passphrasesets the AP password. Set asNULLfor open networks.channelsets the Wi-Fi channel.bssidsets the AP BSSID.tryConnectsetstrueto connect to the configured network automatically.
Note
The begin function also accepts String types for the ssid and passphrase parameters, providing convenient overloads for use with Arduino String objects.
Function to start the connection after being configured.
wl_status_t begin();
connect
Function to connect to a Wi-Fi network. This is called internally by begin but can also be used directly for more control.
bool connect(const char* ssid, const char *passphrase = NULL, int32_t channel = 0, const uint8_t* bssid = NULL, bool tryConnect = true);
Where:
ssidsets the AP SSID.passphrasesets the AP password. Set asNULLfor open networks.channelsets the Wi-Fi channel.bssidsets the AP BSSID.tryConnectsetstrueto connect to the configured network automatically.
Note
The connect function also accepts String types for the ssid and passphrase parameters, providing convenient overloads for use with Arduino String objects.
config
Function config is used to configure Wi-Fi. After configuring, you can call function begin to start the Wi-Fi process.
bool config(IPAddress local_ip, IPAddress gateway, IPAddress subnet, IPAddress dns1 = (uint32_t)0x00000000, IPAddress dns2 = (uint32_t)0x00000000);
Where:
local_ipsets the local IP.gatewaysets the gateway IP.subnetsets the subnet mask.dns1sets the DNS.dns2sets the DNS alternative option.
The function will return true if the configuration is successful.
The IPAddress format is defined by 4 bytes as described here:
IPAddress(uint8_t first_octet, uint8_t second_octet, uint8_t third_octet, uint8_t fourth_octet);
Example:
IPAddress local_ip(192, 168, 10, 20);
See the WiFiClientStaticIP.ino for more details on how to use this feature.
STA Connection
reconnect
Function used to reconnect the Wi-Fi connection.
bool reconnect();
disconnect
Function to force disconnection.
bool disconnect(bool wifioff = false, bool eraseap = false);
Where:
wifioffusetrueto turn the Wi-Fi radio off.eraseapusetrueto erase the AP configuration from the NVS memory.
The function will return true if the configuration is successful.
isConnected
Function used to get the connection state.
bool isConnected();
Return the connection state.
setAutoConnect
Function is deprecated.
getAutoConnect
Function is deprecated.
setAutoReconnect
Function used to set the automatic reconnection if the connection is lost.
bool setAutoReconnect(bool autoReconnect);
Where:
autoConnectis set totrueto enable this option.
getAutoReconnect
Function used to get the automatic reconnection if the connection is lost.
bool getAutoReconnect();
The function will return true if this setting is enabled.
setMinSecurity
Function used to set the minimum security for AP to be considered connectable.
bool setMinSecurity(wifi_auth_mode_t minSecurity);
Where:
minSecurityis the minimum security for AP to be considered connectable. Default isWIFI_AUTH_WPA2_PSK.
WiFiMulti
The WiFiMulti allows you to add more than one option for the AP connection while running as a station.
To add the AP, use the following function. You can add multiple AP’s and this library will handle the connection.
bool addAP(const char *ssid, const char *passphrase = NULL);
Or, if you have WPA2-Enterprise support enabled (CONFIG_ESP_WIFI_ENTERPRISE_SUPPORT):
bool addAP(const char *ssid, const char *passphrase = NULL, const char *username = NULL, const char *identity = NULL);
For:
Open networks,
ssidmust be set.Networks using a passphrase, e.g. WPA2-PSK,
passphrasemust be set.Networks using WPA2-Enterprise with PEAPv0/EAP-MSCHAPv2,
usernameandpassphrasemust be set to the username and password required for inner authentication (MSCHAPv2), respectively.identitymust be set to the “anonymous identity” used for PEAP, if required by the network, or must be set to an empty string otherwise. Note that WPA2-Enterprise networks using certificate-based authentication (e.g. EAP-TLS) are currently not supported. It is also currently not possible to supply a CA certificate to validate the server certificate for PEAP. Given these limitations, you should consider whether this is secure enough for your needs.
After adding the AP’s, run by the following function.
uint8_t run(uint32_t connectTimeout=5000);
To see how to use the WiFiMulti, take a look at the WiFiMulti.ino, WiFiMultiAdvanced.ino and WiFiMultiEnterprise.ino examples available.
WiFiScan
To perform the Wi-Fi scan for networks, you can use the following functions:
Start scan Wi-Fi networks available.
int16_t scanNetworks(bool async = false, bool show_hidden = false, bool passive = false, uint32_t max_ms_per_chan = 300, uint8_t channel = 0);
Called to get the scan state in Async mode.
int16_t scanComplete();
Delete last scan result from RAM.
void scanDelete();
Loads all infos from a scanned Wi-Fi in to the ptr parameters.
bool getNetworkInfo(uint8_t networkItem, String &ssid, uint8_t &encryptionType, int32_t &RSSI, uint8_t* &BSSID, int32_t &channel);
To see how to use the WiFiScan, take a look at the WiFiScan.ino or WiFiScanAsync.ino example available.
Examples
Complete list of Wi-Fi examples.
Wi-Fi AP Example
/*
  WiFiAccessPoint.ino creates a WiFi access point and provides a web server on it.

  Steps:
  1. Connect to the access point "yourAp"
  2. Point your web browser to http://192.168.4.1/H to turn the LED on or http://192.168.4.1/L to turn it off
     OR
     Run raw TCP "GET /H" and "GET /L" on PuTTY terminal with 192.168.4.1 as IP address and 80 as port

  Created for arduino-esp32 on 04 July, 2018
  by Elochukwu Ifediora (fedy0)
*/

#include <Arduino.h>
#include <WiFi.h>
#include <NetworkClient.h>
#include <WiFiAP.h>

#ifndef LED_BUILTIN
#define LED_BUILTIN 2  // Set the GPIO pin where you connected your test LED or comment this line out if your dev board has a built-in LED
#endif

// Set these to your desired credentials.
const char *ssid = "yourAP";
const char *password = "yourPassword";

NetworkServer server(80);

void setup() {
  pinMode(LED_BUILTIN, OUTPUT);

  Serial.begin(115200);
  Serial.println();
  Serial.println("Configuring access point...");

  // You can remove the password parameter if you want the AP to be open.
  // a valid password must have more than 7 characters
  if (!WiFi.softAP(ssid, password)) {
    log_e("Soft AP creation failed.");
    while (1);
  }
  IPAddress myIP = WiFi.softAPIP();
  Serial.print("AP IP address: ");
  Serial.println(myIP);
  server.begin();

  Serial.println("Server started");
}

void loop() {
  NetworkClient client = server.accept();  // listen for incoming clients

  if (client) {                     // if you get a client,
    Serial.println("New Client.");  // print a message out the serial port
    String currentLine = "";        // make a String to hold incoming data from the client
    while (client.connected()) {    // loop while the client's connected
      if (client.available()) {     // if there's bytes to read from the client,
        char c = client.read();     // read a byte, then
        Serial.write(c);            // print it out the serial monitor
        if (c == '\n') {            // if the byte is a newline character

          // if the current line is blank, you got two newline characters in a row.
          // that's the end of the client HTTP request, so send a response:
          if (currentLine.length() == 0) {
            // HTTP headers always start with a response code (e.g. HTTP/1.1 200 OK)
            // and a content-type so the client knows what's coming, then a blank line:
            client.println("HTTP/1.1 200 OK");
            client.println("Content-type:text/html");
            client.println();

            // the content of the HTTP response follows the header:
            client.print("Click <a href=\"/H\">here</a> to turn ON the LED.<br>");
            client.print("Click <a href=\"/L\">here</a> to turn OFF the LED.<br>");

            // The HTTP response ends with another blank line:
            client.println();
            // break out of the while loop:
            break;
          } else {  // if you got a newline, then clear currentLine:
            currentLine = "";
          }
        } else if (c != '\r') {  // if you got anything else but a carriage return character,
          currentLine += c;      // add it to the end of the currentLine
        }

        // Check to see if the client request was "GET /H" or "GET /L":
        if (currentLine.endsWith("GET /H")) {
          digitalWrite(LED_BUILTIN, HIGH);  // GET /H turns the LED on
        }
        if (currentLine.endsWith("GET /L")) {
          digitalWrite(LED_BUILTIN, LOW);  // GET /L turns the LED off
        }
      }
    }
    // close the connection:
    client.stop();
    Serial.println("Client Disconnected.");
  }
}
Wi-Fi STA Example
/*
    Go to thingspeak.com and create an account if you don't have one already.
    After logging in, click on the "New Channel" button to create a new channel for your data. This is where your data will be stored and displayed.
    Fill in the Name, Description, and other fields for your channel as desired, then click the "Save Channel" button.
    Take note of the "Write API Key" located in the "API keys" tab, this is the key you will use to send data to your channel.
    Replace the channelID from tab "Channel Settings" and privateKey with "Read API Keys" from "API Keys" tab.
    Replace the host variable with the thingspeak server hostname "api.thingspeak.com"
    Upload the sketch to your ESP32 board and make sure that the board is connected to the internet. The ESP32 should now send data to your Thingspeak channel at the intervals specified by the loop function.
    Go to the channel view page on thingspeak and check the "Field1" for the new incoming data.
    You can use the data visualization and analysis tools provided by Thingspeak to display and process your data in various ways.
    Please note, that Thingspeak accepts only integer values.

    You can later check the values at https://thingspeak.com/channels/2005329
    Please note that this public channel can be accessed by anyone and it is possible that more people will write their values.
 */

#include <Arduino.h>
#include <WiFi.h>

const char *ssid = "your-ssid";          // Change this to your WiFi SSID
const char *password = "your-password";  // Change this to your WiFi password

const char *host = "api.thingspeak.com";        // This should not be changed
const int httpPort = 80;                        // This should not be changed
const String channelID = "2005329";             // Change this to your channel ID
const String writeApiKey = "V6YOTILH9I7D51F9";  // Change this to your Write API key
const String readApiKey = "34W6LGLIFXD56MPM";   // Change this to your Read API key

// The default example accepts one data filed named "field1"
// For your own server you can ofcourse create more of them.
int field1 = 0;

int numberOfResults = 3;  // Number of results to be read
int fieldNumber = 1;      // Field number which will be read out

void setup() {
  Serial.begin(115200);

  // We start by connecting to a WiFi network

  Serial.println();
  Serial.println("******************************************************");
  Serial.print("Connecting to ");
  Serial.println(ssid);

  WiFi.begin(ssid, password);

  while (WiFi.status() != WL_CONNECTED) {
    delay(500);
    Serial.print(".");
  }

  Serial.println("");
  Serial.println("WiFi connected");
  Serial.println("IP address: ");
  Serial.println(WiFi.localIP());
}

void readResponse(NetworkClient *client) {
  unsigned long timeout = millis();
  while (client->available() == 0) {
    if (millis() - timeout > 5000) {
      Serial.println(">>> Client Timeout !");
      client->stop();
      return;
    }
  }

  // Read all the lines of the reply from server and print them to Serial
  while (client->available()) {
    String line = client->readStringUntil('\r');
    Serial.print(line);
  }

  Serial.printf("\nClosing connection\n\n");
}

void loop() {
  NetworkClient client;
  String footer = String(" HTTP/1.1\r\n") + "Host: " + String(host) + "\r\n" + "Connection: close\r\n\r\n";

  // WRITE --------------------------------------------------------------------------------------------
  if (!client.connect(host, httpPort)) {
    return;
  }

  client.print("GET /update?api_key=" + writeApiKey + "&field1=" + field1 + footer);
  readResponse(&client);

  // READ --------------------------------------------------------------------------------------------

  String readRequest = "GET /channels/" + channelID + "/fields/" + fieldNumber + ".json?results=" + numberOfResults + " HTTP/1.1\r\n" + "Host: " + host + "\r\n"
                       + "Connection: close\r\n\r\n";

  if (!client.connect(host, httpPort)) {
    return;
  }

  client.print(readRequest);
  readResponse(&client);

  // -------------------------------------------------------------------------------------------------

  ++field1;
  delay(10000);
}
Wi-Fi Events Example
/*
 *  This sketch shows the WiFi event usage
 *
*/

/*
* WiFi Events

0  ARDUINO_EVENT_WIFI_READY               < ESP32 WiFi ready
1  ARDUINO_EVENT_WIFI_SCAN_DONE                < ESP32 finish scanning AP
2  ARDUINO_EVENT_WIFI_STA_START                < ESP32 station start
3  ARDUINO_EVENT_WIFI_STA_STOP                 < ESP32 station stop
4  ARDUINO_EVENT_WIFI_STA_CONNECTED            < ESP32 station connected to AP
5  ARDUINO_EVENT_WIFI_STA_DISCONNECTED         < ESP32 station disconnected from AP
6  ARDUINO_EVENT_WIFI_STA_AUTHMODE_CHANGE      < the auth mode of AP connected by ESP32 station changed
7  ARDUINO_EVENT_WIFI_STA_GOT_IP               < ESP32 station got IP from connected AP
8  ARDUINO_EVENT_WIFI_STA_LOST_IP              < ESP32 station lost IP and the IP is reset to 0
9  ARDUINO_EVENT_WPS_ER_SUCCESS       < ESP32 station wps succeeds in enrollee mode
10 ARDUINO_EVENT_WPS_ER_FAILED        < ESP32 station wps fails in enrollee mode
11 ARDUINO_EVENT_WPS_ER_TIMEOUT       < ESP32 station wps timeout in enrollee mode
12 ARDUINO_EVENT_WPS_ER_PIN           < ESP32 station wps pin code in enrollee mode
13 ARDUINO_EVENT_WIFI_AP_START                 < ESP32 soft-AP start
14 ARDUINO_EVENT_WIFI_AP_STOP                  < ESP32 soft-AP stop
15 ARDUINO_EVENT_WIFI_AP_STACONNECTED          < a station connected to ESP32 soft-AP
16 ARDUINO_EVENT_WIFI_AP_STADISCONNECTED       < a station disconnected from ESP32 soft-AP
17 ARDUINO_EVENT_WIFI_AP_STAIPASSIGNED         < ESP32 soft-AP assign an IP to a connected station
18 ARDUINO_EVENT_WIFI_AP_PROBEREQRECVED        < Receive probe request packet in soft-AP interface
19 ARDUINO_EVENT_WIFI_AP_GOT_IP6               < ESP32 ap interface v6IP addr is preferred
19 ARDUINO_EVENT_WIFI_STA_GOT_IP6              < ESP32 station interface v6IP addr is preferred
20 ARDUINO_EVENT_ETH_START                < ESP32 ethernet start
21 ARDUINO_EVENT_ETH_STOP                 < ESP32 ethernet stop
22 ARDUINO_EVENT_ETH_CONNECTED            < ESP32 ethernet phy link up
23 ARDUINO_EVENT_ETH_DISCONNECTED         < ESP32 ethernet phy link down
24 ARDUINO_EVENT_ETH_GOT_IP               < ESP32 ethernet got IP from connected AP
19 ARDUINO_EVENT_ETH_GOT_IP6              < ESP32 ethernet interface v6IP addr is preferred
25 ARDUINO_EVENT_MAX
*/

#include <Arduino.h>
#include <WiFi.h>

const char *ssid = "your-ssid";
const char *password = "your-password";

// WARNING: This function is called from a separate FreeRTOS task (thread)!
void WiFiEvent(WiFiEvent_t event) {
  Serial.printf("[WiFi-event] event: %d\n", event);

  switch (event) {
    case ARDUINO_EVENT_WIFI_READY:               Serial.println("WiFi interface ready"); break;
    case ARDUINO_EVENT_WIFI_SCAN_DONE:           Serial.println("Completed scan for access points"); break;
    case ARDUINO_EVENT_WIFI_STA_START:           Serial.println("WiFi client started"); break;
    case ARDUINO_EVENT_WIFI_STA_STOP:            Serial.println("WiFi clients stopped"); break;
    case ARDUINO_EVENT_WIFI_STA_CONNECTED:       Serial.println("Connected to access point"); break;
    case ARDUINO_EVENT_WIFI_STA_DISCONNECTED:    Serial.println("Disconnected from WiFi access point"); break;
    case ARDUINO_EVENT_WIFI_STA_AUTHMODE_CHANGE: Serial.println("Authentication mode of access point has changed"); break;
    case ARDUINO_EVENT_WIFI_STA_GOT_IP:
      Serial.print("Obtained IP address: ");
      Serial.println(WiFi.localIP());
      break;
    case ARDUINO_EVENT_WIFI_STA_LOST_IP:        Serial.println("Lost IP address and IP address is reset to 0"); break;
    case ARDUINO_EVENT_WPS_ER_SUCCESS:          Serial.println("WiFi Protected Setup (WPS): succeeded in enrollee mode"); break;
    case ARDUINO_EVENT_WPS_ER_FAILED:           Serial.println("WiFi Protected Setup (WPS): failed in enrollee mode"); break;
    case ARDUINO_EVENT_WPS_ER_TIMEOUT:          Serial.println("WiFi Protected Setup (WPS): timeout in enrollee mode"); break;
    case ARDUINO_EVENT_WPS_ER_PIN:              Serial.println("WiFi Protected Setup (WPS): pin code in enrollee mode"); break;
    case ARDUINO_EVENT_WIFI_AP_START:           Serial.println("WiFi access point started"); break;
    case ARDUINO_EVENT_WIFI_AP_STOP:            Serial.println("WiFi access point  stopped"); break;
    case ARDUINO_EVENT_WIFI_AP_STACONNECTED:    Serial.println("Client connected"); break;
    case ARDUINO_EVENT_WIFI_AP_STADISCONNECTED: Serial.println("Client disconnected"); break;
    case ARDUINO_EVENT_WIFI_AP_STAIPASSIGNED:   Serial.println("Assigned IP address to client"); break;
    case ARDUINO_EVENT_WIFI_AP_PROBEREQRECVED:  Serial.println("Received probe request"); break;
    case ARDUINO_EVENT_WIFI_AP_GOT_IP6:         Serial.println("AP IPv6 is preferred"); break;
    case ARDUINO_EVENT_WIFI_STA_GOT_IP6:        Serial.println("STA IPv6 is preferred"); break;
    case ARDUINO_EVENT_ETH_GOT_IP6:             Serial.println("Ethernet IPv6 is preferred"); break;
    case ARDUINO_EVENT_ETH_START:               Serial.println("Ethernet started"); break;
    case ARDUINO_EVENT_ETH_STOP:                Serial.println("Ethernet stopped"); break;
    case ARDUINO_EVENT_ETH_CONNECTED:           Serial.println("Ethernet connected"); break;
    case ARDUINO_EVENT_ETH_DISCONNECTED:        Serial.println("Ethernet disconnected"); break;
    case ARDUINO_EVENT_ETH_GOT_IP:              Serial.println("Obtained IP address"); break;
    default:                                    break;
  }
}

// WARNING: This function is called from a separate FreeRTOS task (thread)!
void WiFiGotIP(WiFiEvent_t event, WiFiEventInfo_t info) {
  Serial.println("WiFi connected");
  Serial.println("IP address: ");
  Serial.println(IPAddress(info.got_ip.ip_info.ip.addr));
}

void setup() {
  Serial.begin(115200);

  // delete old config
  WiFi.disconnect(true);

  delay(1000);

  // Examples of different ways to register wifi events;
  // these handlers will be called from another thread.
  WiFi.onEvent(WiFiEvent);
  WiFi.onEvent(WiFiGotIP, WiFiEvent_t::ARDUINO_EVENT_WIFI_STA_GOT_IP);
  WiFiEventId_t eventID = WiFi.onEvent(
    [](WiFiEvent_t event, WiFiEventInfo_t info) {
      Serial.print("WiFi lost connection. Reason: ");
      Serial.println(info.wifi_sta_disconnected.reason);
    },
    WiFiEvent_t::ARDUINO_EVENT_WIFI_STA_DISCONNECTED
  );

  // Remove WiFi event
  Serial.print("WiFi Event ID: ");
  Serial.println(eventID);
  // WiFi.removeEvent(eventID);

  WiFi.begin(ssid, password);

  Serial.println();
  Serial.println();
  Serial.println("Wait for WiFi... ");
}

void loop() {
  delay(1000);
}