Compile ESP-AT Project Locally
This document details how to build your own ESP-AT project locally and flash the generated firmware into your ESP32. It comes in handy when the official released firmware cannot meet your needs, for example, to customize the AT port pins, Bluetooth LE services, and partitions, and so on.
If you have difficulties in compiling ESP-AT project locally, or you only need to modify a small amount of code, we recommend that you use Compile ESP-AT Project on the GitHub Webpage.
Detailed Steps
Please follow the detailed steps below to set up your environment and build the project. It is recommended that you develop the esp-at project on Linux system.
Step 1. Get Started with ESP-IDF
Get started with ESP-IDF before compiling an ESP-AT project, because ESP-AT is developed based on ESP-IDF.
Please follow ESP-IDF v5.4 Get Started guide, configure, build, flash onto the ESP32 device of the hello_world example.
Note
This step is not a must, but if you are a beginner, you are strongly recommended to complete it in order to familiarize yourself with ESP-IDF and ensure smooth proceeding with the following steps.
After you complete the ESP-IDF get started in the step above, now you can proceed to compile an ESP-AT project according to the following steps.
Step 2. Get ESP-AT
To compile an ESP-AT project, you need the software libraries provided by Espressif in the ESP-AT repository.
To get ESP-AT, navigate to your installation directory and clone the repository with git clone, following instructions below specific to your operating system.
Linux or macOS
cd ~/esp
git clone --recursive https://github.com/espressif/esp-at.git
Windows
For ESP32 series of modules, it is recommended that you run ESP-IDF 5.4 CMD as an administrator first.
cd %userprofile%\esp
git clone --recursive https://github.com/espressif/esp-at.git
If you are in China or regions with restricted GitHub access, ESP-AT may be cloned faster from the following mirror: git clone https://jihulab.com/esp-mirror/espressif/esp-at.git.
ESP-AT will be downloaded into ~/esp/esp-at on Linux or macOS, or %userprofile%\esp\esp-at on Windows.
Note
This guide uses the directory ~/esp on Linux or macOS, or %userprofile%\esp on Windows as an installation folder for ESP-AT. You can use any directory, but you will need to adjust paths for the commands respectively. Keep in mind that ESP-AT does not support spaces in paths.
Step 3. Install Environment
Run the project tool install to install the environment. This tool will automatically install Python packages, ESP-IDF repository, and the compiler and tools used by ESP-IDF.
Linux or macOS
./build.py install
Windows
python build.py install
Select the following configuration options for your ESP32 if it is your first time.
Select the
Platform namefor your ESP32. For example, selectPLATFORM_ESP32for ESP32 series of products.Platform nameis defined in factory_param_data.csv .Select the
Module namefor your ESP32. For example, selectWROOM-32for the ESP32-WROOM-32 module.Module nameis defined in factory_param_data.csv .
Before selecting to enable or disable silence mode, please read the documentation to understand silence mode. Generally, it should be disabled.
The above three option items will not appear if the file
build/module_info.jsonexists. So please delete it if you want to reconfigure the module information.For example, set
Platform nametoESP32,Module nametoWROOM-32, and enable silence mode as follows:$ ./build.py install Ready to install ESP-IDF prerequisites.. ... (more lines of install ESP-IDF prerequisites) Ready to install ESP-AT prerequisites.. ... (more lines of install ESP-IDF prerequisites) Platform name: 1. PLATFORM_ESP32 ... choose(range[1,7]):1 Module name: 1. WROOM-32 (Firmware description: ...) ... choose(range[1,7]):1 Enable silence mode to remove some logs and reduce the firmware size? 0. No 1. Yes choose(range[0,1]):1 Platform name:ESP32 Module name:WROOM-32 Silence:1 Cloning into 'esp-idf'... ... (more lines of clone esp-idf) Ready to set up ESP-IDF tools.. ... (more lines of set up ESP-IDF tools) All done! You can now run: ./build.py build
Step 4. Connect Your Device
Connect your ESP32 device to the PC with a USB cable to download firmware and print log. See Hardware Connection for more information. Note that you do not need to set up the “AT command/response” connection if you do not send AT commands and receive AT responses during the compiling process. You can change default port pins referring to How to Set AT Port Pins.
Step 5. Configure
Run the project configuration utility menuconfig to configure.
Linux or macOS
./build.py menuconfig
Windows
python build.py menuconfig
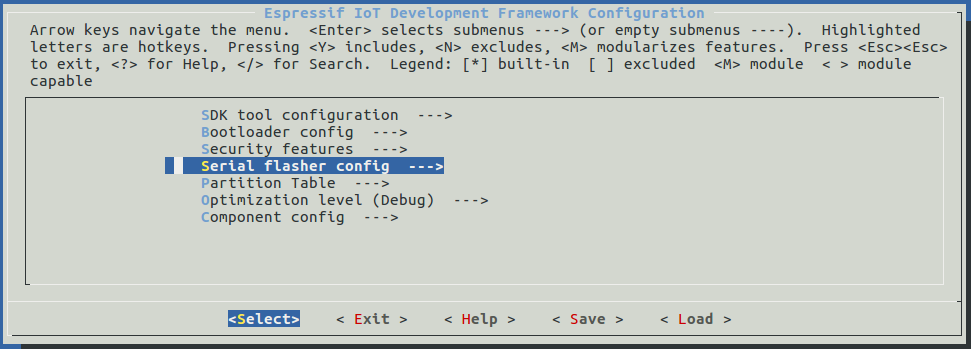
If the previous steps have been done correctly, the following menu pops up:

Project configuration - Home window
You are using this menu to set up project-specific configuration, e.g. changing AT port pins, enabling Classic Bluetooth function, etc. If you made no changes, it will run with the default configuration.
Step 6. Build the Project
Build the project by running:
Linux or macOS
./build.py build
Windows
python build.py build
If Bluetooth feature is enabled, the firmware size will be much larger. Please make sure it does not exceed the OTA partition size.
After compiled, the combined factory bin will be created in build/factory. See ESP-AT Firmware Differences for more information.
Step 7. Flash onto the Device
Flash the firmware that you just compiled onto your ESP32 by running:
Linux or macOS
./build.py -p (PORT) flash
Windows
python build.py -p (PORT) flash
Note that you need to replace (PORT) with your ESP32’s serial port name. Or you can follow the printed instructions to download the bin files into flash. Note that you also need to replace the (PORT).
If the ESP-AT bin fails to boot and prints “ota data partition invalid”, you should run python build.py erase_flash to erase the entire flash, and then reflash the AT firmware.
build.py Advanced Usage
The script build.py is based on idf.py, which means that all idf.py <cmd> features should be included in build.py <cmd>. You can run the following command for more details.
Linux or macOS
./build.py --help
Windows
python build.py --help