Touch Digit Recognition
Touch Principle and Data Acquisition
Touch Principle
The ESP_Touch_Kit_Touchpad is used as the touch pad. This touchpad consists of a 6*7 array of touch channels.
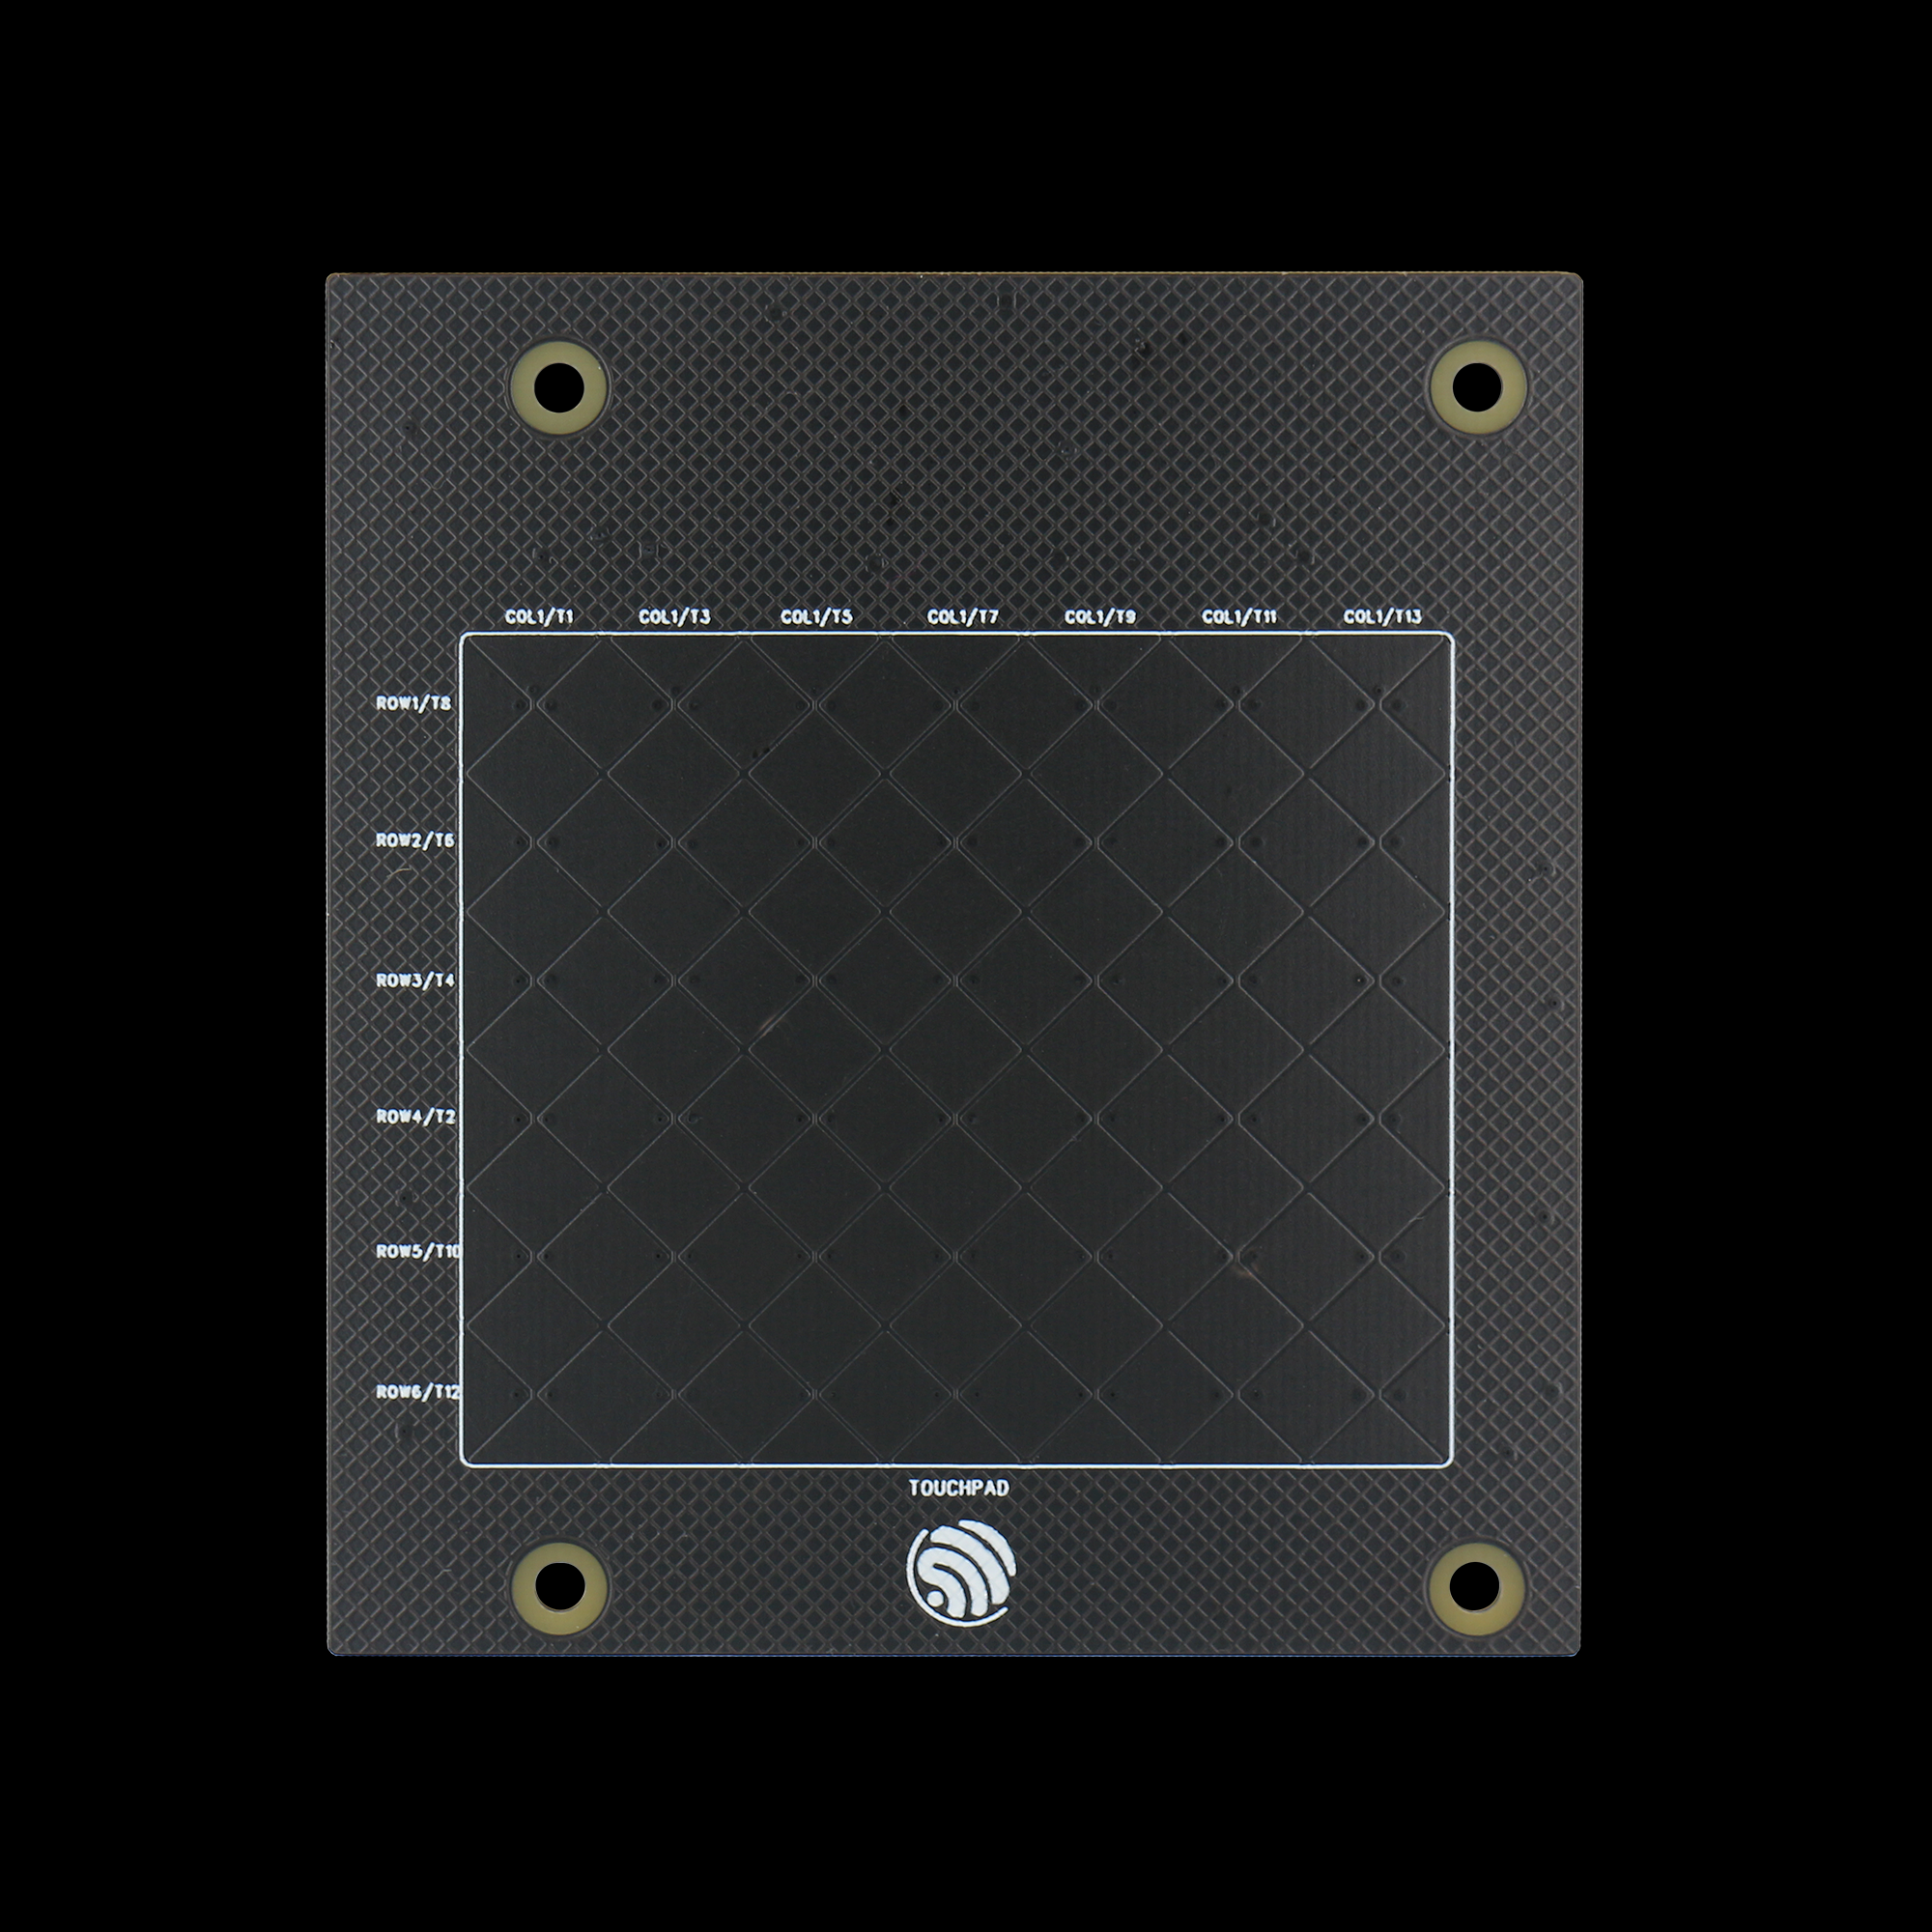
Physical Touch Pad
When a finger moves across the touch pad, it changes the capacitance values of the touch channels, allowing us to detect the finger position by monitoring these capacitance changes.
Detection Algorithm
Due to hardware variations, each channel has different maximum and minimum trigger values. Therefore, the capacitance values need to be normalized. This is done by recording the maximum and minimum values as the finger slides across the pad.
During finger movement, one channel will show the highest rate of capacitance change. By identifying this channel and its adjacent channel with the next highest change rate, we can locate two neighboring channels.
Using a ratio-based calculation between these two channels’ values, we can determine the relative coordinate of the finger along that direction (the offset from the center point between the two channels).
By applying the above steps, we can obtain relative coordinates in both directions, thus determining the finger’s position.
Note
An appropriate trigger threshold needs to be set to determine whether the finger is moving on the touch pad.
When finger lift-off is detected, the drawn data can be saved.
Data Collection
In real-world scenarios, the digits drawn on a touchpad are often visually different from the handwritten digits in the MNIST dataset. As a result, models trained directly on MNIST perform poorly when applied to actual touch input. Therefore, it is necessary to collect a custom dataset of digits drawn on a touchpad and use it for training.
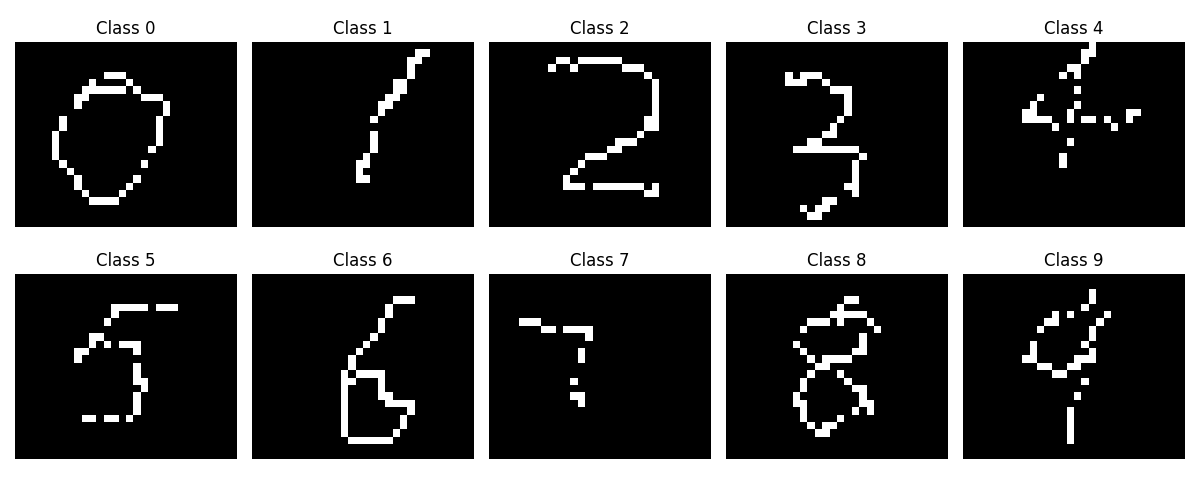
Real Dataset Based on Touchpad Drawn Input
Note
The size of the handwritten data image after interpolation is 30×25.
Click here to download the dataset used in this example: touch_dataset.zip
Model Training and Deployment
Model Construction
Based on the PyTorch framework, a neural network model suitable for touch-based handwritten digit recognition is constructed. The architecture is as follows:
class Net(torch.nn.Module):
    def __init__(self):
        super(Net, self).__init__()
        self.model = torch.nn.Sequential(
            torch.nn.Conv2d(in_channels=1, out_channels=16, kernel_size=3, stride=1, padding=1),
            torch.nn.ReLU(),
            torch.nn.MaxPool2d(kernel_size=2, stride=2),

            torch.nn.Conv2d(in_channels=16, out_channels=32, kernel_size=3, stride=1, padding=1),
            torch.nn.ReLU(),
            torch.nn.MaxPool2d(kernel_size=2, stride=2),

            torch.nn.Conv2d(in_channels=32, out_channels=64, kernel_size=3, stride=1, padding=1),
            torch.nn.ReLU(),

            torch.nn.Flatten(),
            torch.nn.Linear(in_features=7 * 6 * 64, out_features=256),
            torch.nn.ReLU(),
            torch.nn.Dropout(p=0.5),
            torch.nn.Linear(in_features=256, out_features=10),
            torch.nn.Softmax(dim=1)
        )

    def forward(self, x):
        output = self.model(x)
        return output
Model Training
The training process of the model includes dataset loading and preprocessing, configuration of training parameters, monitoring of the training progress, and saving of the trained model.
Data Loading and Preprocessing
The images corresponding to different digits are organized under the dataset/extra directory, with each digit stored in a separate subfolder named after the digit. Image preprocessing is performed using transforms.Compose, including grayscale conversion, random rotation and translation, and normalization. The entire dataset is then loaded using ImageFolder and split into training and test sets in an 8:2 ratio. Finally, DataLoader is used to construct batch loaders for subsequent model training and evaluation.
import matplotlib.pyplot as plt
import torch
import torch.nn as nn
import torch.optim as optim
from torch.utils.data import DataLoader, random_split
from torchvision import datasets, transforms

transform = transforms.Compose([
    transforms.Grayscale(num_output_channels=1),
    transforms.RandomAffine(degrees=10, translate=(0.1, 0.1)),
    transforms.ToTensor(),
    transforms.Normalize((0.5,), (0.5,)),
])

dataset = datasets.ImageFolder(root='./dataset/extra', transform=transform)

train_size = int(0.8 * len(dataset))
test_size = len(dataset) - train_size
train_dataset, test_dataset = random_split(dataset, [train_size, test_size])

train_loader = DataLoader(dataset=train_dataset, batch_size=32, shuffle=True)
test_loader = DataLoader(dataset=test_dataset, batch_size=32, shuffle=False)
Model Training Parameter Configuration
Model training parameters include learning rate, optimizer, loss function, and others. In the actual training process, cross-entropy is used as the loss function, and the Adam optimizer is employed to update the model parameters.
device = "cuda:0" if torch.cuda.is_available() else "cpu"
model = Net().to(device)
criterion = nn.CrossEntropyLoss()
optimizer = optim.Adam(model.parameters(), lr=0.001)
Model Training and Saving
The number of training epochs is set to 100. During training, the model parameters are updated using the training set, while the test set is used to evaluate the model’s performance after each epoch. Once training is complete, the model parameters are saved to the file ./models/final_model.pth.
def train_epoch(model, train_loader, criterion, optimizer, device):
    model.train()
    running_loss = 0.0
    correct = 0
    total = 0

    for inputs, labels in train_loader:
        inputs, labels = inputs.to(device), labels.to(device)

        optimizer.zero_grad()
        outputs = model(inputs)
        loss = criterion(outputs, labels)
        loss.backward()
        optimizer.step()

        running_loss += loss.item()
        _, predicted = torch.max(outputs.data, 1)
        total += labels.size(0)
        correct += (predicted == labels).sum().item()

    epoch_loss = running_loss / len(train_loader)
    epoch_acc = 100 * correct / total
    return epoch_loss, epoch_acc


def test_epoch(model, test_loader, criterion, device):
    model.eval()
    running_loss = 0.0
    correct = 0
    total = 0

    with torch.no_grad():
        for inputs, labels in test_loader:
            inputs, labels = inputs.to(device), labels.to(device)

            outputs = model(inputs)
            loss = criterion(outputs, labels)

            running_loss += loss.item()
            _, predicted = torch.max(outputs.data, 1)
            total += labels.size(0)
            correct += (predicted == labels).sum().item()

    epoch_loss = running_loss / len(test_loader)
    epoch_acc = 100 * correct / total
    return epoch_loss, epoch_acc

num_epochs = 100
train_acc_array = []
test_acc_array = []
for epoch in range(num_epochs):
    train_loss, train_acc = train_epoch(model, train_loader, criterion, optimizer, device)
    test_loss, test_acc = test_epoch(model, test_loader, criterion, device)

    print(f'Epoch [{epoch + 1}/{num_epochs}], '
        f'Train Loss: {train_loss:.4f}, Train Acc: {train_acc:.2f}%, '
        f'Test Loss: {test_loss:.4f}, Test Acc: {test_acc:.2f}%')
    train_acc_array.append(train_acc)
    test_acc_array.append(test_acc)

torch.save(model.state_dict(), './models/final_model.pth')
During the training process, the accuracy curves of the training and test sets evolve as follows:
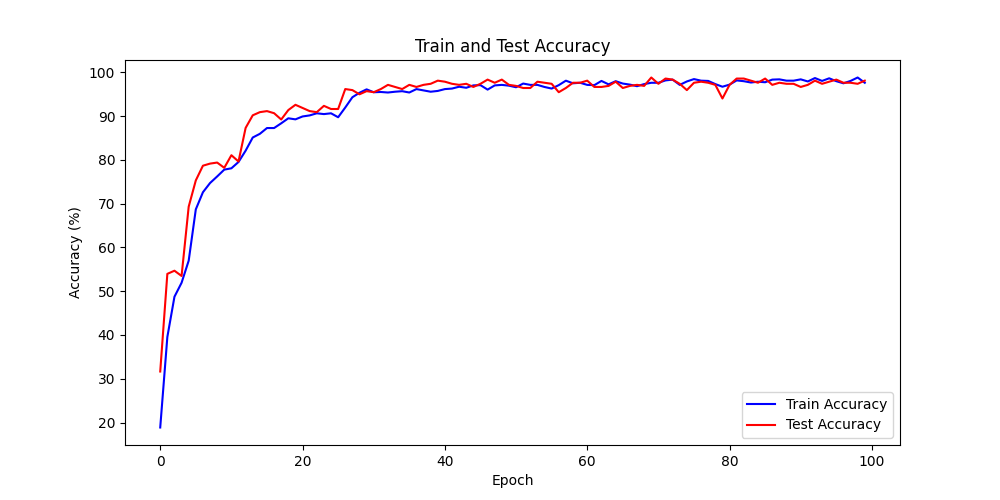
Accuracy Curves of the Training and Test Sets
Model Deployment
ESP-PPQ Environment Configuration
ESP-PPQ is a quantization tool based on ppq. Please use the following command to install ESP-PPQ:
pip uninstall ppq
pip install git+https://github.com/espressif/esp-ppq.git
Model Quantization and Deployment
Refer to How to quantize model for model quantization and export. If you need to export a model for ESP32P4, set TARGET to esp32p4.
import torch
from PIL import Image
from ppq.api import espdl_quantize_torch
from torch.utils.data import Dataset
from torch.utils.data import random_split
from torchvision import transforms, datasets

DEVICE = "cpu"

class FeatureOnlyDataset(Dataset):
    def __init__(self, original_dataset):
        self.features = []
        for item in original_dataset:
            self.features.append(item[0])

    def __len__(self):
        return len(self.features)

    def __getitem__(self, idx):
        return self.features[idx]


def collate_fn2(batch):
    features = torch.stack(batch)
    return features.to(DEVICE)


if __name__ == '__main__':
    BATCH_SIZE = 32
    INPUT_SHAPE = [1, 25, 30]
    TARGET = "esp32s3"
    NUM_OF_BITS = 8
    ESPDL_MODEL_PATH = "./s3/touch_recognition.espdl"

    transform = transforms.Compose([
        transforms.Grayscale(num_output_channels=1),
        transforms.ToTensor(),
        transforms.Normalize((0.5,), (0.5,)),
    ])

    dataset = datasets.ImageFolder(root="../dataset/extra", transform=transform)
    train_size = int(0.8 * len(dataset))
    test_size = len(dataset) - train_size
    train_dataset, test_dataset = random_split(dataset, [train_size, test_size])

    image = Image.open("../dataset/extra/9/20250225_140331.png").convert('L')
    input_tensor = transform(image).unsqueeze(0)
    print(input_tensor)

    feature_only_test_data = FeatureOnlyDataset(test_dataset)

    testDataLoader = torch.utils.data.DataLoader(dataset=feature_only_test_data, batch_size=BATCH_SIZE, shuffle=False,
                                                collate_fn=collate_fn2)

    model = Net().to(DEVICE)
    model.load_state_dict(torch.load("./final_model.pth", map_location=DEVICE))
    model.eval()

    quant_ppq_graph = espdl_quantize_torch(
        model=model,
        espdl_export_file=ESPDL_MODEL_PATH,
        calib_dataloader=testDataLoader,
        calib_steps=8,
        input_shape=[1] + INPUT_SHAPE,
        inputs=[input_tensor],
        target=TARGET,
        num_of_bits=NUM_OF_BITS,
        device=DEVICE,
        error_report=True,
        skip_export=False,
        export_test_values=True,
        verbose=1,
        dispatching_override=None
    )
To facilitate model debugging, ESP-DL provides the functionality to add test data during quantization and view inference results on the PC side. In the above process, image is loaded into espdl_quantize_torch for testing. After model conversion is complete, the inference results of the test data will be saved in a file with the *.info extension:
test outputs value:
%23, shape: [1, 10], exponents: [0],
value: array([9.85415445e-34, 1.92874989e-22, 7.46892081e-43, 1.60381094e-28,
    3.22134028e-27, 1.05306175e-20, 4.07960022e-41, 1.42516404e-21,
    2.38026637e-26, 1.00000000e+00, 0.00000000e+00, 0.00000000e+00],
    dtype=float32)
Important
During model quantization and deployment, please set the shuffle parameter in torch.utils.data.DataLoader to False.
On-device Inference
Refer to How to load test profile model and How to run model for implementing model loading and inference.
It’s important to note that in this example, the Touch driver reports pressed and unpressed states as 1 and 0, while the model input is normalized image data. Therefore, preprocessing of the data reported by the Touch driver is necessary:
for (size_t i = 0; i < m_feature_size; i++) {
    int8_t value = (input_data[i] == 0 ? -1 : 1);
    quant_buffer[i] = dl::quantize<int8_t>((float)value, m_input_scale);
}
For the complete project, please refer to: ai/esp_dl/touchpad_digit_recognition