Get Started
ESP-Drone Overview
ESP-Drone is an ESP32/ESP32-S2/ESP32-S3 based flying development board provided by Espressif. ESP-Drone is equipped with Wi-Fi key features, which allows this drone to be connected to and controlled by an APP or a gamepad over a Wi-Fi network. This drone comes with simple-structured hardware, clear codes, and supports functional extension. Therefore, ESP-Drone can be used in STEAM education. Part of the codes is from Crazyflie open source project under GPL3.0 license.

ESP-Drone
Main Features
ESP-Drone has the following features:
Stabilize mode: keep the drone stable to achieve smooth flight.
Height-hold mode: control thrust output to keep the drone flying at a fixed height.
Position-hold mode: keep the drone flying at a fixed position.
PC debugging: use cfclient for static/dynamic debugging.
Controlled by APP: easily controlled over Wi-Fi by your mobile APP.
Controlled by gamepad: easily controlled via the gamepad by cfclient.
Main Components
ESP-Drone 2.0 consists of a main board and several extension boards:
Main board: integrates an ESP32-S2 module, necessary sensors for basic flight, and provides hardware extension interfaces.
Extension boards: integrate extension sensors via hardware extension interfaces of the main board, to implement advanced flight.
No. |
Modules |
Main Components |
Function |
Interfaces |
Mount Location |
|---|---|---|---|---|---|
1 |
Main board - ESP32-S2 |
ESP32-S2-WROVER + MPU6050 |
Basic flight |
I2C, SPI, GPIO, extension interfaces |
|
2 |
Extension board - Position-hold module |
PMW3901 + VL53L1X |
Indoor position-hold flight |
SPI + I2C |
Mount at bottom, facing to the ground. |
3 |
Extension board - Pressure module |
MS5611 pressure module |
Height-hold flight |
I2C or MPU6050 slave |
Mount at the top or at the bottom |
4 |
Extension board - Compass module |
HMC5883 compass |
Advanced flight mode, such as head-free mode |
I2C or MPU6050 slave |
Mount at the top or at the bottom |
For more information, please refer to Hardware Reference.
ESP-IDF Overview
ESP-IDF is the IoT Development Framework provided by Espressif for ESP32/ESP32-S2/ESP32-S3.
ESP-IDF is a collection of libraries and header files that provides the core software components that are required to build any software projects on ESP32/ESP32-S2.
ESP-IDF also provides tools and utilities that are required for typical developer and production use cases, like build, flash, debug and measure.
For more information, please check ESP-IDF Programming Guide.
Crazyflie Overview
Crazyflie is a Bitcraze open-source quadcopter, with the following features:
Support various sensor combinations for advanced flight modes, such as Height-hold mode and Position-hold mode.
Based on FreeRTOS, which allows users to break down complex drone systems into multiple software tasks with various priorities.
Customized full-featured cfclient and CRTP communication protocol, for debug, measurement, and control purposes.
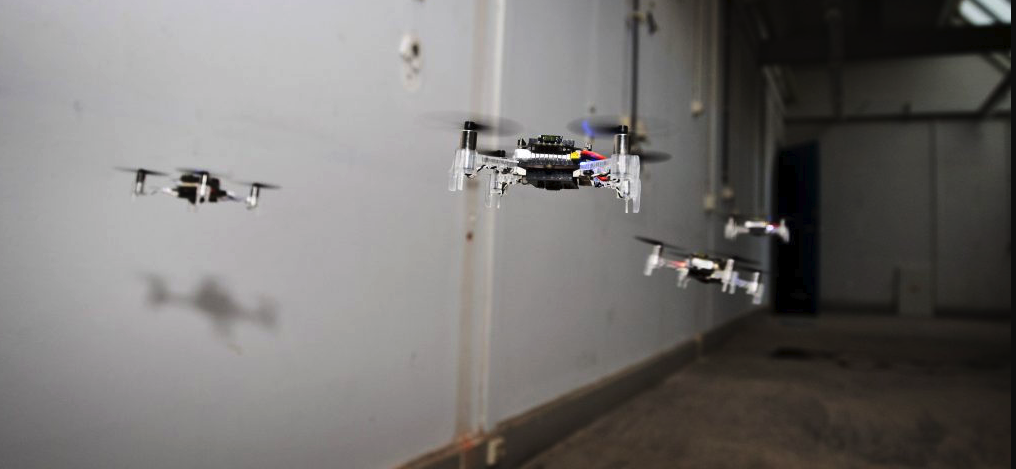
A swarm of drones exploring the environment, avoiding obstacles and each other. (Guus Schoonewille, TU Delft)
For more information, see Crazyflie.
Preparations
Assemble Hardware
Please follow the steps below to assemble ESP32-S2-Drone V1.2.
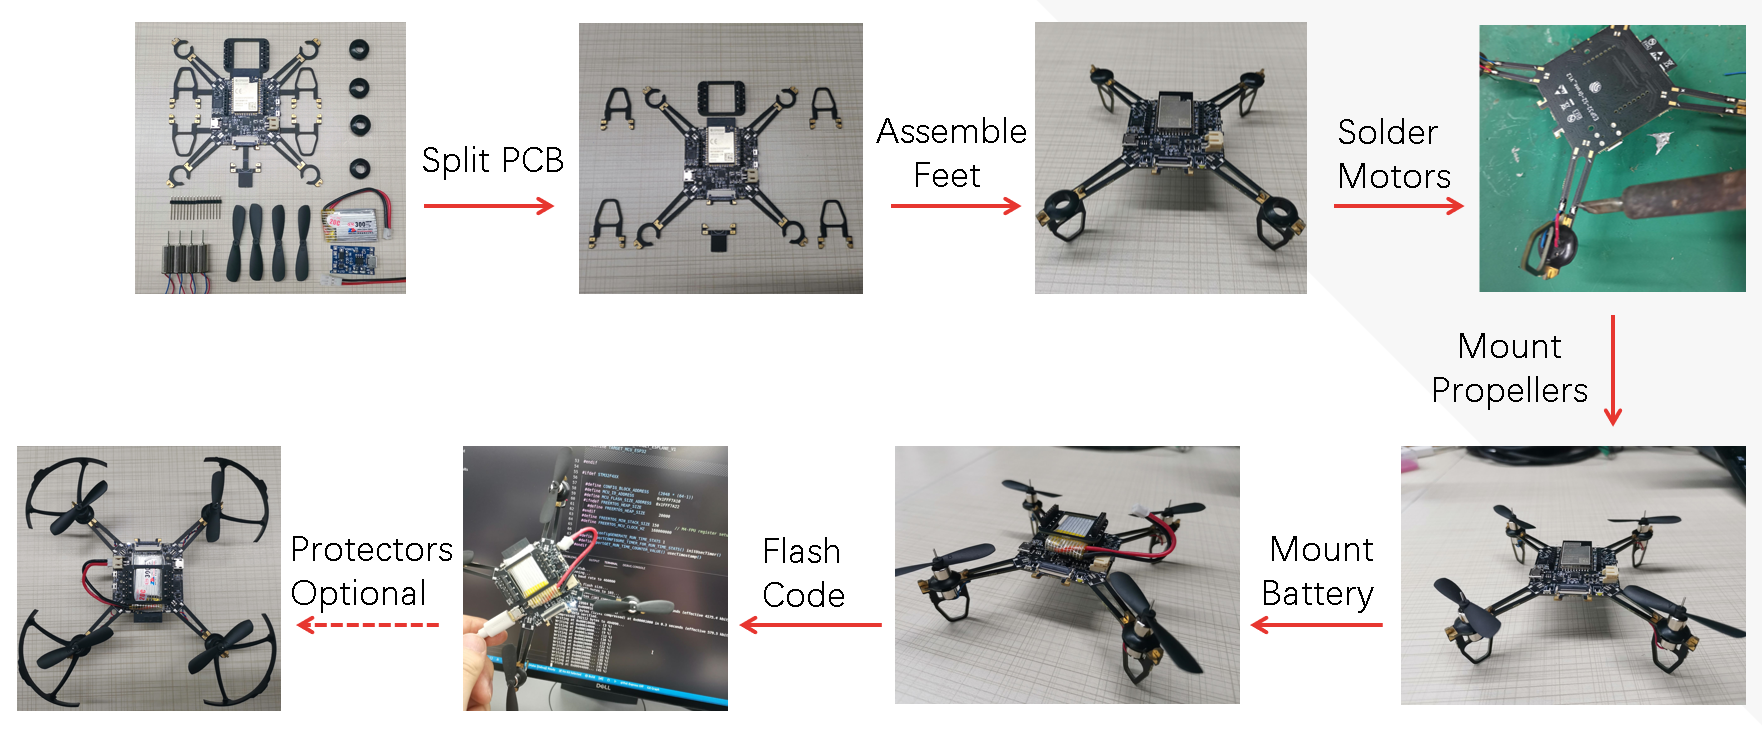
ESP32-S2-Drone V1.2 Assemble Flow
Hardware overview and pin allocation are available at: Hardware Reference.
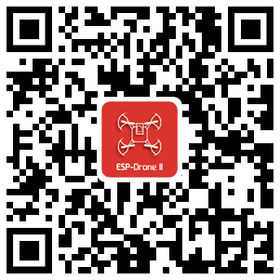
Download and Install ESP-Drone APP
ESP-Drone APP is available for Android and iOS.
For Android, please scan the QR below to download ESP-Drone APP.
For iOS, please search and download the ESP-Drone APP in App Store.
iOS APP source code: ESP-Drone-iOS
Android APP source code: ESP-Drone-Android
Install cfclient
This step is optional, only for advanced debugging.
cfclient Interface
1. Install cfclient
1.1 Download the source code
git clone https://github.com/qljz1993/crazyflie-clients-python.git
1.2 Check into the directory
cd crazyflie-clients-python
1.3 Install cfclient
pip3 install -e .
1.4 Start cfclient
cfclient
2. Configure the controllers
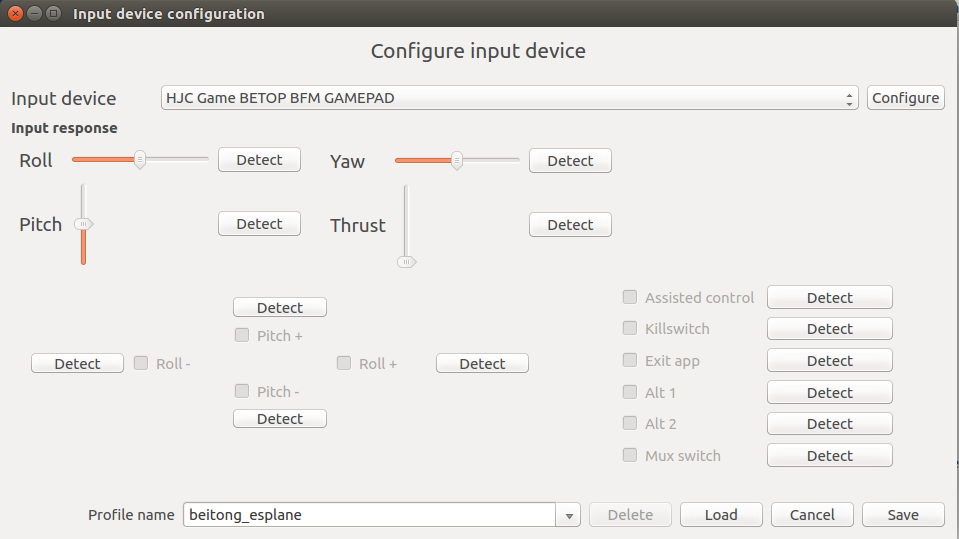
Controller Configuration
2.1 Configure the four main dimensions of controls: Roll, Pitch, Yaw, Thrust.
2.2 Configure button Assisted control for flight mode switching.
ESP-Drone APP Guide
Establish Wi-Fi connection
Scan Wi-Fi AP on your mobile. ESP-Drone device works as a Wi-Fi AP with the following SSID:
SSID: ESP-DRONE_XXXX (XXXX is configured based on MAC) PASSWORD: 12345678
Click this AP, connect your mobile to this AP.
Now a Wi-Fi connection is established between your mobile and your drone.
Customize settings
In this step, you can customize the flight settings according to your application scenarios, or use the default configuration below.
```
Default configuration:

Flight control settings
    1. Mode: Mode2
    2. Deadzone: 0.2
    3. Roll trim: 0.0
    4. Pitch trim: 0.0
    5. Advanced flight control: true
    6. Advanced flight control preferences
        1. max roll/pitch angle: 15
        2. max yaw angle: 90
        3. max thrust: 90
        4. min thrust: 25
        5. X-Mode: true
Controller settings
    7. use full travel for thrust: false
    8. virtual joystick size: 100
App settings
    9. Screen rotation lock: true
    10. full screen mode:true
    11. show console: true
```
Flight Control
Click “Connect” button/icon at your APP. When the connection is established successfully between your drone and APP, the LED on the drone blinks GREEN.
Slide “Thrust” slightly to take off the drone.
Control the flight by moving your fingers on the APP.
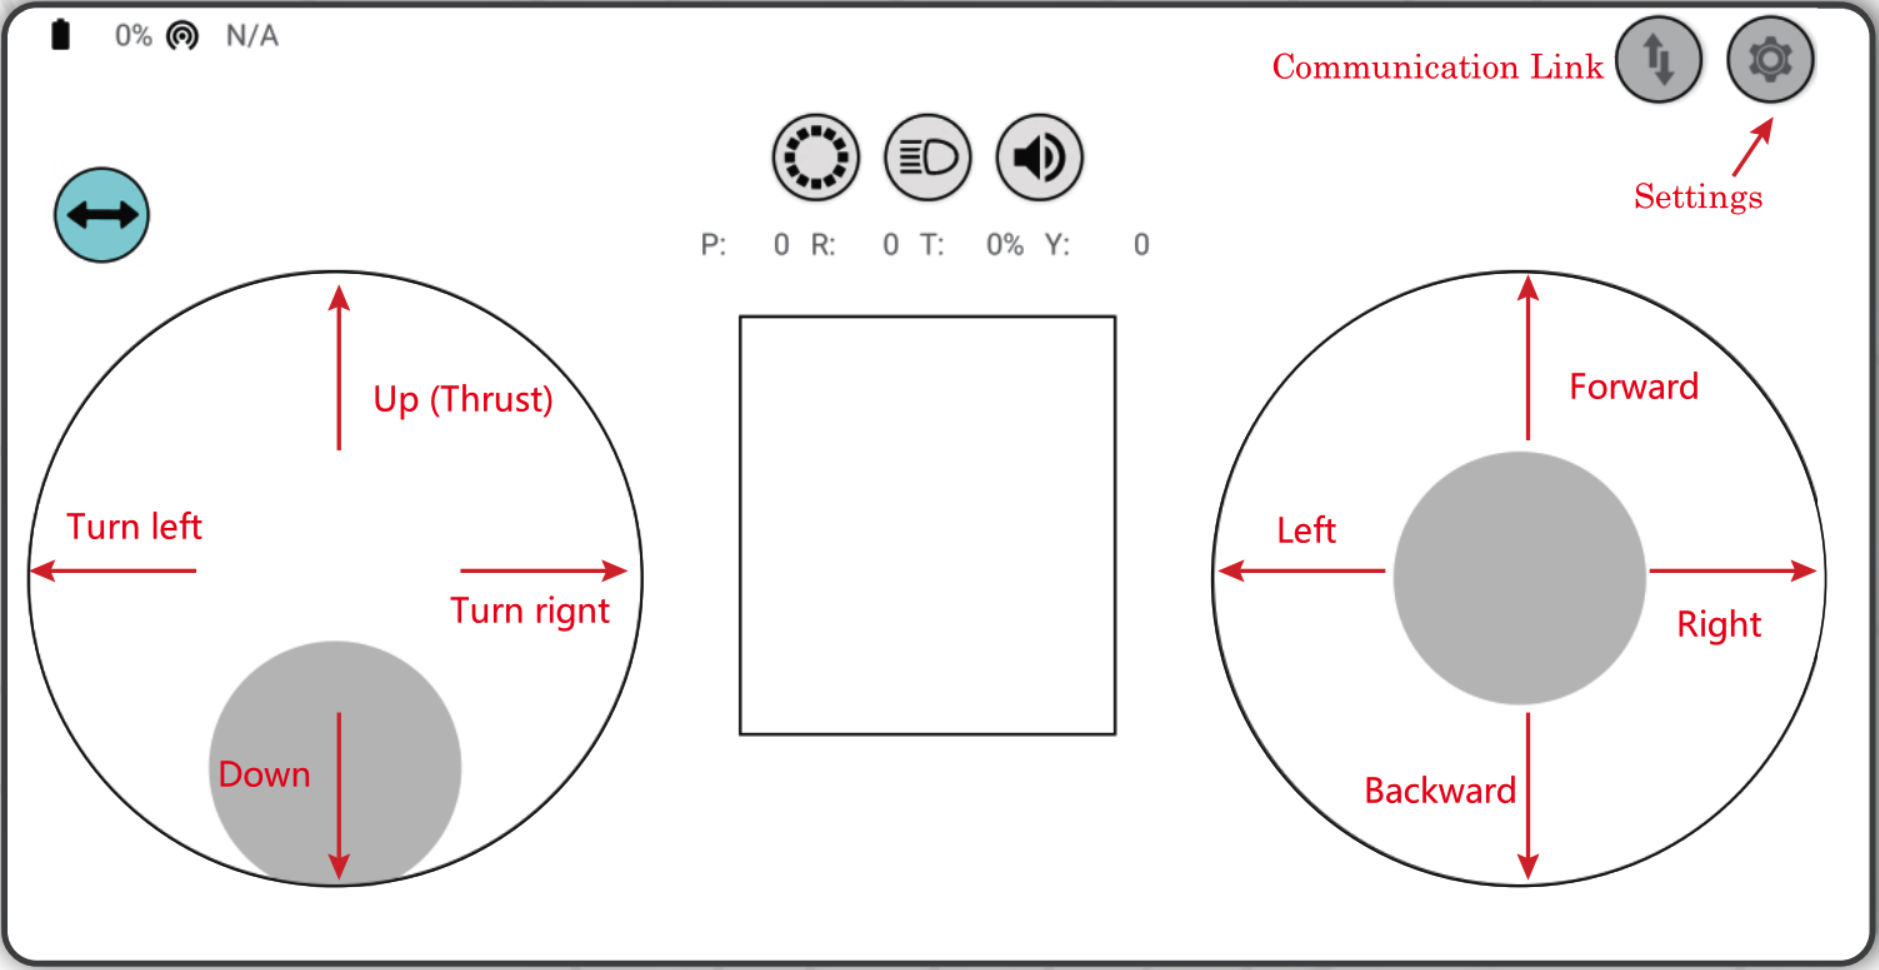
Android APP Interface
PC cfclient Guide
Cfclient is the PC client for Crazeflie source project, which has fully implemented the functions defined in CRTP and makes the drone debugging faster. ESP-Drone customizes this cfclient to meet functional design needs.
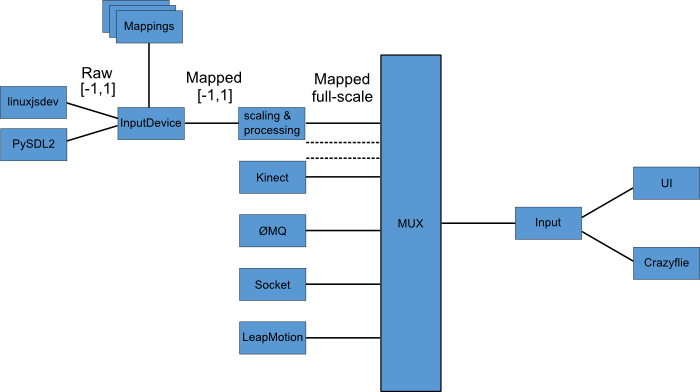
Cfclient Architecture
Cfclient Console Interface
In this project, we have configuration files and cache files. JSON file is used to store configuration information. For more information about the configuration, please refer to User Configuration File.
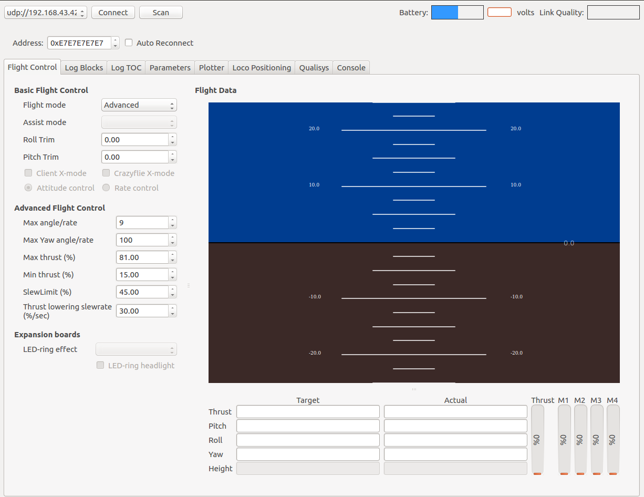
Flight Settings
Basic Flight Control
Flight mode: normal and advanced modes
Normal mode: for beginners.
Advanced mode: unlock the maximum angle and the maximum thrust.
Assisted mode
Altitude-hold mode: maintain flight altitude. To implement this mode, a barometric pressure sensor is needed.
Position-hold mode: maintain current flight position. To implement this mode, an optical flow sensor and a Time of Flight (TOF) sensor are needed.
Height-hold mode: keep flight height. Note: to apply this mode, the drone should fly at 40 cm or higher over the ground, and a TOF is needed.
Hover mode: stay and hover at 40 cm or higher over the take-off point. To implement this mode, a optical flow sensor and a TOF are needed.
Trim
Roll Trim: trim the rotation around a horizontal axis going through the drone from back to front. This rotation literally rolls the drone and moves it left and right. Roll trim is used to compensate for the level installation deviation of sensors.
Pitch Trim: trim the rotation around a horizontal axis going through the drone from left to right. This rotation tilts the drone and moves it forwards or backwards. Pitch trim is used to compensate for the level installation deviation of sensors.
Note that in assisted mode, the thrust controller works as a height controller.
Advanced Flight Control
Max angle: set the maximum pitch and roll rotation: roll/pitch.
Max yaw rate: set the allowed yaw:
yaw.Max thrust: set the maximum thrust.
Min thrust: set the minimum thrust.
Slew limit: prevent sudden drop of thrust. When the thrust drops below this limit, the rates below
Slew ratewill not be allowed.Slew rate: this is the maximum rate when the thrust is below
slew limit.
Configure Input Device
Follow the prompts, route the controllers to each channel.
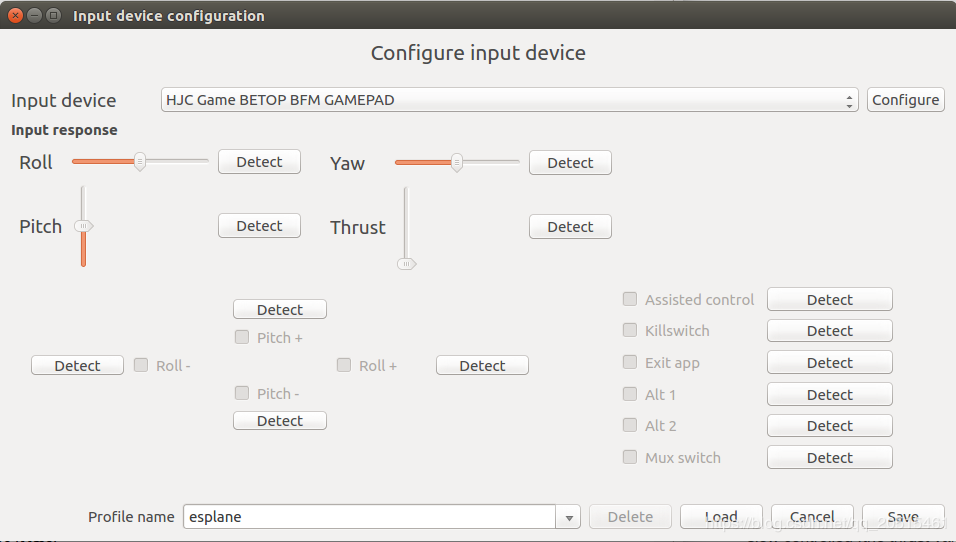
Cfclient Input Device Configuration
Flight Data
On the tab “Flight Control” of cfclient, you can check the drone status. The detailed information is shown at the bottom right, including:
Target: target angle
Actual: measured angle
Thrust: current thrust value
M1/M2/M3/M4: actual output of motors
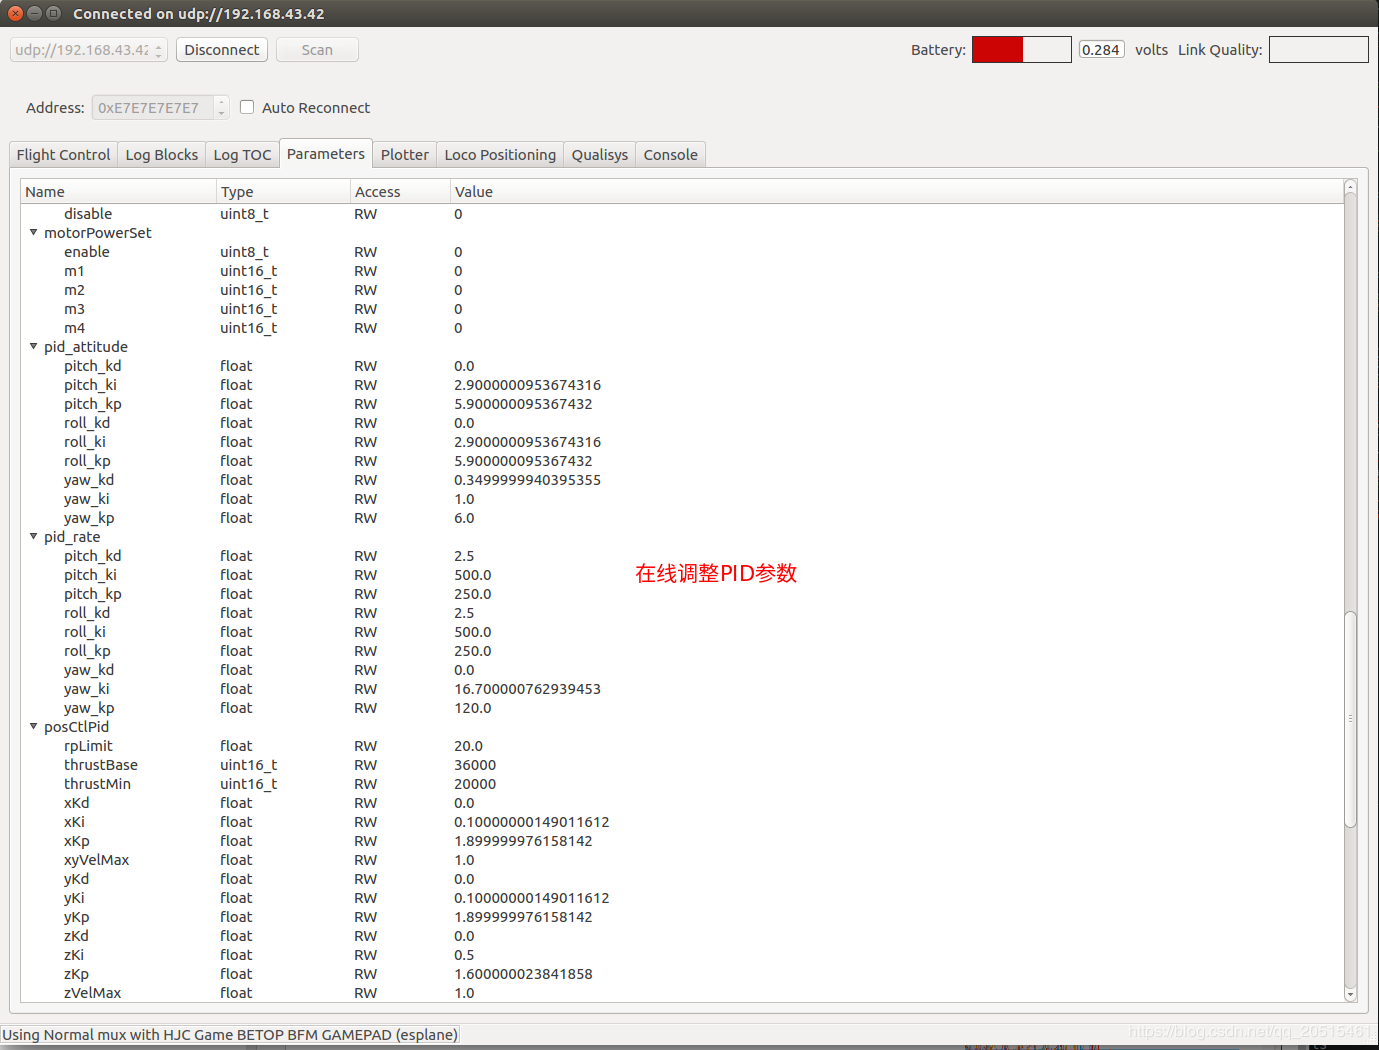
Tune Online Parameters
Tune PID parameters online
Cfclient PID Parameters Tunning
Note
The modified parameters take effect in real time, which avoids frequent flash of firmware.
You can define in your code which parameters can be modified by PC in real time.
Note that modifying parameters online is only for debugging purpose. The modified parameters will not be saved at power down.
Monitor Flight Data
Configure the parameters to monitor at Tab Log configuration and Tab Log Blocks:
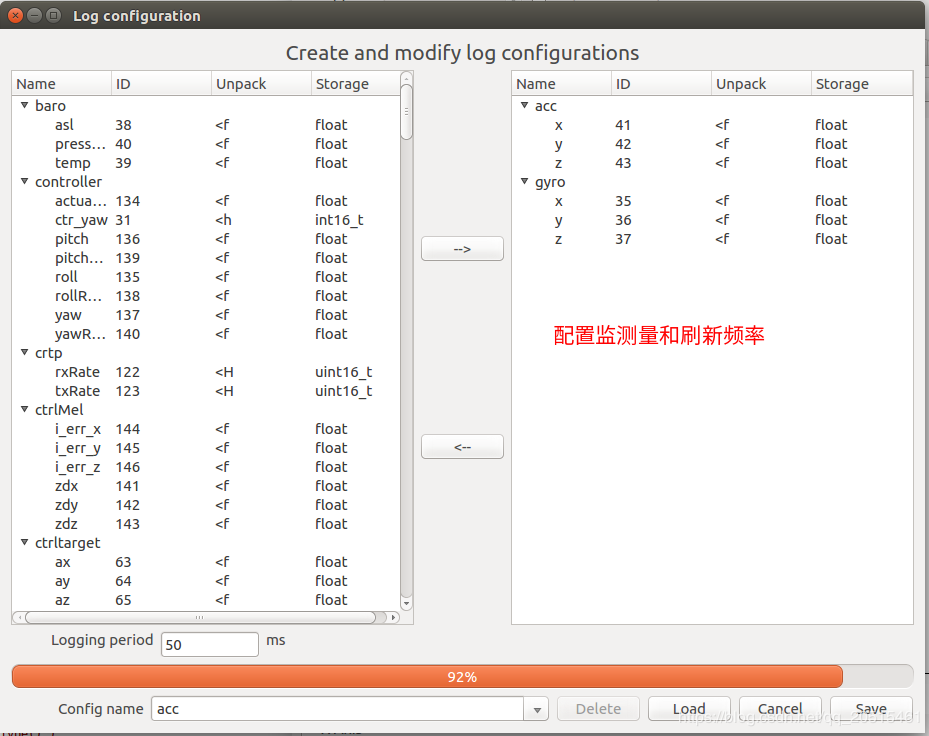
Log Configuration

Log Blocks
Configure real-time waveform drawing at Tab Plotter, to monitor gyro accelerometer data.
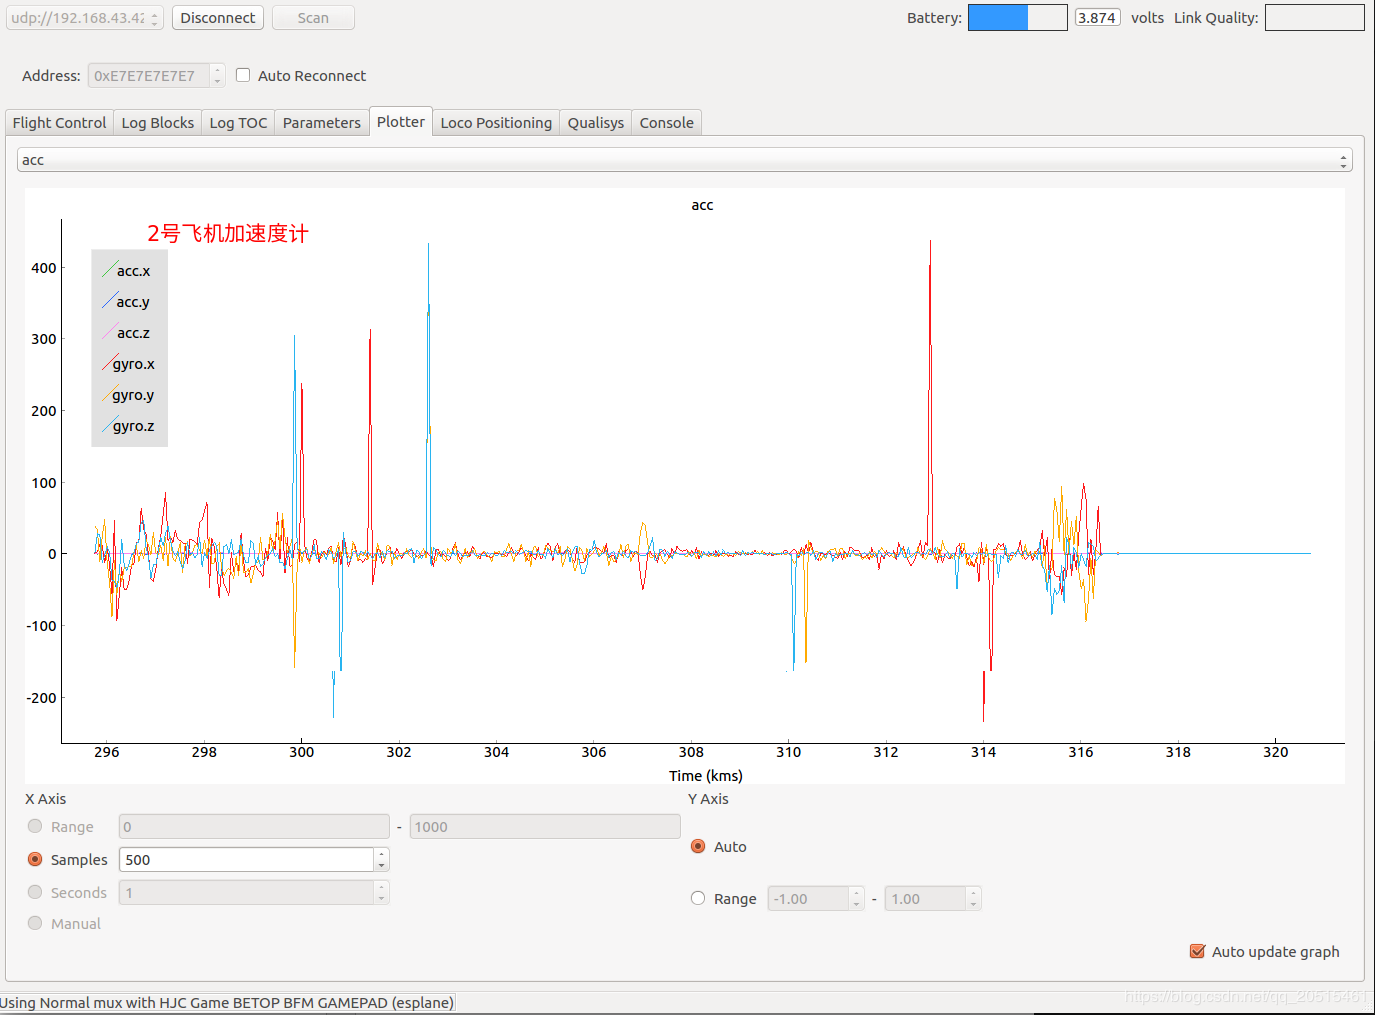
Accelerometer Logging
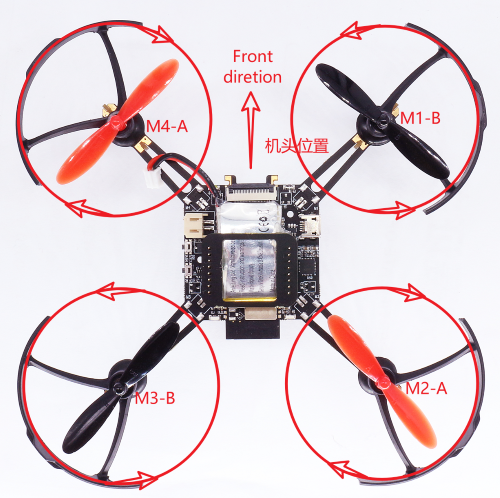
Propeller Direction
Install A and B propellers according to the figure below.
During the power-on self-test, check if the propellers spin properly.
Propeller Check
Preflight Check
Place the drone with its head on the front, and its tail (i.e. the antenna part) at the back.
Place the drone on a level surface and power it up when the drone stays still.
Check on the cfclient if the drone is placed level.
After the communication is established, check if the LED at the drone tail blinks GREEN fast.
Check if the LED on the drone head blinks RED, which indicates battery LOW.
Slide forward the Trust controller slightly at the left side of your APP (i.e. the commands controlled by your left finger), to check if the drone can respond the command quickly.
Move your finger at the right command area of the APP (i.e. the commands controlled by your right finger), to check if the direction control works well.
Go fly and have fun!